Friday, March 25, 2022

Just Add Ink #596 | Sketch Challenge

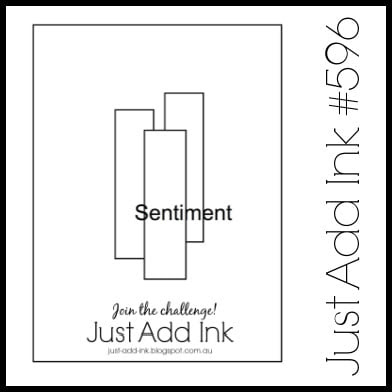
Hello there stamping friends! Happy Friday! Welcome and thanks for joining me on my blog today. It's so good to have you here. I hope you're having a fabulous day and that you have all been safe and well. Today over at Just Add Ink, it's that time again! New challenge time! This week we have a fabulous sketch challenge with the sketch designed by fellow team memeber Narelle.

While I love the original sketch, I couldn't help but change it up a little. I've kept the basic elements but put a 'Rochelle' spin on them. 

I've used the Blessings of Home stamp set is found in the Stampin' Up! 2022 January - June Mini Catalouge. It is perfect for colouring! I've used a very quick colouring technique that I call Messy Colouring or quick colouring. The colouring is just done quickly by 'painting' on a little bit of colour and really the aim is not to be perfect and not to go all the way to the edges either. It's best to colour with a light colour first and then layer over a darker colour. Start with the lightest colour and then layer on top the darker colours. It's such a fun and quick way to colour and I love that it really doesn't have to be perfect. You really are just 'slapping' the colour on. 

I've used Misty Moonlight as the blue layers and then used the gorgeous Heart & Home DSP for that fabulous woodgrain patterned paper. I've coloured in the florals with Misty Moonlight, Petal Pink, Blushing Bride, Garden Green, So Saffron and Daffotil Delight. THe Misty Moonlight and Garden Green colours I watered down more to get the lighter variation of that colour.

I've then finished off the card with Linen Thread, White Bakers Twine and the sentiment from the Heart & Home stamp set.

The Just Add Ink Design Team have lots of amazing creations for you and to show you their take on this weeks sketch. You'll be surprised at all the different projects we came up with. We hope that you'll join in this weeks challenge. I can't wait to see you join in and to see your take on the sketch challenge.

Thanks so much for stopping by!
Happy Stamping!


Live in Australia?
Shop for Stampin' Up! with Me 24/7 HERE
 
 Recreate this project at home using the following Stampin' Up! products.  Click on the images below to see the product information and to shop from my online store.
 

Friday, March 11, 2022

Just Add Ink #594 | Just Add Masking

  Hello there stamping friends! Happy Friday! Welcome and thanks for joining me on my blog today. It's so good to have you here.  I hope you're having a fabulous day and that you have all been safe and well. Today we over at Just Add Ink have another creative challenge for you. This week we have a technique challenge for you - Just Add Ink #594 | Just Add Masking.

Basic masking is a fantastic way to add dimension to your cards without adding lots of paper layers. This is one of those techniques that has been around since the beginning of cardmaking began but it is one that gives such fabulous results. An 'oldie but a goodie' as they say

I've used the Stampin' up! Celebrate Sunflowers stamp set for the fun masking technique today. I stamped one of the sunflowers in the centre more to the edge and then stamped the same image on a large sticky note and cut that out with my paper snips. I layered my sticky note cut out over my already stamped sunflower and then was able to stamp the top and the bottom sunflower so that it looked like the middle sunflower was in front and the top and the bottom sunflower were sitting behind. To see the basic masking in action check out this tutorial here.

I've coloured the sunflowers in various Copic markers and then flicked over the card the brush tip end of the Crumb Cake Stampin' Write marker. I've finished the card off with Evening Evergreen Windowpane Check Ribbon (cut in half), Linen Thread, Gilded Gems, Pattern Party DSP and a heat embossed sentiment.

To see some other examples of Basic Masking check out my posts HERE and HERE.

There are lots of AMAZING creations from the rest of the Just Add Ink Design Team on the JAI Blog. Go and check out to see all the ways the team used the masking technique and then see how you can join in this weeks challenge. Can't wait to see your masked creation.

Thanks so much for stopping by!
Happy Stamping!

Live in Australia?
Shop for Stampin' Up! with Me 24/7 HERE
 
 Recreate this project at home using the following Stampin' Up! products.  Click on the images below to see the product information and to shop from my online store.

Friday, February 25, 2022

Just Add Ink #592 | Just Choose Two Challenge

  Hello there stamping friends! Happy Friday! Welcome and thanks for joining me on my blog today. It's so good to have you here.  I hope you're having a fabulous day and that you have all been safe and well. Today we over at Just Add Ink have another creative challenge for you. This week its a fantstic Just Chose Two Challenge, chosen by Just Add Ink team member Nikki Spencer. - Just Add Ink #592 | Just Choose Two Challenge.

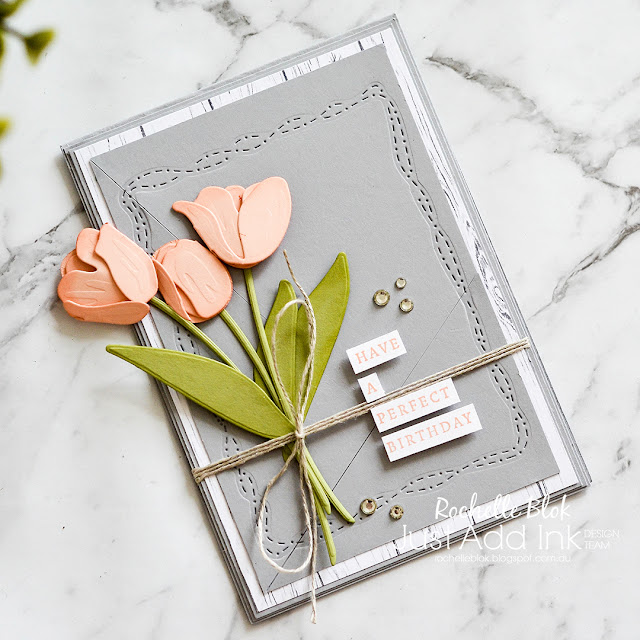
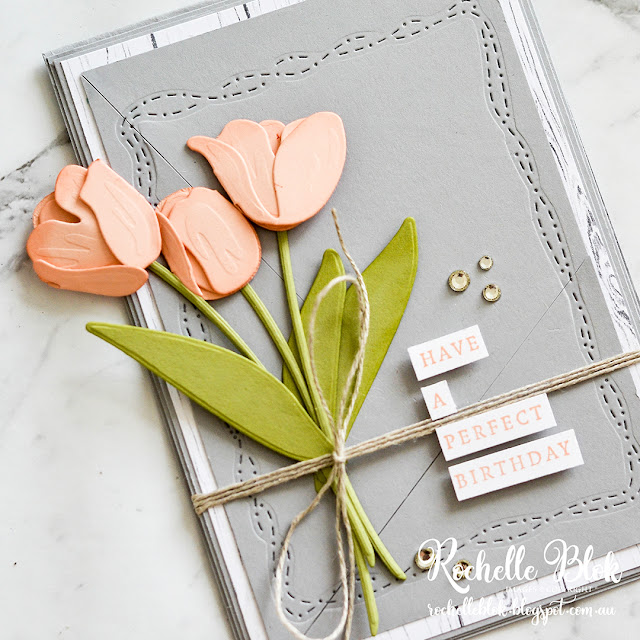
I do love a 'Just Choose Two' challenge and this one is no different. I've chosen to use Patterned Paper and Layers (lots of them) for my project for you today. I've used some of the Stampin' Up! Heart & Home DSP and then combined lots of layers to make a beautiful tulip birthday card using the oh so stunning Stampin' Up! Tulips Dies.

Normally I love a white card base for my cards but this time I decided to go for a Smoky Slate card base. I loved the grey in the Heart & Home DSP and thought it looked better on the Smoky Slate as opposed to Basic White. The Smoky Slate grey makes for a gorgeous back ground for the super pretty, Petal Pink Tulips.

I've used the Stampin' Up! Stitched with Whimsy Dies to create a fun border behind the tulips. I die cut the tulip petals out of Petal Pink and then lightly sponged the edges with Calypso Coral Ink. The tulip stems and leaves are die cut out of Pear Pizzazz cardstock and then the edges are sponged using Pear Pizzazz Ink. The sponged edges help to give the tulips and leaves some added dimension and texture.

As I really wanted the tulips to be the main focus of the card I've added minimal embellishments to finish off the card, using only Linen Thread and Basic Rhinestone Jewels. The sentiment comes from the Blessings of Home stamp set - stamped in Petal Pink Ink and then each word cut out for a fun and modern look.

There are lots of AMAZING creations from the rest of the Just Add Ink Design Team on the JAI Blog. Go and check out to see what 'two' elements they all used this week and then while you are there you can see how you can enter your project. Can't wait to see what 'two' you used.

Thanks so much for stopping by!
Happy Stamping! 

Live in Australia?
Shop for Stampin' Up! with Me 24/7 HERE
 
 Recreate this project at home using the following Stampin' Up! products.  Click on the images below to see the product information and to shop from my online store.

Friday, February 11, 2022

Just Add Ink #590 | Inspiration Picture Challenge

 Hello there stamping friends! Happy Friday! Welcome and thanks for joining me on my blog today. Today we over at Just Add Ink have a fabulous inspiration picture challenge - Just Add Ink #590 | Inspiration Picture Challenge

While on a first glance at this picture you may think that there isn't that to glean from the picture to make a crafty project but the longer you look the more you get out of it. I've used some of the colours in the picture for my project for you today.

 I've used some pink, green and grey colours found in the inspiration pic for a 'pretty in pink' birthday card.

I've used the Blessings of Home stamp set is found in the Stampin' Up! 2022 January - June Mini Catalouge. It is perfect for colouring! This stamp set is also part of the Heart & Home Suite with many other amazing coordinating products. The products in this suite all so stunning!

I've layered Smoky Slate, Shimmery White and Vellum for the card base and then stamped the floral image on Fluid 100 Water Colour paper for a gorgeous watercoloured image.

I used Soft Succulent, Flirty Flamingo, Blushing Bride and So Saffron to colour the flowers and leaves. I then finished the card off with some Mint Macaron Ribbon, Linen Thread, Basic Rhinestones and a sentiment embossed on Smoky Slate cardstock.

I'm loving the crisp white base layers and then the little pops of colour from the flowers and the embelishments. So pretty!

The Just Add Ink Design Team have lots of amazing creations for you and to show you what inspired them. You'll be surprised at all the different projects we came up with. We hope that you'll join in this weeks challenge. I can't wait to see you join in and to see what has inspired you this week.

Thanks so much for stopping by!
Happy Stamping!

Live in Australia?
Shop for Stampin' Up! with Me 24/7 HERE
 
Recreate this project at home using the following Stampin' Up! products.  Click on the images below to see the product information and to shop from my online store.
  

Friday, January 14, 2022

Just Add Ink #586 | Just Add Ink Blog Hop | Just Add Summer

Hello there stampers! Happy Friday! Welcome and thank you for joining me on my blog today. I've  just had a very well deserved and much needed Christmas Break with my family and some time away camping in our caravan, with 4 other families. Lots of fun in the sun, trying out my new stand up paddle board that I got for Christmas, swimming in the lake, swimming at the beach, boating, knee-boarding, 4WD, and lots of all-round summer fun! Was so good to be away in the great outdoors of Australia.

Over at Just Add Ink, to kick off the first challenge for the year we are commencing 2021 with a blog hop to go with the new challenge. Our theme for this hop and the challenge is 'Just Add Summer'. With all that fun in the sun I've just had for the last two weeks the new challenge seems very fitting and it's perfect for us in the Southern Hemisphere where we are right in the middle of Summer.

While most people, including me, usually see Summer as a time for being at the beach or the pool and enjoying lots of time outside, and I do all that. But one thing I love that happens quite regularly here in Melbourne are the amazing summer storms. After days of extremely hot weather there is nothing better than a summer storm to feel alive and refreshed.

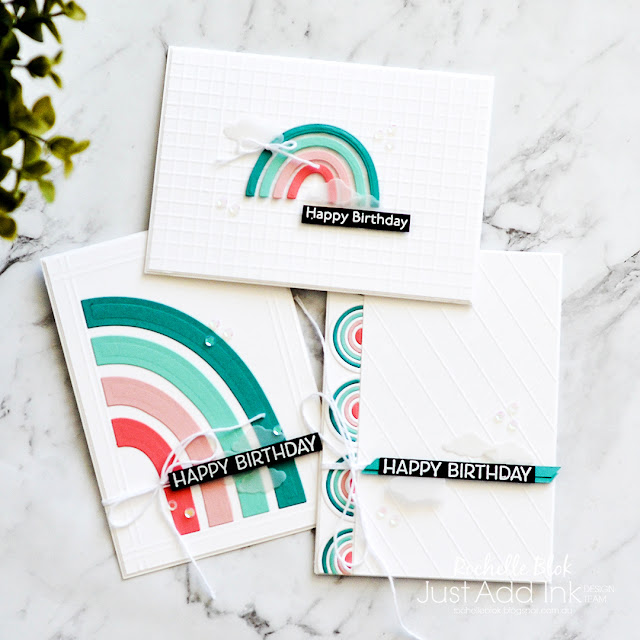
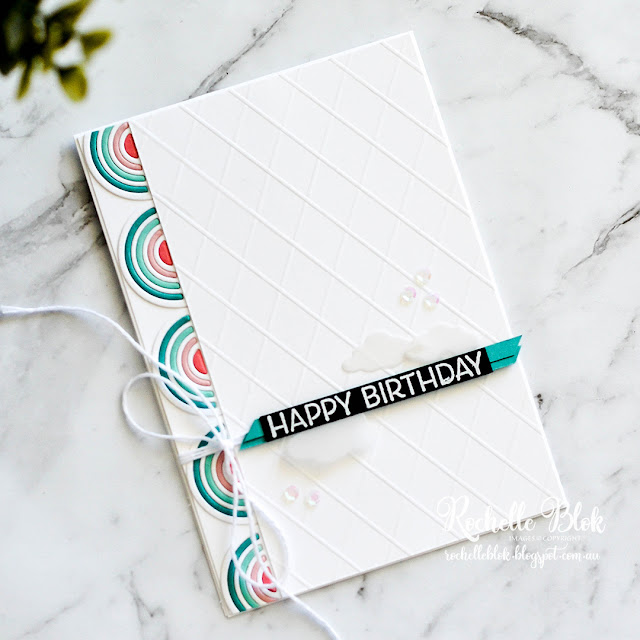
One thing that usually comes with those storms are the stunning rainbows that shine so brightly against those dark grey clouds. So with that my projects for today's blog hop all use the new Brilliant rainbow dies from the new 2022 Jan - Jun Mini Catalogue.

Ive used some non-traditional rainbow colours and then combined those gorgeous rainbows with some fabulous background scoring techniques. A super easy way to add details to any project with not much effort.

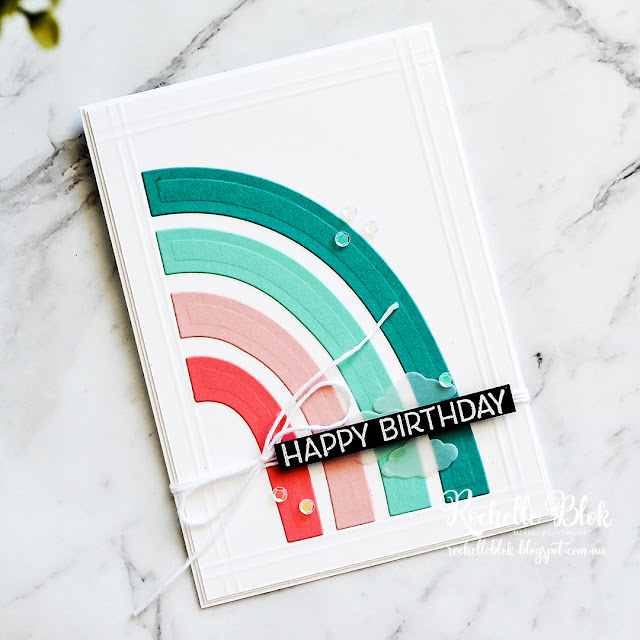
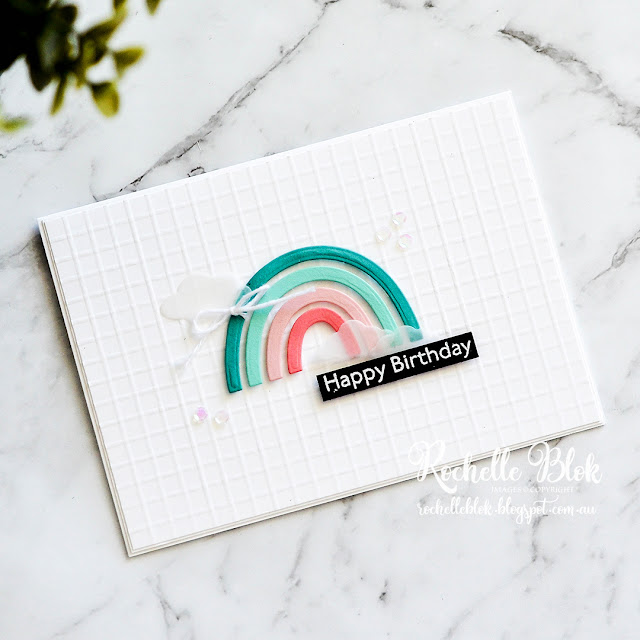
For each rainbow I've used the Stampin' Up! colours - Bermuda Bay, Coastal Cabana, Blushing Bride and Flirty Flamingo. How gorgeous are these colours together? I just love the combo and they look extra amazing against the crisp Basic White.

The big rainbow dies are such a statement. I love how when using them you don't really need much else to go with them. Here I've used the cloud dies (part of the Brilliant rain Bow Dies) and die cut the clouds out of vellum. I've then used White Bakers Twine, some Adhesive Backed Sequins and the embossed Happy Birthday from the Artistically Inked Stamp Set. I just added scoring lines around the edge using my Stampin' Up! Paper Trimmer, just lining up the edge at the 1/2" mark and then spacing the next line 1/4" apart. Super easy and just score on all four sides.

My next card I created a grid background using my Stampin' Up! Simply Scored Tool. My lines are 1/4" apart and it was very quick and easy to do and makes an awesome grid pattern. The rainbow is again die cut with the same colours and also finished off with the same embellishments and trim. This Happy Birthday comes from the Art Gallery Stamp Set.

My last card uses the 'tag' rainbow die to create a fabulous border. I die cut 5 of the tags in Basic White to make the border and then used that same die to then get the rainbow 'inserts' in each of the four colours. While there is a smaller die in this set that makes a border for you, I liked the bigger size for more of an impact. This time for the scored lines I made a diagonal pattern spaced 1/2" apart. I again used my Stampin' Up! Paper trimmer to score from corner to corner and then just lined up the scored lines on the 1/2" line and continued the lines across the card in both directions.

While my cards are quite CAS I really love the bright colour combo against the bright white. It then makes it a whole lot easier to mass produce if you are making a lot of them. Change up the Happy Birthday for another sentiment and you've got a card for all occasions.

Next up on the blog hop is the fabulous Tristan Dawes. Make sure you click your way around to everyone on the hop as there are lots of amazing creations and lots of different takes on our 'Just Add Summer' theme. Once you've been through the hop make why not get creative with your own Just Add Summer creation and add it to our Just Add Ink Blog. I can't wait to see your projects!

Thanks so much for stopping by!
Happy Stamping!

Live in Australia?
Shop for Stampin' Up! with Me 24/7 HERE
 
 Recreate this project at home using the following Stampin' Up! products.  Click on the images below to see the product information and to shop from my online store.
  

Friday, November 19, 2021

Just Add Ink #581 | Just Add Legs Challenge

Hello there stamping friends! Happy Friday! Welcome and thanks for joining me on my blog today. It's so good to have you here.  I hope you're having a fabulous day and that you have all been safe and well. Today we over at Just Add Ink have another creative challenge for you. This week we are 'Just Adding Legs' - Just Add Ink #581| Just Add Legs Challenge - suggested by fellow Just Add Ink team member Lou Kitzelman. How fun!


Yep, so anything that has legs you can use for this challenge. You are only limited by your imagination and your crafting supplies.

I'm using the Stampin' Up! Be Jolly stamp set for a super cute and super fun Christmas card. How cute is Santa with his short little legs and his big round belly? 

I started my card today with some layers of Shimmery White cardstock and then I heat embossed the snow flurry image from the Stampin' up! Peaceful Deer stamp set. I repeat stamped this image on the card and heat embossed it with white embossing powder. Then using the fabulous Stampin' Up! Blending Brushes I blended some Pool Party Ink over the embossing for an emboss resist look.


 I've coloured in my images today using a mix of Copic Alcohol Markers and Stampin' Blends Alcohol Markers. I really love how the colouring turned out with these images and keeping to some traditional Christmas colours really adds to the festive feel of the card.

I've finished off the card today with my favourite trim - Linen Thread and some rhinestones from the Holiday Rhinestones Basic Jewels. Becuase the colours are bright and bold I really though that the card didn't need much trim and embellishment so really kept that all farily simple and basic.

There are lots of AMAZING creations from the rest of the Just Add Ink Design Team on the JAI Blog. Go and check out to see what 'legs' elements the JAI Design Team used. I love the out of the box thinking that the DT memebers used for their projects this week. Cant' wait to see what your project will be!

Thanks so much for stopping by!
Happy Stamping!

Live in Australia?
Shop for Stampin' Up! with Me 24/7 HERE
 
Recreate this project at home using the following Stampin' Up! products.  Click on the images below to see the product information and to shop from my online store.
  

Saturday, November 13, 2021

TGIF Challenges | #TGIF342 Sketch Challenge

Hello there stamping friends! Today I'm playing along and entering my card in the challenge over at TGIF Challenges | #TGIF342 Sketch Challenge. I always love a sketch challenge and they really help to get the creative ideas flowing. Pick a stamp set or some Designer Series Paper and use the sketch to get your creativity going. 

Don't you just love this sketch from TGIF??!! It has a basic design element and then it gives you so much room to do what you feel lead to create. And as I was lead I used my creative license to change it up a little while still holding the basic design elements. And yes again, I'm using the Words of Cheer Bundle. I've really loved this bundle and have had so many creative ideas when using this bundle. To see my other projects using these products check them out HERE, HERE and HERE. I'm using a colour combo I used a couple of months ago again becuase I loved it so much - Soft Succulent, Polished Pink and Gold.

Instead of having an acutal circle on my card as per the sketch I've used he floral image from the Words of Cheer stamp set as my 'circle' element. I've stamped the floral image on Crumb Cake cardstock, heat embossed it with White Embossing powder and then coloured on the Crumb Cake Cardstock.

I just love to colour on coloured cardstock but sometimes when you try to do this with the ink colour straight onto the cardstock the ink colour changes and even gets a little lost into the cardstock background. The best way to colour onto coloured cardstock is to cover your image first with a Whisper White Craft Ink 'undercoat' layer and then add your chosen colour over top. Check out my Instagram Step-By-Step Tip I did a few years ago HERE on how you can achieve this different look.

I've used a combo of Linen Thread and the Gold Metallic Thread from the Retired Forever Greenery Ribbon Combo Pack for the trim across the card and then layered the 'Happy' from the Christmas Cheer Dies over top of that. I've die cut the 'Happy' with Vellum and Soft Succulent Cardstock.

I've then finished the card off with the floral dies from the Christmas Cheer Dies, using Soft Succulent, Polished Pink Cardstock and Gold from the Gold & Rose Gold Metallic Specialty Paper. In the die cut flowers I've added 2021 - 2023 In Color Jewels for that extra touch of bling and then layered the heat embossed Christmas over the 'Happy' die cuts. 

I just love how this turned out and the colouring on the coloured cardstock. If you haven't tried colouring on coloured cardstock before give it a go, you'll love the results.

Thanks so much for stopping by!
Happy Stamping!

Live in Australia?
Shop for Stampin' Up! with Me 24/7 HERE
 
Recreate this project at home using the following Stampin' Up! products.  Click on the images below to see the product information and to shop from my online store.