Thursday, August 27, 2020

Stampin Fancy Friday | Sketch Challenge

Hello there stamping friends! Welcome, welcome! It's so good to have you here. I have a project for you for the Stampin' Fancy Friday Design Team. This month is a sketch challenge and if you've been around here for a while you would know that I love a sketch challenge!


This sketch is basic in its design and layout, but enough to get those creative ideas going and that creative brain working. I've actually made three cards with the sketch rather than just the one. I got on a bit of a roll and then the ideas just kept coming.
All my three cards today incorporate the sketch and also the Banner Blooms Dies from the Artistry Blooms Suite in the Stampin' Up! '20 - '21 Annual Catalogue.


My first card today starts with a neutral feel layering Whisper White, Basic Black, and Crumb Cake Cardstock. The Crumb Cake layer is then embossed with my all-time favourite goes with any project Subtle 3D Embossing Folder. If there was only one embossing folder that you could get then I would say get that one! Over the embossed layer, I've added some Basic Black splatters but flicking the brush end of the Basic Black Stampin' Write Marker.


Next comes the embellishment layers. To start the layering I've used one of the Forever Gold Laser Cut Speciality pieces. The neutral layers with touches of gold is just such a gorgeous and classic look. Next over that is some strips of the In Good Taste Designer Series Paper with some pieces of Gold Cord from the Wonder of the Season Ribbon combo pack and some Very Vanilla Scalloped Lace Trim. Over the ribbon and trim are some layers of Vellum and Shimmery White Cardstock die-cut with the Layering Circles Dies and the Banner Blooms Dies. How pretty is the Banner Blooms Die, die-cut on Shimmery White, and then layered on the Shimmery White cardstock circle. Makes for a beautiful tone on tone look. Last and by no means least is one of the In Good Taste wooden elements, some linen thread, and the sentiment cut from the Tasteful Touches Stamp Set.


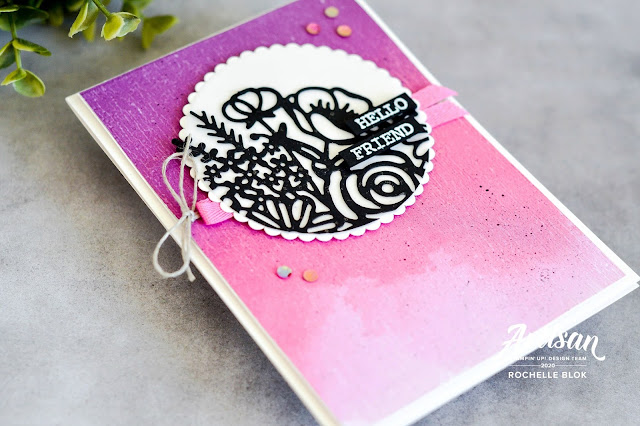
I was on a roll creating with this sketch that I created two more cards for you. My next card uses the Artistry Blooms Designer Series Paper to start with. Because this DSP is so bright and bold it really doesn't need much else to go with it. I have embossed it though with the Subtle 3D embossing folder to add some more texture.


I've really pulled back on this card as opposed to the first card because the DSP and the Whisper White and Vellum die cut circle and Basic Black Banner Blooms Die makes for a beautiful contrast. I've finished off the card with some Linen Thread, Magenta Madness Ribbon and some of the Artistry Blooms Adhesive Backed Sequins.


For my last card, I've turned the sketch horizontal. This time I've started with a Shimmery White base and then added colour from there starting with some splatters flicked from the Magenta Madness Stampin' Write Marker.


This time I've used Basic Black for the circle element and then layered some of the Rainbow Glimmer Paper, die-cut with the Banner Blooms Die. I wasn't so sure of the Rainbow Glimmer paper when I first saw it in the Stampin' up! Annual Catalogue but when paired with the right products it really is gorgeous! And the best thing about using this glimmer paper is that the glitter stays on the paper and doesn't go everywhere else!


All finished off with some ribbon, trim, Magenta Madness In Color Enamel Dots, and a sentiment from A Wish for Everything Stamp Set.

I really love that with the one sketch you can create three different looks. Check out the rest of the sketch creations that the Stampin' Fancy Friday Design Team has made on the Stampin' Fancy Friday Instagram Account. This is where all their creations will be shared throughout the month, so make sure that you are following them to get all of the amazing ideas!

Thanks so much for stopping by!
Happy Stamping!
Live in Australia?
 Shop for Stampin' Up! with me 24/7

 Recreate these projects at home using the following Stampin' Up! products. Click on the images below to see the product information and to shop from my online store.

Friday, August 21, 2020

Stampin' Up! Artisan Design Team Blog Hop | Peace & Joy

Hello, there dear stamping friends! It's so good to have you here. Welcome to another Stampin' Up! Artisan Design Team Blog Hop. We are getting very festive for you today with projects using the Peace & Joy Bundle from the Stampin' Up! 2020 Aug - Dec Mini Catalogue. I know this bundle is on lots of people's wish lists, so I hope that we can give you some inspiration for all different styles of crafting.

International readers, please use the translate feature, found in the sidebar, to translate to your language.


The Peace & Joy Bundle includes the Peace & Joy Photopolymer Stamp Set and the Joy Dies. The stamp set helps you to send our warmest Christmas wishes with hand made cards and the Joy Dies to help you to create fun layered die cut words. These dies include the words 'Joy', 'Peace', and 'Bright'. Use them on cards, scrapbook pages, and other projects.  By purchasing these two products together you save 10% as opposed to purchasing these two items separately. Everyone loves a saving!

https://www.stampinup.com.au/products/peace-joy-bundle?demoid=4009899


I've got three projects for you today. I've used traditional red and green Christmas colours and then incorporated Crumb Cake as well. Two using the stamp set and the dies together and then one showing how you can use just the stamp set on its own.


My first card for you today I've started with a fun Cherry Cobbler and Crumb Cake Striped Background. I first put the stripes on a larger piece of cardstock and then die cut the piece with the Rectangle Stitched Dies. To give the base layers a more festive feel I flicked Clear Wink of Stella all over the front for a beautiful glittery shimmer. It's hard to pick it up in the photo but it looks so pretty!


Using the images from the Peace & Joy stamp set I've created a fun wreath. I've stamped one of the leaf images in Shaded Spruce Ink and then fussy cut them out and then arranged them in a circle. I then stamped the 'Holly' leaf image in Garden Green Ink and then arranged those on the wreath. The 'Holly Berries' are from the Holiday Rhinestone Basic Jewels. The jewels add more again to the festive feel. All finished off with layers from the Joy Dies. If you are after some gold thread for your projects separate the Gold Cording from the Wonder of the Season Ribbon Combo Pack and pull out the individual strands. 


My second card uses all the leaf images from the Peace & Joy Stamp Set to make a fun leafy border. I've used Shaded Spruce, Old Olive, Garden Green, and Mossy Meadow for the leaf images. Some are stamped in full strength and others are stamped off once. This creates lots of variation in colour and some different looks in colours. I've then used Cherry Cobbler stamped off once for the holly berries.


To add more texture to the stamped layer I've embossed it with the Subtle 3D Embossing Folder. I love this folder. Can you tell? The gorgeous texture that it gives is stunning and it goes with any project. I've then finished the card off with some layers of Shimmery White cut with the Rectangle Stitched dies and then the Peace embossed on the top layer with Gold Stampin' Emboss powder.


My last project is a quick gift tag. I've used the Stitched Nested Label Dies for the tag shape and then embossed it with the Subtle 3D embossing folder. To add to all the gold touches I swiped the edges of the tag on the Versamark Ink Pad and then embossed the edges with Gold Stampin' Emboss Powder.


Add a statement ribbon to the tag and some layers of the Joy dies and you've got yourself a quick gift tag to pretty up any Christmas gift.


I do hope that I've given you some more ideas on using this fantastic bundle and some new ways to use these amazing products. Put this bundle on your next order and you won't be disappointed. Contact me today on how you can place your order.

Next up on this festive hop is my Artisan buddy Stesha Bloodhart in the U.S. You are sure to be WOWed by her projects. The projects she makes are always amazing and I'm always in awe of her ideas. There are so many amazing projects with this suite. I do hope that you take the time to check out all 16 blogs. We have so much to show you so I don't want you to miss out!

https://stampinhoot.com/2020/08/artisan-aug-fb-2/


Thanks so much for stopping by!
Happy Stamping!
Live in Australia?
 Shop for Stampin' Up! with me 24/7

 Recreate these projects at home using the following Stampin' Up! products. Click on the images below to see the product information and to shop from my online store.

Friday, August 14, 2020

Just Add Ink #518 | Just Add 'T'

Hello there stamping friends! I hope that you are having a fantastic week and a fabulous day! It's Friday, so that means it's time for another Just Add Ink Challenge
This week it's one of our much-loved letter challenges - Just Add 'T'. You are only limited by your imagination as to what you could do to incorporate the letter 'T' into your creations.


I've gone with a fun fold card for our 'Just Add T' theme - Triangle Trifold Card. Say Triangle Trifold 10 times and I'm sure you'll get tongue-tied! I found the tutorial for this card HERE on Splitcoast Stampers if you want to make it also.  The finished card ends up being a 4" x 4" square, so if you don't tie a large bow on the side, you can still put it in a regular envelope to post.

I've started with an Early Espresso base cut at 4" x 12" and scored at 4" and 8" on the long side. Here's where things get a little tricky, to get the triangle fold you need to score the right and the left flap on the diagonal (from point to point) making sure the diagonal score on the left and right sides both go in the same diagonal direction. Prefold on all the score lines and fold together so that the 2 triangle flaps on either side meet in the middle.


I've decorated the front of the card with products from the gorgeous mega-suite, Wonder of the Season, from the Stampin' Up! 2020 Aug - Dec Mini Catalogue.  If you love the traditional reds and greens for your Christmas Cards and Christmas Projects then this is the suite for you. I've layered Shaded Spruce and Garden Green Cardstock on the front and then added on top of that some of the 'Tis The Season DSP with the gorgeous green star pattern. On top of that, I've also added some of the woodgrain DSP from the In Good Taste DSP pack that is found in the Annual Catalogue. The woodgrain pattern adds to the rustic, vintage feel of the Wonder of the Season products.


When making any card its fun to make it more special by embellishing the inside as well. Use the same products that you've used on the front of the card makes for a beautifully coordinated look.


 On the front of the card is the beautiful Shaded Spruce Argyle Satin Ribbon to hold the card closed. This stunning ribbon also comes with some Gold Cording for the Wonder of the Season Ribbon Combo pack. When these two items are used together it makes for a stunning, festive look. So pretty!


Over the ribbon is one of the labels from the Hippo & Friends Dies. I die cut the label out of Shimmery White cardstock and then left the die on the die-cut piece to create a 'border'. I then sponged over the die-cut label with Sahara Sand ink for a soft sponged look. Over that, I've splattered some Clear Wink of Stella for a Shimmery, Glittery look. Don't all Christmas Cards need some shimmer?
To finish the card off I've layered some bits and pieces from the stamp sets, dies, and DSP from the Wonder of the Season Suite. The 'Merry Christmas' comes from the Poinsettia Palace Stamp Set. The Merry Christmas is perfect to stamp and then heat emboss and then to cut around the words.

Please head on over to the Just Add Ink Blog, where you can find the rest of the Design Teams projects. We hope that you'll come and join us in this week's Challenge for Just Add 'T'. Can't see what you will come up with! 

Thanks so much for stopping by!
Happy Stamping!
Live in Australia?
 Shop for Stampin' Up! with me 24/7

 Recreate this project at home using the following Stampin' Up! products. Click on the images below to see the product information and to shop from my online store.

Friday, August 7, 2020

Just Add Ink #517 | Sketch Challenge

Hello there stamping friends. Hope you are all safe and well. It's been a crazy few days here in Melbourne with the return of tighter restrictions, cerfews and people ordered to stay at home, workforces closed down in a hope to reduce the Covid-19 spread that has been happening. I'm a bit of home body anyway, so I don't mind staying at home. Gives me more time to craft and create. I don't know what I would do if I didn't have a creative outlet while at home.
Speaking of getting creative it's time again for another Just Add Ink challenge, Just Add Ink #517 - Sketch Challenge.


This sketch is basic in its design and layout, but enough to get those creative ideas going and that creative brain working. I've gone for a Christmas card today using products from the new 2020 Aug - Dec Mini catalogue, formerly know as the Holiday Catalogue.

Most of the products used today come from the Wonder of the Season Suite. This is what is considered a Mega Suite with two Stamp and die bundles, two different DSP's, Memories and More Card Pack, Memories and More Cards and Envelopes, Ribbons and Embellishments. By getting this suite, you have all that you need to make and mass produce your Christmas cards.


My take on this weeks sketch is a little more subtle by cuting a line through all the layers to create the angled line in the card, as per the sketch. I've started with a Cherry Cobbler card base and then picked a Cherry Cobbler DSP pattern, from the 'Tis the Season 6" x 6" DSP to coordinate with Cherry Cobbler Cardstock. Over that is a piece of DSP from the In Good Taste DSP and then a piece from the Wonder of the Season Specialty DSP.  Lots of layers really make for a special look.


Next of the card is a cluster of accents to embellish the card. I've used some pieces from the Wonder of Season Ribbon Combo Pack, Linen Thread and some strips of the 'Tis the Season 6" x 6" DSP. Over that is the die cut bells from the Sounds of the Season Dies. These bells have been die cut in the beautiful new Brushed Metallic Cardstock. This Brushed Metallic Cardstock is super gorgeous and I love the ultra smooth finish that it has.


How gorgeous are these die cut bells? I'm loving them. The leaves and holly berries are die cut out and come out in little pieces. I love them still in so to keep them staying in I added some tear and tape on the back to hold these small pieces in. I mustn't have used enough tear and tape on the middle one, and one of the holly berries fell out just as I had finished the card. Oh well it has to stay that way now. I've finished off the card with some branches also cut from the Sounds of Season Dies, in Shaded Spruce and Garden Green cardstock, and some of the Wonderful Gems. The Merry and Christmas come from the Peace & Joy Stamp Set.

I do hope that I've given you some inspiration for this weeks sketch challenge and that you will come and join in the creative fun.Make sure that you check out the Just Add Ink Blog to see the rest of the gorgeous projects from the JAI Design Team. We hope you'll join us and create your own card using this week's sketch. We love to see what you make as we browse the gallery each week to see your fabulous projects.

Thanks so much for stopping by!
Happy Stamping!
Live in Australia?
 Shop for Stampin' Up! with me 24/7

Recreate this project at home using the following Stampin' Up! products. Click on the images below to see the product information and to shop from my online store.