Thursday, January 31, 2019

Butterfly Gala | South Pacific Blog Hop

Hello there stamping friends! Some of my Stampin' Up! Artisan Design Team friends from Australia and New Zealand - Narelle Farrugia, Angela Meiritz-Reid, Tanya Rees, Jackie Aitken and myself,  are having a special blog hop showing the Butterfly Gala Photopolymer Bundle, which includes the Butterfly Gala Photopolymer Stamp Set and the Butterfly Duet Punch.

 
Some of the products from the 2019 Stampin' Up! Occasions Catalouge and Sale-a-bration Promotion have far exceeded expectations and are flying out the door. This includes the Butterfly Gala Bundle and the Butterfly Duet Punch. These products are very low in stock here in Australia, currently still avaliable, and will be put on back order once the inventory of these products has been depleted. 

 
If the bundle or the punch is on your wish list, then make sure you grab this NOW to ensure you get you hands on these beautiful products. It will be back… but not for a few months.

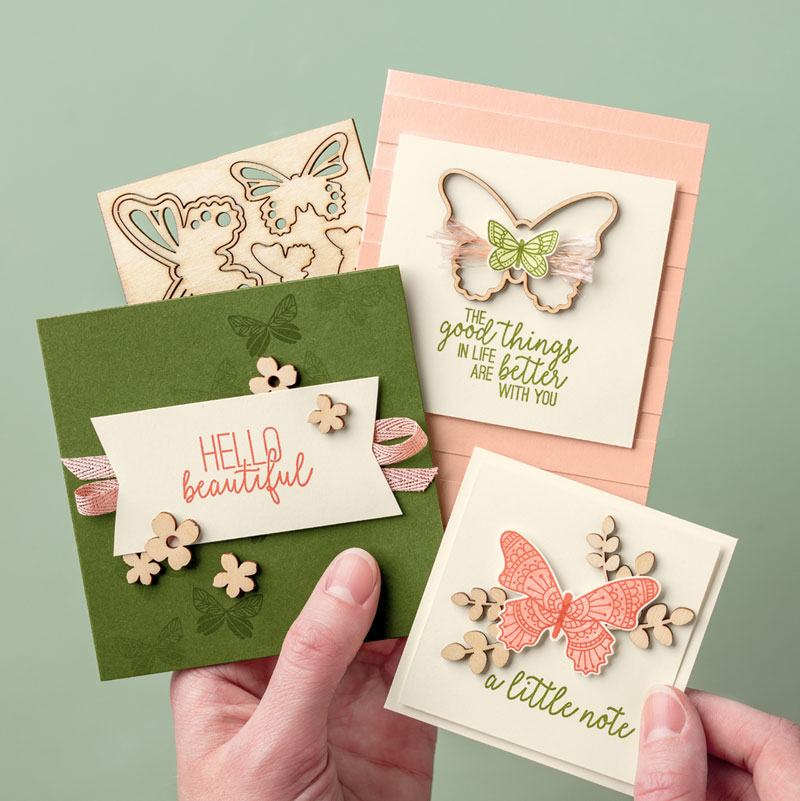
 If you are on the fence with this stamp set here are a few projects for you today that may whet your appetite to give you are few more ideas, showing you how versatile this bundle really is.


My projects today are combining the gorgeous colours of Mango Melody and So Saffron with the my favourite DSP at the moment, Botanical Butterfly DSP, which is a Sale-a-bration FREEBIE at the moment. Spend $90 (not including P & H) with me and you can get this stunning, stunning paper. How gorgeous is that black and white gingham? If you've been following me for a while now you know that a Black and White DSP is my favourite. It's such a classic look.


To get the two tone colour on the butterfly I used the Stamparatus and some sponge daubers. First the Mango Melody was sponged on the middle of the solid butterfly image, stamped on the butterfly black outline, and then leaving the stamp in place on the Stamparatus plate I kept adding the colour with the daubers until I was happy with the colour on each butterfly.


Are you loving the wooden butterfly accents throughout my projects today? These too are a Sale-a-bration FREEBIE! Got to love FREE products! One of the wooden Butterfly Elements is a butterfly outline. This outline looks fabulous on its own or the larger butterfly punch out from the Butterfly Duet Punch fits perfectly inside this outline! Don't you just love it when these different products all fit in together.


Have you ever wanted to use a piece of DSP to cover the whole base layer of your card but thought that it was too 'busy'? Why not cover a portion of it with some vellum. The vellum really tones down the pattern but still allows it to show through. It might be a bit hard to see here but I did die cut this piece of vellum using the new Rectangle Stitched Framelits Dies.  I could have just cut a piece of the vellum with my Stampin' Trimmer but I think the stitching on the rectangle really just gives that something extra and special.


If you think that a card needs that something else, why not add some splatters or embossing paste or even both. It's hard to see here but I used the Shimmery White Embossing paste to give that little bit of sparkle, and then using a Stampin' Write marker flicked the brush tip end to create that splatter.


I really hope that I've given you some more inspiration using this amazing Butterfly Gala Bundle. Remember that if you want this Bundle or the Punch on it's own you need to get it NOW or you'll have to wait a couple of months before there is more product back in stock. 

Click HERE to order these products from me TODAY! (Australian Residents) Any order placed online here with me, any where in Australia, will be delivered straight to your door! 

Now on to the fabulous Narelle for her amazing Butterfly Gala creations. That girl is amazing with her layers and you wont be dissapointed with her projects. 

https://narellefarrugia.com/2019/01/31/butterfly-gala-south-pacific-blog-hop/

Thanks so much for stopping by!
Happy Stamping!

Live in Australia?
 Shop for Stampin' Up! with me 24/7


 Recreate these card at home using the following Stampin' Up! products. Click on the images below to see the product information and to shop from my online store.

Friday, January 25, 2019

Just Add Ink #441 | Just Add Inspiration

Hello stamping friends. I hope you are having a fabulous week. It's still summer school holidays here in Melbourne, so we are having lots of days relaxing, chilling out, enjoying the summer sun, lots of time in the pool but also getting school books, school shoes and uniforms all organised so every one is all set to go back. 6 more sleeps to go (I'm not counting much, Ha!) and they go back to school for the beginning of a new school year.

It's time again for a new challenge over at Just Add Ink #441 | Just Add Inspiration. We've got a super gorgeous inspiration picture for you with lots of gorgeous colours.

https://just-add-ink.blogspot.com/2019/01/just-add-ink-441inspiration.html

I was naturally drawn to the colours in the cupcakes and wanted to use the new Piece of Cake Stamp Set with coordinating punch to keep with cake theme.

While using the inspiration picture as the basis for my card today, I was also inspired by some real cakes that I had seen on Instagram. The fondant icing around the outside of the cakes was all in strips creating beautiful ruffled edging all around. Super fun and so gorgeous! If you haven't seen these cakes before google Ruffled Cakes and you'll be able to see what I mean

The base of the card was trying to replicate, as best I could, that ruffled look. Using the colours Gorgeous Grape, Highland Heather, Coastal Cabana and Flirty Flamingo I measured 2 cm strips on a 10.1cm wide piece of card stock and riped the strips to give that 'ruffled' look. Each strip I then sponged the edge with a sponge dauber to highlight the edge more.


To go with my 'Ruffled Cake' background I continued the cake theme by colouring one of the images from the new Piece of Cake Stamp Set from the 2019 Occasions Catalogue. This is such a versatile set and has cakes for for any occasion and a fabulous thing about this set is the coordinating punch! Love it!


How gorgeous is that cake? And it looks super pretty coloured with the Stampin' Blend Markers. Would look fabulous with some Watercolour Pencils or water colouring with the Stampin' Up! Classic Ink and an aqua painter.


To finish off my cake card I've used the Well Said Cling Stamps and the Well Written Framelits Dies to create a Happy Birthday Sentiment. This is such an amazing bundle and I love that you can put all different words together to create your own sentiments. I'm loving the colours of this card and the elements and embellishments that bring it all together. So fun!

Be sure to stop by all the Just Add Ink Design Team members blogs for more inspiration HERE with this weeks Just Add Inspiration Challenge. While you are there checking out the design team members creations, check out the details on how you can enter your creation. We would love for you to play along! 

Thanks so much for stopping by!
Happy Stamping!
Live in Australia?
 Shop for Stampin' Up! with me 24/7

 Recreate this card at home using the following Stampin' Up! products. Click on the images below to see the product information and to shop from my online store.

Saturday, January 19, 2019

Stampin' Up! Artisan Corporate Blog Post | All My Love Valentine's Gift Packaging

Hello there stamping friends! Welcome to my first Stampin' Up! Artisan Corperate Blog Post for 2019.

All My Love
Hello stamping friends.  With Valentine’s Day just around the corner I thought I would share some gift packaging ideas using some of the Packaging Basics from the 2018 – 2019 Annual Catalogue, found on pg.’s 192 – 193, teamed up with the gorgeous products from the All My Love Suite from the 2019 Occasions Catalogue, pg.’s 4 – 6, really incorporating the Forever Lovely Stamp Set (148624) and the Be Mine Stitched Framelits Dies (148527). 


These gift packaging ideas are a gorgeous way to share some love to your loved one this coming Valentine’s Day mixing some of the old with the new.


The first is the gift bag using the Striped Treat Bags (144255). These white treat bags have a gold foil stripe and are food safe, so you could even bake your significant other their favourite treat and present it to them in a beautifully decorated treat bag. To die cut the heart out of the bag, and so as not to cut through both layers of the bag, I put the largest heart inside the bag and had the die facing up on the Big Shot Platform (142802) and then placed the Standard Cutting Pad (113475). I then die cut a heart from the All My Love Designer Series Paper (148576) and inlaid that in the heat outline in the Striped Treat Bag. To hold all the layers together I adhered a piece of Whisper White Cardstock (106549) inside the treat bag, just so there was something to adhere the die cut heart to. Alternatively, you could just die cut the heart out and then adhere it to the front of the bag. I just wanted the die cut pieces to be flush on the bag.


The next packaging project uses the Mini Pizza Boxes (144645). These are also food safe and are a perfect size for holding a cookie but it is also the perfect size for things like jewellery, just saying.  Because I’m such a sucker for anything with stripes, especially the large stripes in the Striped Treat Bags, I cut some up and used them as DSP for the base layer to decorate the Mini Pizza Boxes. Then using the squares from the Stitched Shapes Framelits Dies (145372) I die cut a square from the same pattern of the All My Love Designer Series Paper as used on the treat bag. All embellished with some of the All My Love Ribbon Combo Pack (148584) and the beautifully detailed heart die from the Be Mine Stitched Framelits Dies cut on Gold Foil Sheets (132622). The detail in that heart is just stunning and it is a beautiful addition to any paper craft project. I can see a new favourite product in those Framelits Dies.


The last gift packaging project is the Kraft Pillow Boxes. These printed, die-cut pillow boxes and perfect for gifts and wrapped goodies. Again using most of the same products as the Treat Bag and Mini Pizza Boxes I’ve accented and embellished them to make a gorgeous pillow box. Did you notice the ‘floral’ hearts on the pillow boxes? These are one of the patterns in the All My Love Designer Series Paper and can be die cut with some of the dies from  the Be Mine Stitched Framelits Dies. Don’t you just love when products co-ordinate like that? I’m a happier person when there is less fussy cutting! Who is with me? This time on the Pillow Boxes I used some of the left over Striped Treat Bags to die cut the detailed heart die. I just love the two tone look to the heart and it really adds another dimension to the die cut! Pretty! 

All of the gift packaging projects have been finished off and layered with Vellum (106584),Whisper White 5/8” Polka Dot Tulle Ribbon (146912), Gold Stampin’ Emboss Powder (109129) or Lovely Lipstick Stampin’ Emboss Powder from the 2018 – 2020 In Color Stampin’ Emboss Powder (146955) as well as the All My Love Ribbon Combo Pack and some of the DSP from the All My Love Designer Series Paper.

It still may feel like Valentine’s Day is a while away, we are all still getting over Christmas, right? But if you want to make something special for your Valentine, you may want to start now so that you have something made in time.

I hope that I’ve inspired you today for ways you can create some gorgeous gift packaging and to show ‘All your love’ this Valentine’s Day.
Thanks so much for stopping by!
Live in Australia?
 Shop for Stampin' Up! with me 24/7

 Recreate these projects at home using the following Stampin' Up! products. Click on the images below to see the product information and to shop from my online store.

Friday, January 18, 2019

Stampin' Up! Artisan Design Team Blog Hop | Forever Lovely

Hello there stamping friends. Welcome to the first Stampin' Up! Artisan Design Team Blog Hop for 2019. I'm so excited for this day, that it has finally arrived and I'm super excited to be finally sharing my creations with you.

This day has been a long time coming since I got the call last year to be on the Artisan Design Team. I'm so excited to be sharing this year with this amazing group of sixteen demonstrators from around the globe. I'm still pinching myself that I have been chosen for round 2 of being a Stampin' Up! Artisan and I'm so honoured to be one of the 5 chosen from the South Pacific Region (Australia and New Zealand).


What do the Stampin' Up! Artisan Design Team do?
We are all experienced craft bloggers who create and share inspiration with you all once or twice a month using Stampin' Up! Products. As well as hopping on a regular basis through out the year we also provide tips for Stampin' Up!s Instagram page and as well as have projects posted on the Stampin' Up! Corporate Blog Facebook Page. It's a big gig but its so rewarding and worthwhile.

If you haven't hopped on to my blog before, just a little bit about me before we move on to the projects. My name is Rochelle Blok and I live in the South-Eastern Suburbs of Melbourne. I’ve been married for 17 fabulous years to Wayne and we have 3 amazing children, 2 boys and a girl, aged 15, 13, and 10.

I fell in love with Stampin’ Up! about 8 years ago when my mum showed me my first Stampin’ Up! catalogue and I just “had to have it all”! I just celebrated my 5-year anniversary as a Stampin’ Up! demonstrator but you could say that I have enjoyed papercrafting since I was a little girl. I’ve always been crafty and have tried many different forms—cross stitch, scrapbooking, knitting, and embroidery—but I have to say that cardmaking and papercrafting have always been No.1.

I would have to say that my creative style is lots of layers, lots of ribbon and trim, and all things delicate and pretty—sometimes putting things together that don’t necessarily go together but still look good. Everything has to have some sparkle or bling. I just love crafting and creating and I don’t know how I would cope if I didn’t have that creative outlet, even if it is just colouring something in. I have to be creating/crafting something.

Now on to my creations! This months hop we are focusing on the Forever Lovely Stamp Set, Lovely Flowers Edgelits Dies, Meant to Be Stamp Set and the Be Mine Stitched Framelits Dies. Just in time to have some projects made for Valentine's Day.I've strayed away a little bit from my usual style of creating but have really love how the cards have turn out.


I've made three cards for you today, incorporating and intertwining all the focus products. All the focus products are fabulous and fantastic on their own but really are even more fabulous when you use them all together.


My first card, I was really drawn to the heart image in the Forever Lovely Stamp Set and instantly was drawn to repeatedly stamping the hearts to make my own background piece. I first, using a sponge brayer, sponged the colours for and Ombre look, graduating from darkest to lightest, and then using the same in colours down the card stock repeatedly stamped the hearts for and 'heartfilled' card. A bit of Ombre and stamping and you have your own custom background.


How gorgeous are those dies from the Be Mine Stitched Framelits Dies? Just love the stitched outline edge and the hearts outline piece with all the different sized hearts all together would have to be one of my favourite dies at the moment. Super pretty and super fun. 


My last card I die cut four of he longer heart outline die and the using all the different colours, infilled the hearts to create a fun and different look. Putting all the different coloured heart pieces back in and then adhering them does take a little bit of time but it really does create a gorgeous effect. Why not try it with a different colour combo?


All a little bit something different for my style but all a bit fun! The Artisan Design Team will be hopping again in a few weeks so be sure to check back often. Make sure that you follow us on our blogs, on Instagram or on Facebook. Let's get social!


The ever amazing Stesha Bloodhart is next up on the hop. I love Stesha's creations and am so thrilled to be sharing this Artisan year with her and all the other amazing Artisans. Be sure to head on over and check out what she and the rest of the Artisan Team have to show you by clicking the next button below.

https://stampinhoot.com/2019/01/artisan-jan-fb/
Blog Roll Artisan Design Team 2019


Thanks so much for stopping by!
Live in Australia?
 Shop for Stampin' Up! with me 24/7


Recreate these cards at home using the following Stampin' Up! products. Click on the images below to see the product information and to shop from my online store.
 

Just Add Ink #440 | Just Add Something New Blog Hop

Hello there stampers! Welcome to my first blog post back for 2019! I've had a very well deserved and needed Christmas Break with my family and some time away camping in our caravan, with 5 other families. Lots of fun in the sun, swimming in the pool, swimming in the river, swimming at the beach, boating, knee-boarding, 4WD in the sand dunes, lots of all round summer fun!

Over at Just Add Ink, to kick off the first challenge for the year we are commencing 2019 with a blog hop to go with the challenge. With the theme being Just Add Something New.

https://just-add-ink.blogspot.com/2019/01/just-add-ink-440blog-hop.html

With the new Stampin' Up! 2019 Occasions Catalogue going live a couple of weeks ago, this has given me plenty of products to use for my 'Something New'. I've gone with and chosen products from the Stampin' Up! Floral Romance Suite and combined with it the Well Said Bundle.


The Floral Romance Suite just screams 'Rochelle' and really goes with my 'pretty' card making style. The gorgeous Lace Dynamic Textured Impressions Embossing Folder, the Wonderful Romance Stamp Set, the Petal Pink/Whisper White Variegated Ribbon, Floral Romance Seals, Floral Romance Specialty Designer Series Paper. Need I say more! Pretty, Pretty, Pretty! Even the colour combo in the DSP is so pretty! 


How amazing does the Lace Dynamic Textured Impressions Embossing Folder look? It is such a statement piece on its own and really doesn't need much else to go with it. But in true 'Rochelle' style I had to add some texture and layers. The stamped image from the Wonderful Romance Stamp set has been stamped and embossed with Gold Stampin' Emboss Powder on Vellum cardstock and the die cut with the Wonderful Floral Framelits Dies. I love how simply stunning the image is embossed on the vellum but it looks equally as stunning coloured in with ink, water colour pencils or Stampin' Blends.


This time the image from the Wonderful Romance Stamp set has again been embossed with Gold Stampin' Emboss Powder but this time it has been used as part of the layering effect with the die cut leaves. Again I'm loving the embossed leaves as they are, embossed straight on the cardstock. With minimal fuss you have a stunning look as the basis for your card. How gorgeous are the Floral Romance Seals? I can see me using a lot of those. They would look fabulous to be used as a 'wax' seal on the back of your envelopes. I know I would get excited if the Floral Romance Seal was used to embellish an envelope. Sometimes its all in the little details.


I hope that I've given you some inspiration with these new products and a different take on using them. I can see me using lots of these products on just about everything. They are all just so stunning!

Now to get one of these cards written and addressed to get in the post. I'm making it one of my goals this year to actually get the cards sent rather than just making them and putting them in a box for and store them away for 'later'.

Now on to the fabulous Di Barnes and her 'Something New' and remember to check the Just Add Ink Blog for this week and join in the fun challenge. Can't wait to see your 'new' creations.


Thanks so much for stopping by!
Live in Australia?
 Shop for Stampin' Up! with me 24/7

Recreate these cards at home using the following Stampin' Up! products. Click on the images below to see the product information and to shop from my online store.