Monday, January 30, 2017

Stamp Review Crew | SAB Bonus Hop

 http://stampreviewcrew.blogspot.com/2017/01/2017-sab-free-for-all.html

Hello and welcome to this special edition of the Stamp Review Crew - 2017 Sale-a-bration Free for All. This hop we are focusing on all the fabulous products that you can get for FREE, yes that's right for FREE from the Stampin' Up! Sale-a-bration promotion.

If you are joining us for the first time we are a group of International Stampin' Up! demonstrators that show one Stampin' Up! stamp set at a time, every first and third Monday's of the month, with the exception of this Bonus Hop today.  Be sure to make your way around the hop by clicking the next button at the bottom of each post. If you get lost along the way click on the banner at the top of each post and that will lead you to the list of hoppers so you can continue seeing all the fabulous creations.

There a lots of fun and fabulous products on offer this year. Something for everyone!


 All you have to do to get your hands on one of these products is spend $90 AUD on any Stampin' Up! products (not including P&H) and one of these products can be all yours for FREE! Who doesn't love a freebie or two?
I know we are the Stamp Review Crew and normally we focus on one stamp set at a time but this hop I wanted to focus on a DSP in the 2017 Sale-a-bration line up (pun intended, Ha!), Inside the Lines Designer Series Paper.

This is a 12"x12" DSP that you can colour in yourself. There are four designs and you get 3 of each design in a pack.  And the designs lend themselves to be coloured with the new and fabulous Stampin' Up! Watercolor Pencils.

If you follow me on Instagram, you may have seen me playing around with this DSP last week.  I was having a bit of a practice with the Watercolour pencils before I got stuck into my project for today.


I think I've picked the most detailed design of all the four designs in the Inside the Lines DSP pack and I'm not going to lie and say that this has been a quick project because this has taken me about 25+ hours, on and off throughout the week, mostly after dinner while watching TV to colour it in. Lucky I love it otherwise I probably would have stopped after the first night.


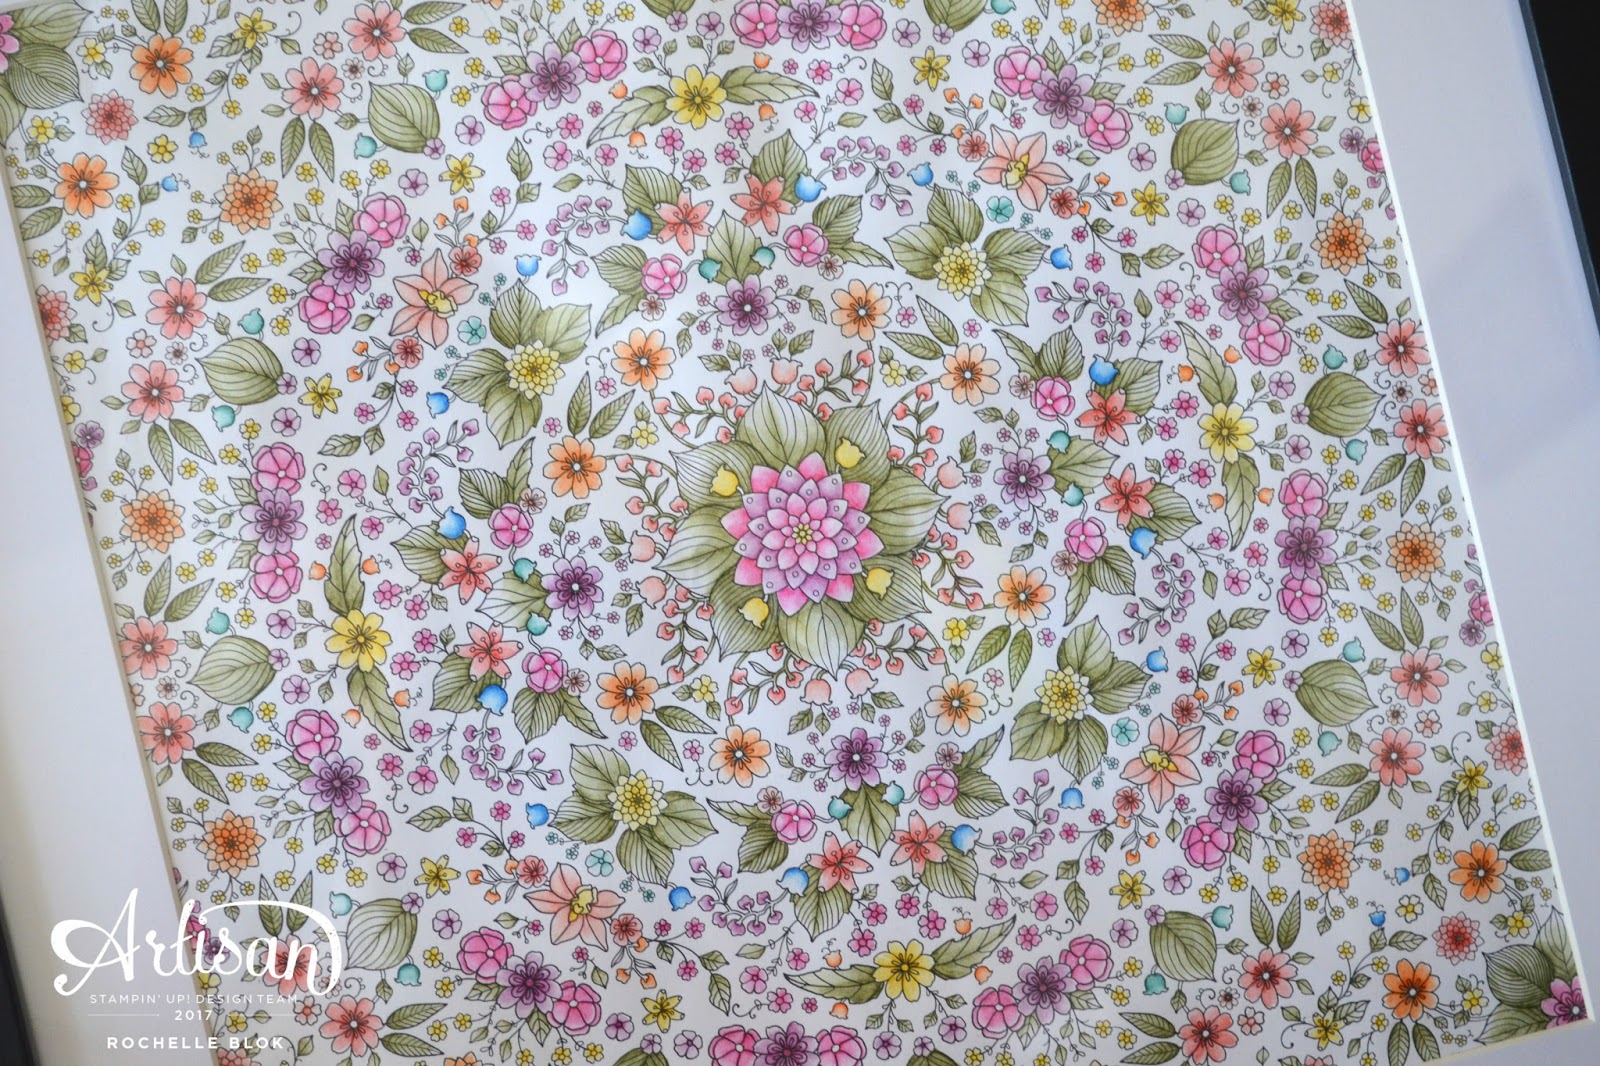
I had originally thought to cut out a section of the DSP and then turn it into a card but after all that work and effort that I put into colouring it in I couldn't bring myself to cut it up. It was just too pretty! I love the sheet of DSP in the beautiful dark frame. The contrast of the frame with the colours in the DSP is gorgeous and makes for a beautiful decor piece in your home.

To colour it in I laid down a little bit of colour in each flower or leaf and then used the Aqua painter to pull the colour out and to give it that water colour look. The water colour pencils are really so easy to use. Make sure when using the Aqua painter on the DSP not to use too much water otherwise the colour would just pool everywhere on the page. I found the best was to have as dry a brush you could have. Basically the brush was just damp and that worked the best for me.

Check out this clip from Stampin' Up! on other fabulous ways you can colour the Inside the Lines DSP.  There are lots of different ways you can colour this DSP. You are only limited by your imagination.


I hope that I've inspired you today with the Inside the Lines DSP. Remember to get this DSP you need to spend $90 AUD with me on any Stampin' Up! products (not including P&H) and the Inside the Lines DSP (#143830) is all yours for FREE!

Next up is the fabulous and fellow Artisan team member, Tanya Boser.

http://tinkerin-in-ink.blogspot.com/2017/01/src2017sab.html

Thanks so much for stopping by!

Live in Australia? Shop for Stampin' Up! products with me
Shop for Stampin' Up! 24/7
 Recreate this creation at home using the following Stampin' Up! products. Click on the images below to see product information and to shop from my online store.


(Australian Residents Only)

Friday, January 20, 2017

#TGIFC 91 | Show me the love

OK. I know I've done a lot of Valentine's Day creations for you lately. I've been having so much fun with some of the new products from Stampin' Up! dedicated to Valentines Day and I was on a roll. And today is no different with the new #tgifc challenge for this week being all things love.


I've incorporated some products from the Stampin' Up! Annual Catalogue as well as the Stampin' Up! 2017 Occasions Catalogue for my love inspired card for you today.


I've used the 'You' from the Sunshine Sayings stamp set and the Sunshine Wishes Thinlits Dies, that are from the Annual Catalogue and then combined it with some of the products from the Sending Love Suite from the 2017 Occasions Catalogue.


I'm not normally a pink and red girl and have always been told that these two colours don't go together but I'm liking the combination of Pink Pirouette and Real Red. I think they look fantastic together. 


I started off with the Pink Pirouette water colour wash for the background and then splattered some Gold Wink of Stella. Still loving that stuff! Looks fabulous splattered on a water colour background. Well, I think it does. I then played around with the rest of the elements swapping them around and them moving them into place till I was happy with the result. Sometimes it takes me ages to be happy with the final result but this time it was quite quick and didn't take me long at all. Love when a card comes together quickly.


Its all finished off with some Subtles Enamel Shapes, Sending Love Embellishments, Mini Paper Clips and some Gold Metallic Thread.

You really must pop over to the blog and check out all the other TGIFC DT's cards. There really is something for everyone with all the different creations! While you are there check out all the details on how to enter your creation.
I'm so looking forward to seeing all your creations and whatever inspires your 'love' creation!

Thanks so much for stopping by! 
Shop for Stampin' Up! 24/7
 Recreate these creations at home using the following Stampin' Up! products. Click on the images below to see product information and to shop from my online store.

(Australian Residents Only)

Stampin' Up! Artisan Blog Hop | Sealed With Love

Welcome to the very first 2017 Stampin' Up! Artisan Design Team Blog Hop. I am super excited and oh so thrilled to be sharing creations with you all! I feel like this day has been a long time coming since I got the call to be on the ADT and am still pinching myself that I was chosen. The team comprises of Stampin' Up! demonstrators from all over the globe. I feel so honoured to be one of the three chosen from the South Pacific region.

Just a little bit about me before we start. My name is Rochelle Blok and I live in the South-East Suburbs in Melbourne, Australia but grew up in country Victoria, South Gippsland, on a dairy farm. So what’s the saying ‘You can take the girl out of the country but you can’t take the country out of the girl’. I love suburbia life but can very much relate to wide open spaces and country living. I’ve been married now for 15 ½ years and we have 3 wonderful children, 2 beautiful boys and a gorgeous girl, ages 13, 11 and 8. I’m a stay at home mum, work in the office of our small business and a Stampin’ Up! demonstrator. All of these things keep me busy and ‘out of trouble’ but I would have to say that my love, besides my hubby and kids, is being a Stampin' Up! demonstrator and all things crafting! If I could craft all day, everyday, I'd be one happy woman!

Our hop today is focusing on the Sealed with Love stamp set. Lots of fabulous ideas for you especially for Valentine's Day coming up.

What a fabulous set to start our first hop with!! Loving it!


I do tend to like to use Kraft/Crumb Cake on my creations and I think that it looks fabulous with the Real Red accents. Loving the contrast! I used the little heart stamp to make a border on my card and then made my own 'DSP' as such and used that for the super cute envelope on the card and the crumb cake panel on the gift bag. How gorgeous are those mini envelopes from the Love Notes Framelits Dies. They are just too cute for words!  The card and bag have been embellished with the Sending Love Designer Series Paper Stack, Mini Paper Clips, Sending Love Ribbon Combo and the Sending Love Embellishments. Loving the mix of the gorgeous stamp images, the Real Red and Crumb Cake combo and the wooden embellishments. 

Now on to the ever fabulous Shannon Lane from Canada. I've admired her creations for a while now and can't believe I'm now on the ADT with her too!

http://crushoncolour.blogspot.com.au/2017/01/artisan-jan-1.html


Thanks so much for stopping by!

Shop for Stampin' Up! 24/7
 Recreate these creations at home using the following Stampin' Up! products. Click on the images below to see product information and to shop from my online store.


(Australian Residents Only)

Just Add Ink #343 | Pop-Up/Interactive Blog Hop


Hello and welcome back to Just Add Ink for 2017. We are so looking forward to getting back into sharing our creations with you and inspiring you for each challenge every week.

We thought we would start of the year with a bang and have a big blog hop for you all with the theme of Pop-Up/Interactive.

There a loads of fabulous products out there in the market at the moment for Pop up and interactive cards and aren't they all amazing!!

I've actually gone with a card that I've seen floating around Pinterest for a while called the Twist and Pop card. It looks tricky but really it isn't. Probably the most tricky part about it is to trying to photograph it. That was hard. Hopefully my pictures will show you how it works.

And again I've gone with a Valentines Day theme creation. Loving the Sealed with Love stamp set and the super cute Framelits, Love Notes.

The front of the card looks like any other card from the front. Here I've used my favourite pattern from the Sending Love DSP stack. Those little hearts are so very gorgeous but now I've used them all up finishing this creation. Insert sad face here! 


I embellished the front with a Double lot of the Stitched Shapes Framelits. Actually what happened is I die cut the larger circle first and thought it was too big for the teeny tiny, very cute envelope and then cut the next sized circle from the larger circle. I then left the smaller one in the larger one and liked the look of the double 'stitching' and left it like that.


Upon opening that's when this card goes from being a normal card to a 'Twist and Pop' card. The mechanics of the card make it so that the 'pop' up middle section lies flat inside when the card is closed and then as you open it the middle section twists and pops open.


I've decorated the inside with more of the cute heart Sending Love DSP stack and some Pool Party Stitched Shapes Squares.


And then its all finished off with one of the heart images from Sealed with Love stamp set and die cut with the Love Notes Framelits. These can be 'Popped' up too as the die doesn't cut the top and the bottom part where the outline meets the heart. So gorgeous!!!

I found the tutorial for this card on Pinterest so if you want to make it too, check it out here.

Next on to my fabulous friend, Chloe Evans. Love her and love her creations! 

http://chloscraftcloset.blogspot.com.au/2017/01/just-add-ink-blog-hop-343-no-bones.html

Thanks so much for stopping by!

Shop for Stampin' Up! 24/7
 Recreate this card at home using the following Stampin' Up! products. Click on the images below to see product information and to shop from my online store.


(Australian Residents Only)

Saturday, January 14, 2017

Sending Love Origami Heart Bookmarks

Hello! I'm finally back for 2017. I've had a most wonderful time away camping with my hubby and kids, enjoying the great outdoors. Lots of sun, a bit of sand, swimming at the beach, fishing, catching up on some good books, relaxing, and just having an all round fabulous time while away. 
I thought I would start off this year with something simple and so easy to do, Origami Heart Bookmarks. They are oh, so easy to make and make a gorgeous little gift for you loved one this coming Valentine's Day.


I've seen them everywhere on Pinterest and wanted to give them a go. I followed this tutorial to make them. They take no time at all to fold and are super cute too.


The Sending Love Glassine Sheets are a perfect thickness for Origami and the folds are effortless to make. If you are using a DSP, like the Sending Love DSP stack, you will need to use a bone folder with each fold to get them crisp.


Once folded they just slip on to the corner of your page and mark your spot perfectly. Because they are folded flat they fit inside a card for your loved one this Valentines Day. Perfect for the book worm in your life.


This Real Red one is gorgeous. So bright!


You can leave them plain or dress them up with a few accents and embellishments. I've used some of the Love Notes Framelits Dies to embellish mine and added a small wooden heart from the Sending Love Embellishments

 Thanks so much for stopping by!

Shop for Stampin' Up! 24/7
 Recreate these bookmarks at home using the following Stampin' Up! products. Click on the images below to see product information and to shop from my online store.