Friday, December 21, 2018

Just Add Ink #439 | Just a Gift Box

Hello there stamping friends! Happy Friday! The second last Friday of the year and the last Just Add Ink Challenge for 2018! Where did that year go? It's crazy to think how fast the year went. It was almost blink and you'll miss it.

For the last challenge of the year we are asking you to Just Add Ink #439| Just Add a Gift Box as suggested by fellow JAI team member Patrice.

https://just-add-ink.blogspot.com/2018/12/just-add-ink-439gift-box.html


This challenge this week is perfect for those last minute gifts that you just need a quick gift box and decorating some of Stampin' Up!s Packaging Basics, like the Mini Pizza Boxes, make it even quicker when you're in a hurry to wrap those last minute gifts.

I've teamed up the Mini Pizza Box with some of the products from the Festive Farmhouse Suite, from the soon to be retiring 2018 Stampin' Up! Holiday Catalogue, and the Merry Christmas to All bundle.


Some layering of some DSP, die cut and embossed shapes, accents of ribbon, trim and embellishment and you've got yourself a gorgeous little gift box. Perfect for things like jewellery 😉 or even to dress up a gift card, or because these pizza boxes are food safe, they are perfect to for those baked Christmas goodies that you want to make look extra special in a gorgeously decorated box. You are only limited by your imagination!  

Make sure that you check out all the fabulous inspiration for this weeks Just Add a Gift Box Challenge and then come and join in the fun. And because we know that things can be a little crazy this time of year the challenge will run for two weeks. Perfect if you need some crafting time out from all the busyness of the festive season. Can't wait to see your creations!

Thanks so much for stopping by!
Happy Stamping!

Live in Australia?
 Shop for Stampin' Up! with me 24/7

 Recreate this card at home using the following Stampin' Up! products. Click on the images below to see the product information and to shop from my online store.

Friday, December 7, 2018

Just Add Ink #437 | Just Add 'I'

Hello stampers and crafters! Well aren't the weeks rolling around. Too fast I say! We are nearing the end of the Just Add Ink Challenges for the year with this one being the third last one for the year. This challenge that we have for your is one of our favourites by Just Adding a letter, with this one being Just Add 'I'. It could be icing, icicles, ice cream, stamp sets beginning with I, anything that incorporates the 'I'.

https://just-add-ink.blogspot.com/2018/12/just-add-ink-437just-add-i.html

I've stepped away from the Christmas creations for this one making a card with the Itty Bitty Birthday's stamp set, available to purchase Jan 3rd, and also adding some insects (butterflies) and some iridescent glitter and sequins for all my 'I' elements.


I stamped the 'Happy Birthday' repeatedly on some Shimmery White cardstock with Blushing Bride ink, sometimes stamping the second and third time before re-inking. Once I had enough of the 'Happy Birthday's' stamped out I then die cut the cardstock with the Stitched Shapes Framelits Dies.


Layered under the die cut circles is my new favourite DSP Botanical Butterfly that you can earn for FREE come Jan 3rd 2019 in the Stampin' Up! Sale-a-bration promotion. Just spend $90 on any products (not including postage and handling) and this amazing DSP is all yours. The coloured butterfly patterns are just amazing but what I love the most is the black and white patterns on the other side. I'm such a sucker for a black and white pattern.


It's hard to see in the photos but the butterflies card covered in the Dazzling Diamonds Iridescent Glitter. I just covered them with the Fine-Tip Glue and the sprinkled over the glitter. The sparkle and shine on the glitter is just gorgeous! So much better in real life.

There are plenty of other gorgeous designs by the team this week with their Just Add 'I', so do pop on over to the Just Add Ink blog and check them out!

Thanks so much for stopping by!
Happy Stamping!
Live in Australia?
 Shop for Stampin' Up! with me 24/7


 Recreate this card at home using the following Stampin' Up! products. Click on the images below to see the product information and to shop from my online store.

Put these products on your wish list. Available from 3rd Jan 2019
 

Available Now

Wednesday, December 5, 2018

Global Design Project #GDP167 | Theme Challenge

Hello friends! I hope you are having a fabulous day! The sun is out here in Melbourne and I've spent some time in the crafting corner to try and get through my list of things I have to create before Christmas. I may or may not have gotten a little distracted with this weeks challenge over at the Global Design Project #GDP167 and thought I would join in and play along.


This weeks challenge is the theme : 'Tis the Season. Anything for the Christmas season. I've made a party favour that I plan to put on the table on Christmas Day, when my in-laws and my husbands family come around for lunch. They will also act as a place setting as well. It's nice to put in the little extra touches to make the table look extra special on Christmas Day. I plan to fill the pillow boxes with a little treat that each guest can take home as well. Lucky there will only be 16 of us in total on Christmas Day for lunch. I wont have to make too many. Phew!


I've started with the Kraft Pillow Boxes. These gorgeous pillow boxes come pre-printed and are the perfect size, being 12.7cm x 7 cm, for for gifts and goodies. How cute do they look as place settings?


All the DSP used comes from the Dashing Along DSP pack. I love the old style newsprint mixed with the other patterns. The DSP circle was punched out with the 2-1/4" Circle Punch and then the Gold Foil Circle was die cut with the Layering Circle Dies. For some added texture I embossed the Gold Foil Circle with the Corrugated Dynamic Embossing Folder. Jut run the gold foil through the Big Shot with the Corrugated folder just once otherwise you will crack the circle and it will tear apart.


To finish off the pillow box I die cut the jumping deer from the Detailed Deer Thinlits Dies. How festive does the deer look die cut with the Gold Glimmer? So sparkly and pretty! I'm such a sucker for the gorgeous sparklyness (if that is a word. HA!) of the Gold Glimmer.  Pretty! 5 made, 11 to go!

If you want some amazing 'Tis the Season inspiration check out all the fabulousness the Global Design Project team have for us. They are one amazing team and have outdone it again this week!

Thanks so much for stopping by! 
Happy Stamping!

Live in Australia?
 Shop for Stampin' Up! with me 24/7

 Recreate this project at home using the following Stampin' Up! products. Click on the images below to see the product information and to shop from my online store.

Friday, November 30, 2018

Fancy Friday Blog Hop | My Christmas Card

Hello there stampers! It's the last Friday of the month so that can mean only one thing, it's Fancy Friday time. Yay!

This challenge is to make some Christmas cards! To show what we are sending to our family and friends. It gives us a good excuse to make some Christmas cards and actually mail them out this year...on time! Fingers crossed I can get them out on time! I love making cards but am terrible at sending them. What date do you send Christmas cards out by? Are you an early sender or are you late to send each year?
If you've not see us before, the Fancy Friday team are past and present Stampin' Up! Artisan Design Team Members. still love creating and blogging and sharing what we love, so we have a blog hop once a month with everything fun and fancy. We've added some new members to the Fancy Friday team, Elizabeth, Teneale and Charlett, so make them feel welcome as you hop along through the blogs.

I must admit that part of these cards were for my swaps for the recent Stampin' Up! On Stage that was held at the start of November. Even though I started my swaps quite early, I ran out of time to finish them them all. I had all these left over coloured images that I spent so much time and effort in. I wasn't going to put them into the UFO (unfinished object) pile and decided put them together for some of my Christmas cards to post out.


When all the colouring was finished, I layered the images on oval embossed die cut shapes and then layered under the ovals was ribbon, trim, DSP and paper.


To give more of a snow feel, once the Pool Party oval was die cut and then embossed, I swiped Whisper White Craft Ink over the over to give that softer look.


How fun are those Santa's Workshop Enamel shapes? Perfect to add a little something extra to any creation.


To see all the blends used to colour the Sign's of Santa images check out the product used list. Even though I only coloured three of the images, they used lots of colours! 

Now on to the fabulous Susan Wong in New Zealand for her Christmas Cards.


https://stampingsusan.blogspot.com/2018/11/nov-ff.html

Thanks so much for stopping by!
Happy Stamping!

Live in Australia?
 Shop for Stampin' Up! with me 24/7


 Recreate this card at home using the following Stampin' Up! products. Click on the images below to see the product information and to shop from my online store.

Just Add Ink #436 | Sketch Challenge

Hello there stampers. Yay it's Friday so that means it's time for a new challenge over at Just Add Ink. We've got a fun sketch challenge suggested by team member  Narelle .

https://just-add-ink.blogspot.com/2018/11/just-add-ink-436sketch.html
I've taken a break from the Christmas creations to play with some new goodies that customers can purchase or even earn for free from 3rd Jan 2019. Because the sketch is pretty straight forward these products really don't need much to go with them, especially the DSP, as they are a feature unto themselves.
 

The butterfly stamp, sentiment, adhesive-backed sequins, Whisper White 5/8" flax ribbon and the Daffodil Delight Gingham Gala DSP will be able to purchase from the new Stampin' Up! 2019 Occasions Catalogue from Jan 3rd 2019. They are part of the gorgeous Gingham Gala Suite. Gingham is so on trend right now. The gorgeous Gingham Gala DSP is classic gingham checks in light and fresh colours. There is a large check pattern on one side and a small check pattern, like what I've used on my card, on the other side. I comes in the fabulous colours Balmy Blue, Daffodil Delight, Grapefruit Grove, Highland Heather and Lemon Lime Twist. Super fun!


The black and white DSP and the yellow Butterfly pattern DSP come from a DSP pack, Botanical Butterfly DSP, that you can earn for FREE in the annual Sale-a-bration promotion. The first fabulous thing about this DSP is that there is a black and white pattern on one side of the DSP and a colour pattern on the other. I just LOVE anything Black and White and the black and white patterns in this DSP are just STUNNING! If I could have a DSP of just all thick black and white stripe, I would be one happy woman! The second fabulous thing about this DSP is that it co-ordinates so beautifully with the products from the Gingham Gala Suite. Even though all the DSP patterns are quite busy, I love the mix of the stunning black and white pattern with the little pops of colour.


The butterfly I embossed with Black Stampin' Emboss Powder and then using and Aqua Painter coloured the butterfly in with Balmy Blue and Daffodil Delight. To go with this stamp set there is a butterfly punch!! Oh yeah! I do love having the beautiful dies that co-ordinate with the stamp sets but there is something just so quick and easy about stamping and punching! Especially if you're making lots of cards!


Have a look at the rest of the JAI Design team creations using the sketch and all details about this challenge are on the Just Add Ink Blog. Check it out and play along! Can't wait to see your creations and your take on the sketch!

Thanks so much for stopping by!
Happy stamping!
Live in Australia?
 Shop for Stampin' Up! with me 24/7

 Recreate this card at home using the following Stampin' Up! products. Click on the images below to see the product information and to shop from my online store.

Put these products on your wish list. Available from 3rd Jan 2019

Avaliable Now

Sunday, November 25, 2018

Stamping Sunday Blog Hop | Wrap It Up

Hello there stamping friends! Welcome to my little part of the Internet and blog land. I here today with the Stamping Sunday Blog Hop team hosted by the gorgeous Sara Levin. Sara asked me to join the team and I am super excited to be the newest member of the team. I'm so looking forward sharing my creations with you each month and also getting to know the gals on the team a lot more.


Now on to the hop. This months theme is to create some sort of 3D wrapping for a gift or treat that highlights products from the Holiday Catalogue. I've made the Dashing Along Designer Series Paper as the focus to my creation this hope and then accented it with the Merry Christmas to All Bundle from the Holiday Catalogue and then the Stitched Shapes Framelits and Layering Circles Framelits from the Annual Catalogue.


The actual bag starts by cutting the DSP to 8-1/2" x 11". It's just a few score lines and folds and you've got yourself a quick bag. Very handy if you needed to make lots for this Christmas season. 


The DSP is scored and folded to create a clever little gift box, perfectly sized for packaging some small treats. The tutorial can be found over HERE. For those that wanted to make this out of an A4 sheet of cardstock, like what we have here in Australia, trim and A4 sheet to 8 1/4 x 11 and then following the linked tutorial score the lines at 2 inch and 6 1/4 inch in step 2 on the short side.


To make the actual tag I started with the Rosette. I cut 2 1" x 12" strips of DSP and then using the Stampin' Up! Simply Scored Scoring Board I scored the strips every 1/4" all the way along. Concertina fold the strips, join them together at each end to form a circle, push the folded circle all the way in together and then using a smaller punched out circle, adhere the rosette to the punched out circle with hot glue. You have to use hot glue or the whole thing will come apart. 


The rosette has been layered with a circle die cut from the Stitched Shapes Framelits and the Layering Circles framelits. All the patterns in the tag come from the Dashing Along DSP. Super fun and super festive! The tags are all finished off the the Merry Christmas to all bundle and layered on and piece of Crumb Cake cardstock embossed with the Corrugated Dynamic Textured Impressions Embossing Folder.


The folded gift bag is quite a decent size with the base measuring 11cm x 5cm. I managed to fit about 8 Lindor Lindt balls in each bag so that's a really good gift bag size. While the tags are a little bit more work if you were to be making them you can make them and embellish them as little or as much as you want.

Make sure you stop by the rest of the team for their Holiday/Christmas gift packaging creations!


Thanks so much for stopping by!
Happy Stamping!
Live in Australia?
 Shop for Stampin' Up! with me 24/7

 Recreate these gift bags at home using the following Stampin' Up! products. Click on the images below to see the product information and to shop from my online store.

Friday, November 23, 2018

Just Add Ink #435 | Just Add Inspiration

Hello there stamping friends! With another Friday rolling around so quickly, we have a new challenge for you over at Just Add Ink. Its an inspiration picture challenge. While it looks dreary, gloomy and cold there really is a lot to inspire you from this picture.

https://just-add-ink.blogspot.com/2018/11/just-add-ink-435inspiration.html

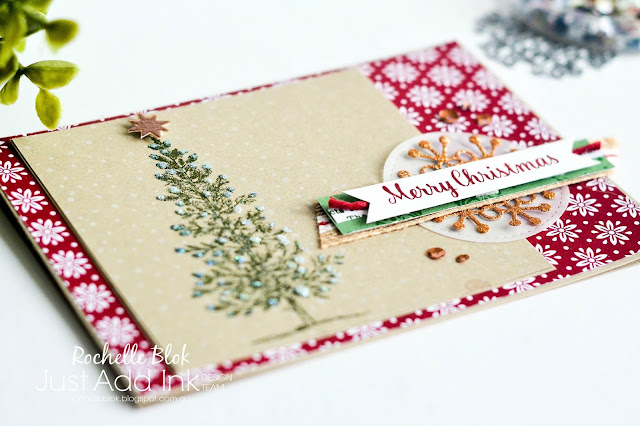
I've pulled out an oldie but but a goodie stamp set, the Stampin' Up! Lovely as a Tree stamp set. I've had this set for a long time and I can probably count on one hand the amount of times I've used it. Ok, I can count on two fingers the amount of times I've used it. Oops. It is perfect, though, for today's Just Add Ink challenge.


I stamped the tree on Crumb Cake cardstock using Mossy Meadow and then using Fine-Tip Glue and Dazzling Diamonds Glitter added dots of bling to the tree to look like either snow or lights on the tree. The photo here doesn't do it justice as to how pretty and sparkly the Dazzling Diamonds is. Word of warning though, no matter how neat you try to be with the Dazzling Diamonds, it gets everywhere! 


The 'snowflake' background comes from the promotional Snow is Glistening Stamp set. Just stamp the image on repeat and you've got yourself a snow background. Make sure that you get this set NOW as it is only available till Nov 30th. Get it before it's too late. When it's gone, it's GONE! Just ask me how you can get it.


I teamed up some of the patterns from the Dashing Along DSP to add some festive layers and layered some ribbon, trim and DSP with the 'Merry Christmas' for some added texture.

Make sure you check out all the amazing creations from the JAI team at the Just Add Ink Blog and see what inspired them from this weeks picture! While you are there check out all the details on this weeks challenge and then come and join in the fun!

Thanks so much for stopping by!
Happy Stamping!
Live in Australia?
 Shop for Stampin' Up! with me 24/7

Recreate this card at home using the following Stampin' Up! products. Click on the images below to see the product information and to shop from my online store.

Friday, November 16, 2018

2019 Stampin' Up! Artisan Design Team

If you follow me on Instagram and Facebook you may have already seen my super exciting news! I've been waiting for what feels like forever for this to be announced and last weekend at the Stampin' Up!® On Stage Local demonstrator only event that was held in Melbourne, my now not so little secret was let out of the bag.

I have the great honour of being selected to be on the 2019 Stampin' Up!® Artisan Design Team and I am beyond thrilled to be chosen again! To have been on it once was unbelievable but now to have been chosen a second time is an opportunity of a life time. I'm still pinching myself to have been asked again! I'm feeling so blessed, so grateful and so thankful to be part of this amazing team with an amazing talented bunch of 16 Stampin' Up!® demonstrators from all over the world. I can’t wait to get creating and just sharing what I love. 
This is the beautiful, personalised memento that all the Artisan Design Team Members were awarded which included a Welcome letter, a beautiful engraved bracelet from Tiffany's and a personalised Artisan Design Team stamp.


 What does it mean to be on the Artisan Design Team? As an Artisan, we have been selected by the Stampin' Up!® company themselves and then Stampin' Up!® will provide myself, and my 15 fellow teammates, with current goodies so that we might create beautiful things to inspire you! We have a once a month blog hop, that will begin in January 2019. We also will be creating blog posts for the Stampin' Up!® Corporate Blog and also sharing some tips and tricks using Stampin' Up!® products for the Stampin' Up!® Instagram account.

This year's team includes 16 demonstrators from all over the world.

I really do hope that you'll follow along with the monthly hops throughout 2019 and be inspired by what we share!

A BIG thank you to all who sent me messages of congratulations! I am very overwhelmed by every one's love and support and I can't wait to get creating and share this Artisan year with you all!

Thanks so much for stopping by!
Happy Stamping!

Just Add Ink #434 | Just Add A Big Bold Sentiment

Hey there stamping friends! Here's to Friday and it nearly being the weekend. The gals and I over at Just Add Ink have a new challenge for you! Our challenge for you is to use a big bold sentiment as the main focal point to your creation.

https://just-add-ink.blogspot.com/2018/11/just-add-ink-434big-bold-sentiment.html

I've gone with a very non-traditional but on trend Christmas colour combination for a fun Christmas card using the Snow is Glistening Stamp set from the Snowflake Showcase Promotion that is on till 30th Nov.


The colour combo from this card came from the suite of decorations at my local Target Australia, mainly a gift bag. I saw it and said 'I can make that using Stampin' Up! products'! I took a photo of it and then used the snowflakes from the Snow is Glistening Stamp set to recreate it. Its amazing what gives us inspiration when out and about!


I just randomly stamped Mint Macaron and Highland Heather (stamped off once) around the edge of the card front and then the smallest snowflake is embossed with Silver Stampin' Emboss powder. To make the sentiment the main focus of the card I used the 'Merry' from the Merry Christmas Thinlits Dies, die cut out of Silver Glimmer Paper and then stamped the 'Christmas' in Mint Macaron Ink on Mint Macaron cardstock for a tone on tone look.

The Silver with the Mint Macaron and the Highland Heather is a beautiful colour combo and I'm sure that I'll use it again.I finished off the card with Silver Sequins, Whisper White Polka Dot Tulle Ribbon, Silver Metallic Thread and a gorgeous Snowflake Trinket. Super fun and super gorgeous!

To see all the Big, Bold Sentiment creations make sure you check out the amazing work from the Just Add Ink Design Team and while you are there check out the details for this weeks challenge and then come and join in this weeks fun. Can't wait to see what you create.

Thanks so much for stopping by!
Happy Stamping!

Live in Australia?
 Shop for Stampin' Up! with me 24/7

 Recreate this card at home using the following Stampin' Up! products. Click on the images below to see the product information and to shop from my online store.