Wednesday, December 6, 2023

Stampin' Fancy Friday | Patterened Paper Challenge

Hello there stamping friends! Welcome, welcome! It's so good to have you here. I have a project for you for the Stampin' Fancy Friday Design Team. If you've not seen us before we are a group of past and continuing Stampin’ Up! Artisan Design Team Members bringing our followers a fancy monthly challenge to inspire them to get creative! This month our theme is Patterned Paper AKA Designer Series Paper. 

 The team were asked to create a fancy project using any patterned paper you have! Current or retired. Your fav or maybe a pattern you find challenging to work with. Heck, even mix them!

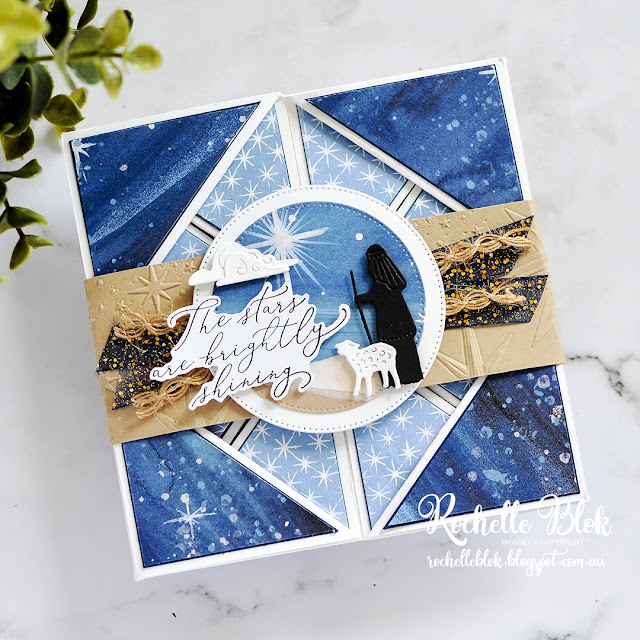
Well I'm still on Christmas crafting so I've created a 'fancy' card usng the beautiful Stampin' Up! O Holy Night DSP.

 
I've actually created a card with a fancy fold for you today. I've used the Napkin Fold. Here it's all folded up and closed with the belly band. It really is quite an easy card to score and fold but once all folded together, decorated and embellished, looks quite intricate. I've made one of these before many years ago. Check it out HERE. You'll find how to make it there too.

A fancy fold card is the perfect way to showcase the amazing Stampin' Up! Designer Series Paper. A card that gives you lots of layers and panels is perfect for using DSP. 


 The Basic White card base is a 12" x 12" sheet of cardstock trimmed down to 11" x 11". Once scored and folded I layered each section with cardstock and the O Holy Night DSP. 

 
 The centre panel and the belly band have also been accented with the O Holy Night DSP and the Night Divine Stamp and Dies Bundle. How stunning is that Nativity Scene?


 The belly band I've made with Crumb Cake Cardstock and then embossed it with the Stars at Night Hybrid Embossing Folder. I've embellished it with the Night of Navy & Gold Glittered Ribbon, some Natural Wavy Trim, and then a layering of die cuts, O Holy Night DSP and the sentiment from the Night Divine Stamp Set.


I added a panel on the back to write a message with some O Holy Night DSP and ribbon & trim.

This is one of those special cards that needs a hand made envelope (which I still have to do) and you give it to a special person. This is not a 'by mail' Christmas card.

Check out the rest of the Patterned Paper creations that the Stampin' Fancy Friday Design Team has made on the Stampin' Fancy Friday Instagram Account. This is where all their creations will be shared throughout the month, so make sure that you are following them to get all of the amazing ideas! 

 Want to join the fancy fun? Grab your stamping supplies, create a project based on the Patterned Paper challenge and then post it on Instagram or Facebook. Tag us or use #stampinfancyfriday when you share so we can 😍 at your project and share in our stories. Can't wait to see how this challenge inspires you!

Thanks so much for stopping by!
Happy Stamping! 

 
Live in Australia?
Shop for Stampin' Up! with Me 24/7 HERE
 
 Recreate this project at home using the following current Stampin' Up! products.  Click on the images below to see the product information and to shop from my online store

Friday, December 1, 2023

Just Add Ink #681| Inspiration Picture Challenge

 Hello there stamping friends! Happy Friday! Welcome and thanks for joining me on my blog today. Wow, the 1st of Dec already. Where has this year gone! Today we over at Just Add Ink have a fabulous inspiration picture challenge - Just Add Ink #681| Inspiration Picture Challenge.

It's a bit of a fun one with all those bright colours for a fun Christmas look. The colours were what caught my eye and that is the focus of my card for today for the Just Add Ink Design Team.

I've used the Stampin' Up! Gift of Giving Stamp Set, which I also used a few weeks ago HERE. Last time I used this stamp I water coloured the image but this time I used some Copic Alcohol Markers. For such a small image it took me forever to colour it because it took me so long to figure out what colours I wanted to use and what colours I felt went together. I've never seen so many swatches of colour combinations when trying to colour an image. Do you swatch your colours first when colouring or just go straight in?

I've actually used a mix of retired, current and yet to be released Stapin' Up! products on this card. Can you pick which one is which? 

With the colours used in the image I felt that Coastal Cabana worked best as the base layers but I could have used Pool Party too. I then embossed the Coastal Cabana layer with the Snowflake Sky 3D embossing folder. Over the embossing I brushed over some Whisper White Craft ink using a Blending Brush. It's hard to see in the photo but it just gives the card a lovely soft look.

I've placed my coloured image on a layer of Vellum Basics 12" x 12" Specialty Designer Series Paper and some Basic White die cut with the Perennial Postage Dies (available January 4th 2024). I've finished off the card with some Gilded Gems, Gold Thread and the "Merry Christmas" from the Cottage Wreaths Stamp Set. How pretty are the gold embellishments with the colours in the cardstock and the Santa image. Love it!

Go and check out the design teams take on this week's Inspiration Picture at the Just Add Ink Blog and then come and join in this week's sketch fun! I can't wait to see what you create.

Thanks so much for stopping by!
Happy Stamping! 

Live in Australia?
Shop for Stampin' Up! with Me 24/7 HERE
 
 Recreate this project at home using the following Stampin' Up! products. Click on the images below to see the product information and to shop from my online store

Monday, November 27, 2023

2024 Stampin' Up!® Jan - April Mini Catalogue | Product Sneak Peek | Perennial Lavender Suite

Hello stamping friends! I'm sharing with you a project I've recently created using the Perennial Lavender Suite products which are coming out in the new 2024 Stampin' Up! Jan - April Mini Catalogue. This is a mega suite in the catalouge with 2 stamp and die bundles, beautiful DSP, Purple Shimmer Gems and Paper Butterfly accents. I can't wait for you to see the catalogue so you can see these products too.


 I needed a gift bag over the weekend and we didn't have the right size so with all the products that I've got in my stash, AKA collection, I'm like "why don't I quickly make one". I just searched a basic gift bag tutorial on Pinterest, and there are lots out there and just used one of those. And because the sheet of DSP that I used had a beautiful design the bag really didn't need to be intricate at all. How gorgeous is the Perennial Lavender DSP by the way? I love that throughout the DSP pack there is minimal white and it is nearly all colour! It's just so stunning. The bag handles are using retired 5/8" Burlap Ribbon still had in my stash.

Every gift bag has to have a matching gift tag right? I used the Perennial Postage Dies to cut the tag and then used the Softly Sophisticated 3D Embossing folder to emboss the tag. This embossing folder is a Sale-a-bration item combined with a stamp set meaning that here in Australia if you spend $180 on product (not including postage and handling) from 4th Jan - 29 Feb 2024 you can get the Softly Sophisticated Stamp Set and Embossing Folder for free.

To finish off the tag I layered some Vellum Basics Specialty DSP, some more of the Perennial Lavender DSP, a piece of Fresh Freesia die cut with the Stylish Shapes Dies, one of the Paper Butterfly Accents from the suite, and some of the gorgeous Purple Fine Shimmer Gems. The Happy Birthday comes from the Retired Cottage Rose stamp set. I just liked the smaller size of it and it layered perfectly with the elements on my tag.

I do hope that you like my little sneaky peek with these new and gorgeous products and I hope that I've given you a little inspiration in using them.

Thanks so much for stopping by!
Happy Stamping! 

Live in Australia?
Shop for Stampin' Up! with Me 24/7 HERE
 
Recreate this project at home using the following Stampin' Up! products. Click on the images below to see the product information and to shop from my online store.
 

Sunday, November 26, 2023

Stampin' Fancy Friday | Christmas Challenge

Hello stamping friends. It's so great to have you here today. Today I have a project for the Stampin' Fancy Friday Team. If you've not see us before we are a group of past and continuing Stampin’ Up! Artisans bringing our followers a fancy monthly challenge to inspire them to get creative! 

This month's challenge is Christmas. Who doesn't love some Christmas crafting inspiration?

  The brief for this challenge - create a fancy project that is SUPER FANCY CHRISTMAS! Try to make it artfully avid and over the top!

 My card today uses products from the Stampin ' Up! Joy of Christmas Suite and as well incorporating the Snowflake Sky 3D Embossing Folder.


 Lately my cards have been mostly white with a little pop of colour but this card is the other way around being mostly colour and a little pop of white. I've stamp the leaf image, to create the wreath, on Crumb Cake cardstock and then coloured in the images with Stampin' Blends Alcohol Markers. Did you know you could colour with the Stampin' Blends on Crumb Cake? There's my tip for the day. Try not to colour too much as the ink can 'bleed' if it is saturated too much but its perfect for the smaller images.

 The card base it Cherry Cobbler (the perfect traditional Christmas colour) and then I used the Gingham paper in the same colour as the base from the Joy of Christmas DSP. Layered over that is the Pecan Pie music sheet from the same DSP. To give the the music sheet DSP a bit more depth I sponged the edges using a Blending Brush also in the Pecan Pie Colour. 

I love the colours in the Joy of Christmas Designer Series Paper. The traditional red, green, and gold teamed up with the browns and greys make for a gorgeous colour combo and this gives the DSP an almost vintage/shabby chic vibe.


 There is a piece from one of the Holly floral sheets from the Joy of Christmas DSP under the wreath and the ribbon but from the photos it's a little hard to see. I've added some Shaded Spruce die cut greenery from the Joy of Noel Dies to add that extra layer. and then over the wreath is the embossed Noel and the Merry Christmas Sentiment.

I've finished the card off with the Black and Very Vanilla Large Check Ribbon, some gems from the Loose Holly Gems & Sequins, and a little strand of the retired Gold Thread.

I hope that I've given you some 'Fancy' Christmas inspiration today. Make sure you visit the Stampin' Fancy Friday Instagram and Facebook pages for lots of ideas for this Christmas challenge and we hope you'll join in the challenge with us. There are new projects posted nearly every day of the month so be sure to check back to either social media sites for more 'fancy' inspiration.

Thanks so much for stopping by!
Happy Stamping!
 

Live in Australia?
Shop for Stampin' Up! with Me 24/7 HERE
 
 Recreate this project at home using the following Stampin' Up! products.  Click on the images below to see the product information and to shop from my online store

Friday, November 17, 2023

Just Add Ink #679 | Colour Challenge

It's Friday! It's time for a new Just Add Ink Challenge - Just Add Ink #679 | Colour Challenge. This weeks colour combo has been suggested by fellow JAI Design Team Member - Di. This week we are using a pretty colour combo - Petal Pink, Calypso Coral, and Pool Party. Just gorgeous!

 I've used this weeks challenge colours to show you a sneaky peek of some products that will be available in the 2024 Jan -  Apr Mini Catalogue. 

I attended the Stampin' Up! On Stage @ Home online conference over the weekend and one of the privileges of attending a Stampin' Up! On Stage Event, is that you get to pre-order select products from the new catalogue before the official pre-order. And I was super lucky that they arrived so quickly that I could have a play and create something for you for this weeks challenge.

This Hot Air Balloon Stamp and Die Bundle come from the Lighter Than Air Suite. The suite comes with the Hot Air Balloon Bundle, a Bakers Twine Three Colour Pack, some Rainbow Adhesive-Backed Dots and the Lighter Than Air 6" x 6" DSP.  The colors of the DSP and the embellisments are gorgeous and give a soft rainbow look and feel. 

For my card today I've gone with a Basic White base and then I've made a cloud background using a Mini Cloud Edges Stencil fron My Favourite Things with the Pool Party colour and the Stampin' Up! Blending Brushes. This is the layered onto some Pool Party cardstock.

The large balloon I've stamped in Petal Pink and then accented with the scalloped details die to give my hot air balloon that extra pretty look. The smaller balloons have been stamped in Calypso Coral. This balloon uses two stamps to make the one image. So one part of the stamp was stamped in full strength Calypso Coral and then the other part was stamped with the ink stamped off once to get the variation in colour.

I've then finished off the card very simply with some of the new Rainbow Adhesive-backed Dots, Linen Thread, and a gold embossed sentiment.

I do hope that you like my little sneaky peek with these new and gorgeous products and that I've given you a little inspiration in using them.

Go and check out the design teams take on this week's colours at the Just Add Ink Blog for some inspiration and then come and join in this week's sketch fun! I can't wait to see what you create.

Thanks so much for stopping by!
Happy Stamping!

Live in Australia?
Shop for Stampin' Up! with Me 24/7 HERE
 
Recreate this project at home using the following Stampin' Up! products. Click on the images below to see the product information and to shop from my online store.
 

Friday, November 3, 2023

Just Add Ink #677 | Sketch Challenge

Hello stamping friends. Happy Friday! I hope you are having a wonderful day. I'm here today with the Just Add Ink Design Team for the new Just Add Ink Challenge - Just Add Ink #677 | Sketch Challenge. This week we have a fabulous sketch for you designed by fellow JAI team member - Jan.

 It's a basic sketch design but has a lot of scope for you to make this sketch your own and of course I have done that today. Just a little bit.


My card today is using products from the Stampin' Up! Joy of Christmas Suite. I've used this suite quite a bit now (more creations to come throughout this month 😉) and I love that each one has turned out so different from the other. If you want to see one of my previous cards using this suite, check it out HERE

I've kept the square deisgn of the sketch with the Noel square centre panel and I've added a foliage spray below that panel to replace the second square element of the sketch. I felt that the card the looked very unbalanced so I then added the second spray of leaves and trip to the top corner. It's all about the balance! I added the embossed and coloured leaves to the bottom die cuts to help add to the actual design of the sketch.

I used the retired Shimmery White cardstock for the base layers so that gives the card a more of a creamy white look rather than a brilliant white. I also used some Gilded Gems and Gold thread from my retired stash.

I've kept the colours of my card farily traditional to the red and green Christmas colours with the addition of the black in the ribbon and the embossed sentiment.

Go and check out the design teams take on the sketch at the Just Add Ink Blog for some inspiration and then come and join in this week's sketch fun! I can't wait to see what you create.

Thanks so much for stopping by!
Happy Stamping! 

Live in Australia?
Shop for Stampin' Up! with Me 24/7 HERE
 
  Recreate this project at home using the following Stampin' Up! products. Click on the images below to see the product information and to shop from my online store
 

Friday, October 20, 2023

Just Add Ink #675 | Just Add ... Spotlight Technique Challenge

 Happy Friday! I'm sharing with you today my latest card for the design team for the new Just Add Ink Challenge - Just Add Ink #675 | Just Add ... Spotlight Technique Challenge.


My take on the Spotlight technique for my cards today was Spotlight Stamping. Its a technique which as the name suggest adds spotlight to certain part of stamp. In this technique what you do is highlight a certain portion of stamp with your favorite coloring medium. So I've stamped the leaf image on the cardstock and embossed it with White Embossing Powder and then I've added some ink blending on the cardstock using the Stampin' Up! colours - Bubble Bath, Fresh Fresia and Highland Heather.

How stunning are these colours blended together? I'm loving it that's for sure! I've used products from the Masterfully Made Suite from the Stampin' Up! 2023 -2024 Annual Catalogue. In the catalogue the project samples are made bright and bold colours but with the colour combination that I've used today I love how gorgeous these suite products with the soft and pretty look.

In this card the embossing creates an emboss resist look and then the laying the image from the die-cut with the image on the cardstock base layer accents the Spotlight Stamping technique.


 In this card, lining up the bottom image with the top image, and having them in different colours really accents the Spotlight Stamping Technique. 

Isn't it such a bonus when you can get two cards from the one technique. I really enjoyed this technique and I'm looking forward to trying it with different stamps and also different ink blending colour combinations.

The Just Add Ink Design Team have lots of amazing creations for you and to show you their take on the Spotlight Technique. I can't wait to see you join in and to see your take on this fun technique.

Thanks so much for stopping by!
Happy Stamping!
 
Live in Australia?
Shop for Stampin' Up! with Me 24/7 HERE
 
 Recreate this project at home using the following Stampin' Up! products. Click on the images below to see the product information and to shop from my online store. 

Friday, October 6, 2023

Just Add Ink #673 | Just Choose Two Challenge

 I'm here today to bring you my card for the NEW challenge we have over at Just Add Ink Challenges - Just Add Ink #673 - Just Choose Two Challenge.

Today for our Just Choose Two challenge (to choose two items to feature on your project) we are choosing from Doors, Windows and Flowers. Flowers was a given for me as I love creating with just about anything floral but my other item to feature was a bit harder to choose. I went with Window but not using an acual image of a window but making a window in my card by making a Split Window Card.


I've used a Calypso Coral card base and then for the flower element I've used the Stampin' Up! Garden Wallk DSP. This is stunning DSP and there is something in it for everyone. The flowers around the side of the window have also been fussy cut from the Garden Walk DSP. 

I've finished off the card with the Black & Very Vanilla Large Check Ribbon (which I cut in half), some Linen Thread and some Blooming Pearls.

There are lots of AMAZING creations from the rest of the Just Add Ink Design Team on the JAI Blog. Go and check out to see what 'two' elements they all used this week and then while you are there you can see how you can enter your project. Can't wait to see what 'two' you used.

Thanks so much for stopping by!
Happy Stamping! 

Live in Australia?
Shop for Stampin' Up! with Me 24/7 HERE
 
Recreate this project at home using the following Stampin' Up! products.  Click on the images below to see the product information and to shop from my online store

Friday, September 22, 2023

Just Add Ink #671 | Inspiration Picture Challenge

Hello there stamping friends! Happy Friday! Welcome and thanks for joining me on my blog today. Today we over at Just Add Ink have a fabulous inspiration picture challenge - Just Add Ink #671 | Inspiration Picture Challenge.

With all the green and gold colourings in the inspiration picture I used those colours as my inspiration today to make a Christmas card.


 I've used products from the Stampin' Up! Joy of Christmas Suite from the new 2023 September - December Mini Catalogue. This suite is what we call a Mega Suite that incorporates two stamp and die bundles, two packs of Designer Series Paper, Ribbon and Embellishments. Lots of products to play and get creative with.


I've started the card today with a Basic White layerd base and then added a layer of Shaded Spruce onto the Basic White. I've stamped one of the image from the Joy of Noel stamp set on the Shaded Spruce layer with Shaded Spruce Ink. Over that I've then used the Shaded Spruce Stampin' Wrtie Marker to add some splatters.

The large greenery die cut piece, from the Christmas Classics Dies, I've die cut out of Vellum and then layered over some Joy of Christmas DSP, Black and Very Vanilla Large Check Ribbon, and some Linen Thread.

The card is then finished off with the Square Label Die, the Noel (stamped, heat embossed, and die cut using the Joy of Noel Bunle), the Merry Christmas from the Christmas Classics Stamp set and some Loose Holly Gems and Sequins.

I love the layering of this card and all the different elements that put it all together. Makes for a very festive looking card.

The Just Add Ink Design Team have lots of amazing creations for you and to show you what inspired them. We hope that you'll join in this weeks challenge. I can't wait to see you join in and to see what has inspired you this week.

Thanks so much for stopping by!
Happy Stamping! 
Live in Australia?
Shop for Stampin' Up! with Me 24/7 HERE
 
 Recreate this project at home using the following Stampin' Up! products.  Click on the images below to see the product information and to shop from my online store.

Friday, August 25, 2023

Just Add Ink #667 | Sketch Challenge

 Hello stamping friends. Happy Friday! I hope you are having a wonderful day. I'm here today with the Just Add Ink Design Team for the new Just Add Ink Challenge - Just Add Ink #667 | Sketch Challenge. This week we have a fabulous sketch for you designed by fellow JAI team member - Di.

I recently recieved my pre-order Stampin' Up! goodies from the 2023 Sept - Dec Mini Catalogue and I was super keen to have a play. So my card today is using some of those new products and is helping me get a head start on making my Christmas cards.

The DSP is the new Garden Walk DSP that is perfect for every occasion. It can be used for every season throughout the year, not just for Christmas. I've used the Garden Green Striped patter for the background layer and the bright Poppy Parade flowers have been fussy cut also from the Garden Walk DSP. 


 The die cut foliage pieces are from the Joy of Christmas Suite, cut from Distressed Gold Specialty Paper. These pieces are on a long rectagular die but I cut them off so that they could sit better with the design of the card.

The ribbon, seqins amd semtiments also all come from the Joy of Christmas Suite. I love combining products from different suites that don't necessarily go together to create something a little bit different.

Make sure you check out my online store  HERE on 6th September 2023 when you can purchase products from the new 2023 Sept - Dec Mini Catalogue.

Go and check out the design teams take on the sketch at the Just Add Ink Blog for some inspiration and then come and join in this week's sketch fun! I can't wait to see what you create.

Thanks so much for stopping by!
Happy Stamping!

Live in Australia?
Shop for Stampin' Up! with Me 24/7 HERE
 
  Recreate this project at home using the following Stampin' Up! products. Click on the images below to see the product information and to shop from my online store