Friday, August 26, 2016

Just Add Ink #326 - Just Add Project Life

Welcome, welcome. It's Just Add Ink time and this week we are Just Adding ... Project Life. I must admit that started Project Lifing when Stampin' Up! first introduced Project Life to it's product range but that is about as far as it got. I've put together about 4 pages but have come to a stand still.
So for my 'Just Add Project Life' I've used one of the stunning card collections at Stampin' Up! have on offer at the moment, Hello Lovely. I've teamed it up with some embellishments from the Hello Lovely Accessory Pack.

Hello Lovely Project Life Card Collection


Hello Lovely Project Life Accessory Pack

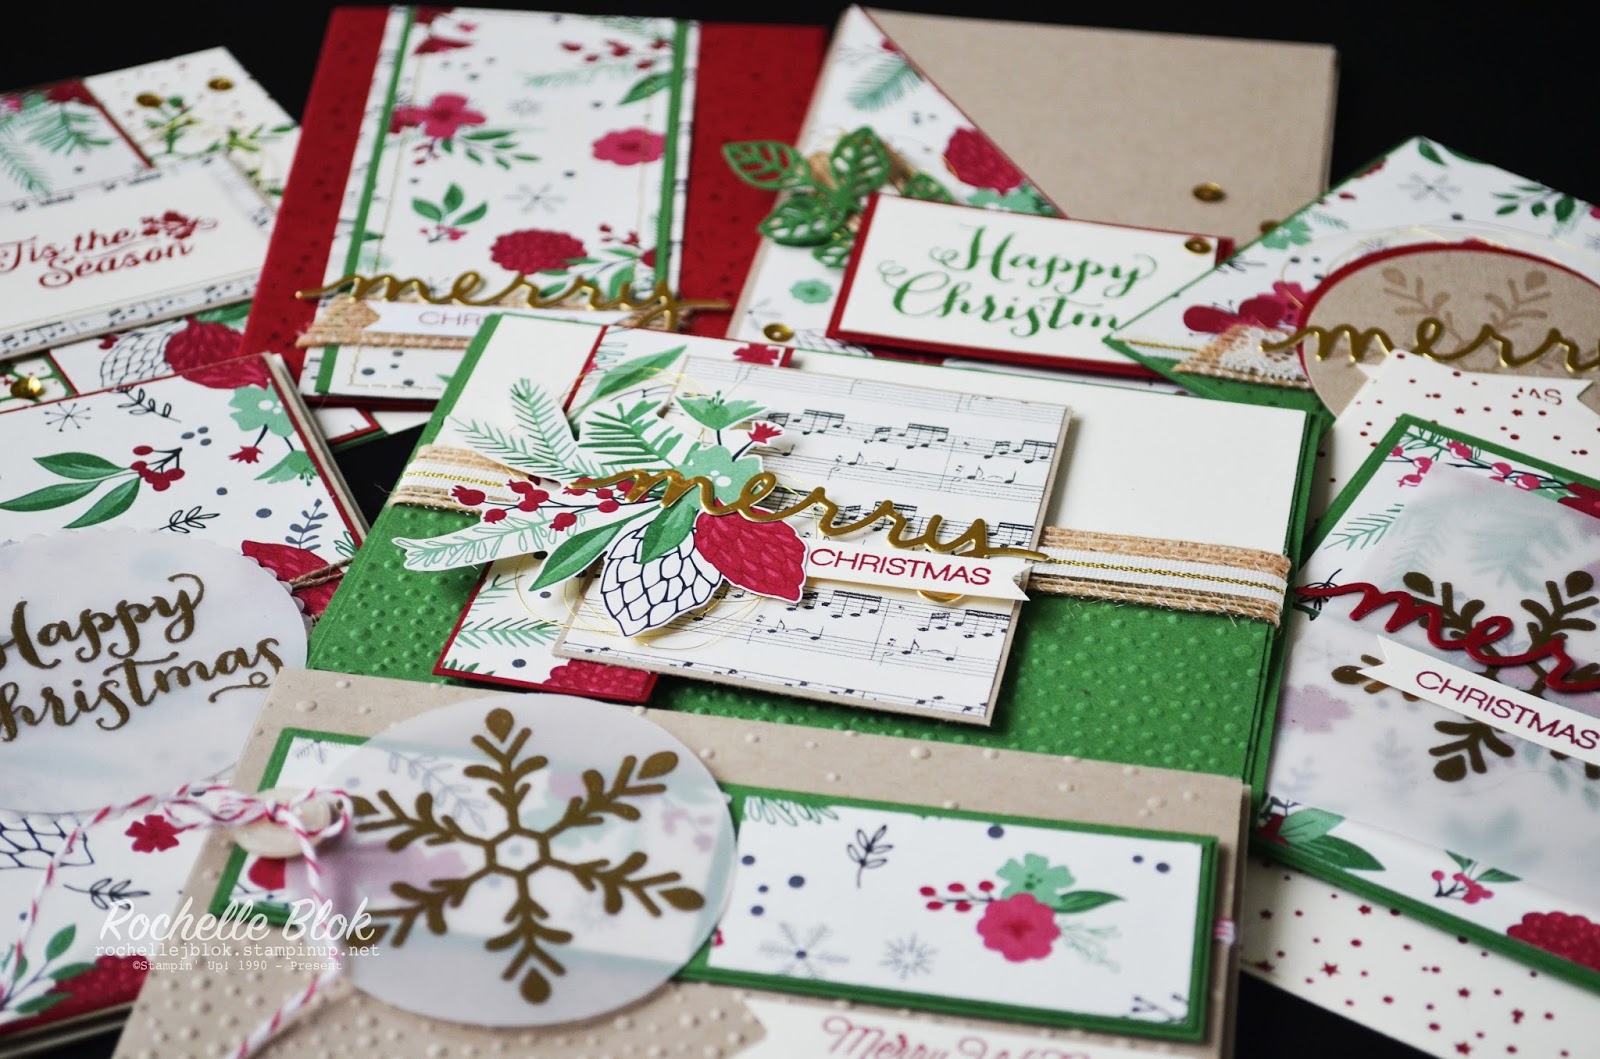
The card collection pack is stunning just on its own and makes a beautiful layer to your cards. Another fabulous thing is that by using the Project Life cards for your cards is that they make for a quick creation. A project life card and a few embellishments from the accessory pack and 'Hey Presto' your done!


I've layered the acetate layer over the card. Please excuse my photo I just couldn't get an awesome shot without some refection. The acetate does look gorgeous over the top though! I did have to trim the PL card and the acetate down slightly but other that that you don't need to do much to get some stunning creations. I really love the hand painted look to this collection! STUNNING!!


To make the card a little more special I've put some Clear Wink of Stella on the wooden flower. It just makes it a little more 'pretty' and adds an extra touch of sparkle and bling. Here you can see that slight shimmer but it does look so much more sparkly, as the kids would say, IRL.


Loving those leaves from the Beautiful Branches Thinlit Dies. These dies co-ordinate with the Thoughtful Branches stamp set that are only around for a few more days. EEEK!! So if you want them you had better get them NOW. You will kick yourself if you don't. It is just a super stunning bundle! They will disappear from sale on the 31st August 2016. Ask me how you can get your Thoughtful Branches Bundle or click on the images below of the products used and you can purchase this bundle straight from my store (Australian Residents Only).

Now head on over to the ever so talented Just Add Ink Design Team and be inspired yet again this week.

Thanks so much for stopping by!
Shop for Stampin' Up! 24/7
 Recreate this card at home using the following Stampin' Up! products. Click on the images below to see product information and to shop from my online store.


Thursday, August 18, 2016

Polka Dot Best Birds

Happy Friday! Well it's nearly Friday. Ok, so it's Thursday night and I'm nearly ready for bed, which means it's pretty much Friday in my mind! Ha!  
I've got a gorgeous little card to share with you today using a fabulous set from the Stampin' Up! Annual Catalogue, Best Birds. I've had this idea for this card mulling around in my head for a little bit now but haven't had a lot of time to create just for me. Well you guessed it I actually had a couple of hours to create today so I thought I would try and get this card out of my head and onto some cardstock.


The original idea for this card started after seeing a fabulous wall hanging at my Brother and Sister-in-law's place in Tasmania a few weeks ago. The wall hanging was all white and just had a bird cut out of the bottom right corner. Instantly I thought, "Wouldn't it be fabulous to use the Best Birds set in a similar way" and that is where it all started. As I continued to think about the card that's when it kept evolving and for all the other elements to go on it.

I started by using the retired Dots Decorative Mask as a template and guide so that I could line up all the flowers perfectly. I lined up the mask over the card base and then marked the centre of each circle for where each flower should be embossed.  So easy to get straight lines that way.


 The bird and the branch is cut out of the Basic Black Polka Dot DSP from the Neutrals 12" x 12" Paper Stack. I love these paper stacks, a lot! All the 4 designs come in every Stampin' Up! colour (except Whisper White and Very Vanilla) so you'll never be short of DSP to match your creations. The Polka Dot and Stripes patterns are my favourite. They make for some fun creations.


I thought with the Kraft, Whisper White and Basic Black it needed just a little 'pop' of colour. That 'pop' comes from the Watermelon Wonder Mini Striped ribbon. I hadn't really noticed the ribbon when the Annual catalogue first came out but since it's release on the 1st June I've seen some fabulous creations with the ribbon and it is so pretty! So far I've only got the Watermelon Wonder ribbon and am looking forward to getting the rest of the colours.

 The flower is cut from on of the dies that goes with the Best Birds Set, Birds & Blooms Thinlits, and yep they are in a bundle so you save 10%. Boo yeah! Savings!! If you haven't had a look at this bundle, check it out!  Its super cute and there are many different ways you can get creative with it! 

Thanks so much for stopping by! 

Shop for Stampin' Up! 24/7
 Recreate this card at home using the following Stampin' Up! products. Click on the images below to see product information and to shop from my online store.

Monday, August 15, 2016

Global Design Project #049 - Guest Designer


The time has finally come for my Guest Designer spot over at the Global Design Project. I'm so excited and a little nervous to be a guest on this fabulous challenge. I really hope that my creation lives up to the expectations and that I don't dissapoint. I just want to say a big thank you to all the team over at GPD for having me this week.

This weeks challenge is a colour challenge with a gorgeous, fun and spring like colour combination. So pretty!
When I first saw the colour combo I always had a thought of something floraly (if that's a word) and some sort of water colour wash some where. It took me a few attempts to figure it out but I eventully got it.


This card actually came together from left over bits and pieces from other recent creations.You can't waste anything in crafting, right?!


I've used the 2" Circle punch and the 2-1/2" Circle Punch to punch out the Fabulous Foil Designer Acetate. Just a tip you need some muscle to squeeze the punches through the acetate. It's tough but you can do it!


The leaves are die cute from the Beautful Branches thinlits dies that are part of the Thoughtful Branches Bundle promotion that is on till the 31st August. I love the shape of these leaves and the modern and detailed look that they have.


Its all accented wtih some Burlap Ribbon, the Flirty Flamingo Ruched Ribbon, Delicate White Doilies and some clear sequins from the Metallics Sequin Assortment.


Why not join in this weeks colour challenge and you can be a guest designer too!

I'm looking forward to sending this to a friend who is going through a tough spot at the moment and I'm hoping that it will brighten her day.

Thanks so much for stopping by!

Shop for Stampin' Up! 24/7
 Recreate this card at home using the following Stampin' Up! products. Click on the images below to see product information and to shop from my online store.

Stamp Review Crew | Jar of Love

http://stampreviewcrew.blogspot.com/2016/05/stamp-review-crew-jar-of-love-edition.html

Welcome to the Stamp Review Crew Blog hop. Get ready to feel the love with this weeks hop using the Jar of Love Stamp set. This is one of the sets that was at the very top of my wish list when the new Annual Catalogue started and I'm excited to be showcasing it in todays hop.

If you are joining us for the first time we are a group of International Stampin' Up! demonstrators showcasing one stamp set at a time, every first and third Monday's of the month. Be sure to make your way around the hop by click the next button at the bottom of each post. It's a big hop today with 21 hoppers all up eager to show you our creations. If you get lost along the way click the banner at the top of the post and that will give you a list of all the hoppers

I've made some quick cards today focusing on the flowers in the stamp set and using some of the new In Colours, Peekaboo Peach, Flirty Flamingo and Sweet Sugarplum. These cards will add to my stash ready to send to a friend just to say hello.


Click to see all Stampin' Up!'s products in that colour.


The stamp set is one that is rustic, country, natural and I think pairs well with products like Kraft card stock and burlap ribbon and that is what I've done today. I've used a Kraft cardstock base and layered over it some Fabulous Foil Designer Acetate. The acetate is gorgeous with gold on one side and looks silver on the other. The acetate is another way to add some interest and a fabulous element to your creations.


All three cards are the same I've just changed up the main colour element in each one. It's so hard to decide which colour I like the best! They are all gorgeous. It's like trying to choose a favourite child (HA!), you just can't!


 Pretty pinks with yellows. Love it!


How gorgeous is the Sweet Sugarplum?! Love the hint of purple!

I hope that I've inspired you with this set and you'll start creating with it too. Watch this space for mor Jar of Love creations. Lots more ideas to come!

 Now on to the super fabulous and super amazing Shana Gaff. If you are hoping in reverse click on the previous blog button to head on to the wonderful and fellow Aussie, Kelly Kent.

http://stressfreestamping.blogspot.com/2016/08/the-stamp-review-crew-jars-of-love.html

http://mypapercraftjourney.com/2016/08/15/stamp-review-crew-jar-of-love/

Thanks so much for stopping by!

Shop for Stampin' Up! 24/7
 Recreate this card at home using the following Stampin' Up! products. Click on the images below to see product information and to shop from my online store
.


Friday, August 12, 2016

TGIF Challenges #68 - Watercolour Wash Butterfly

What a busy, creative week I've had!! After not doing much at all last week due to having a winter cold and not feeling that great at all I've been playing a bit of catch up with my Design Team commitments. This week over at TGIF Challenges #68 we have a sketch challenge. Yay! My fave! If you know me and my crafting style I'm not a real fan of anything on an angle. Well lets just say 'not a fan' is an understatement. I love clean lines or layers of circles but not angles. So ... as you've probably already guesses, I've changed up the sketch keeping the basic design principles but changing that big angled piece across the front.


I've paper-pieced one of the Butterfly Thinlit dies with a watercolour wash background piece that I made using the colours Bermuda Bay and Cucumber Crush.
Click to see all Stampin' Up!'s products in that colour.


First I made the water colour background and die cut it with the Butterflies Thinlits die. Making sure that I had all the pieces, you don't want to loose one cause then you have to start all over again, and then I cut the Basic Black cardstock again with the Butterflies Thinlits die. The detailed Basic Black butterfly is then adhered to a Basic Black Bold Butterfly Framelits Die cut. These two butterfly dies layer perfectly together as they are the same size. I then painstakingly glued each little watercolour butterfly piece back into the Basic Black butterfly. I will say that it did take a little time to do this but luckily the swimming was on TV at the Olympics and I got to see some Aussie swimmers win Gold and Silver Medals. Go Aussies!!! 


Those Bermuda Bay and the Cucumber Crush together are just stunning and as hard as I tried I just couldn't capture the brightness of these two colours.


The butterfly is layered on some of the Pop of Pink DSP. Loving the black polka dots on the white. Reminds me of a stunning Kikki K yearly planner that I love but have restrained myself not to get because I already have one. Two Kikki K planners would just be a little OTT as much as I love it. It is also finished off with a Delicate white Doily, Basic Black Solid Bakers Twine, Black Metallic thread, Black Metallic Sequins and an Enamel Shape from the Brights Enamel Shapes.

Click here to see the rest of the inspiration and instructions to join in! I would love to see you join us this week over at TGIF Challenges!

Thanks so much for stopping by!
 
Shop for Stampin' Up! 24/7
 Recreate this card at home using the following Stampin' Up! products. Click on the images below to see product information and to shop from my online store
.

Just Add Ink #324 - Jar of Love Inspiration


Hello, hello! It's that time of the week for you to put your creative thinking caps on for the new challenge over at Just Add Ink. We have a beautiful inspiration picture for you! It screams to me natural, rustic, florals and a little hint of spring.


I decided that this picture was the perfect opportunity to use something that I just 'had to have' from the Annual Catalogue but haven't actually used yet, Jar of Love. If I could use emojis in my blog I would put the wide-eyed, surprised looking emoji here! This stamp set and co-ordinating Everyday Jar Framelits fits in so well with the inspiration picture.


I've pulled out an embossing folder that I haven't used for a while, Woodgrain, and then flicked some Gold Wink of Stella across the panel remebering the tip from Sara Douglass, Stampin' Up! CEO and her live Facebook video she did a few weeks ago. To flick the Wink of Stella, push the brush tip against the inside of the lid and, flick. I may have squeezed the barrel a little too hard this time so it splattered some big drops as well. Oops!


I've stamped the flowers in Flirty Flamingo and So Safrron. I'm loving the Flirly Flamingo more and more. It's such a gorgeous pink. And how pretty is the ribbon in the same colour! LOVE IT!


This is the first play with the Jars of Love set and I'm sure it won't be the last!

Make sure that you click here to see all the amazing creations that the rest of the Just Add Ink gals have made for you. They are off the charts! What a creative and talented bunch of ladies! While you are there check out all the detalis on how to enter your creation and I can't wait to see what inspires you with our inspiration challenge. Looking forward to seeing your creations.

Thanks so much for stopping by!
Shop for Stampin' Up! 24/7
 Recreate this card at home using the following Stampin' Up! products. Click on the images below to see product information and to shop from my online store.

Tuesday, August 9, 2016

The Inkreators Blog Hop | One Sheet Wonder


Big welcome to you today to our very last Inkreators Blog Hop with the theme of One Sheet Wonders. It's been a fabulous time hopping with fellow Stampin' Sisters and sharing my creations with you all in these hops over the past year but due to Lauren of  Love Life Lauren not being able to continue, due to studying commitments, the Inkreators Blog Hops will be no more.I hope that we insprie your creting today and for you to do a one sheet wonder.

  I'm not very good at figuring out how to cut up a 12" x 12" sheet of DSP and trying to figure out all the different sizes of each different piece and to to cut it up evenly so I've gone with a pre-made template created by Mae Collins. Check it out here. The most fabulous thing about this template is that it is in centimetres. That might not mean much to you but as an Aussie who uses mostly cm's it is a fabulous thing. I do use inches and the like sometimes but I still have a bit of trouble figuring it all out. It's like learning another language. Well almost.

I thought because I was making quite a few cards from this template I may as well get a head start on my Christmas cards. I've used the  Stampin' Up! This Chistmas DSP and co-ordinated the cards with the Holly Jolly Greeting stamp set, Christmas Greetings Thinlits and the Oh, What Fun stamp set.

Why not grab a cuppa and a bikkie (biscuit or cookie) or two and take a look at our One Sheet Wonder Blog Hop. My cards are all pretty straight forward and I'm sure that you are able to see all the products I've used. If you are unsure scroll down to the images at the bottom of the post and that will show you all the products I've used for my One Sheet Wonder creations. Click on the images and that will lead you to my Online store with description about that product. You can order the product from there too and it will be delivered to your door (Australian Residents only).

If you have any questions about any of my cards here put it in the comments at the bottom of the post and I'll answer it as soon as I can.


Click to see all Stampin' Up!'s products in that colour
I hope that I've inspired you today to do a One Sheet Wonder creation and to get a head start on your Christmas Cards.

Now on to the ever fabulous Lauren to see her One Sheet Wonder creations.

http://www.lovelifelauren.com/journal/one-sheet-wonder

Thanks so much for stopping by!

Shop for Stampin' Up! 24/7
 Recreate these cards at home using the following Stampin' Up! products. Click on the images below to see product information and to shop from my online store.