Hello there stamping friends! Welcome, welcome! It's so good to have you here. I have a project for you for the Stampin' Fancy Friday Design Team. This month is a sketch challenge and if you've been around here for a while you would know that I love a sketch challenge!
This sketch is basic in its design and layout, but enough to get those creative ideas going and that creative brain working. I've actually made three cards with the sketch rather than just the one. I got on a bit of a roll and then the ideas just kept coming.
All my three cards today incorporate the sketch and also the Banner Blooms Dies from the Artistry Blooms Suite in the Stampin' Up! '20 - '21 Annual Catalogue.
My first card today starts with a neutral feel layering Whisper White, Basic Black, and Crumb Cake Cardstock. The Crumb Cake layer is then embossed with my all-time favourite goes with any project Subtle 3D Embossing Folder. If there was only one embossing folder that you could get then I would say get that one! Over the embossed layer, I've added some Basic Black splatters but flicking the brush end of the Basic Black Stampin' Write Marker.
Next comes the embellishment layers. To start the layering I've used one of the Forever Gold Laser Cut Speciality pieces. The neutral layers with touches of gold is just such a gorgeous and classic look. Next over that is some strips of the In Good Taste Designer Series Paper with some pieces of Gold Cord from the Wonder of the Season Ribbon combo pack and some Very Vanilla Scalloped Lace Trim. Over the ribbon and trim are some layers of Vellum and Shimmery White Cardstock die-cut with the Layering Circles Dies and the Banner Blooms Dies. How pretty is the Banner Blooms Die, die-cut on Shimmery White, and then layered on the Shimmery White cardstock circle. Makes for a beautiful tone on tone look. Last and by no means least is one of the In Good Taste wooden elements, some linen thread, and the sentiment cut from the Tasteful Touches Stamp Set.
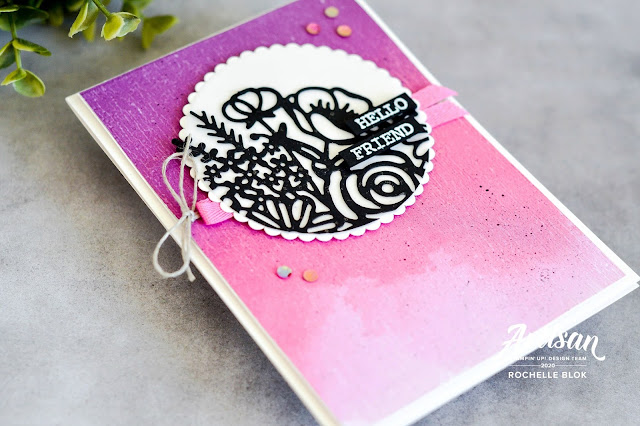
I was on a roll creating with this sketch that I created two more cards for you. My next card uses the Artistry Blooms Designer Series Paper to start with. Because this DSP is so bright and bold it really doesn't need much else to go with it. I have embossed it though with the Subtle 3D embossing folder to add some more texture.
I've really pulled back on this card as opposed to the first card because the DSP and the Whisper White and Vellum die cut circle and Basic Black Banner Blooms Die makes for a beautiful contrast. I've finished off the card with some Linen Thread, Magenta Madness Ribbon and some of the Artistry Blooms Adhesive Backed Sequins.
For my last card, I've turned the sketch horizontal. This time I've started with a Shimmery White base and then added colour from there starting with some splatters flicked from the Magenta Madness Stampin' Write Marker.
This time I've used Basic Black for the circle element and then layered some of the Rainbow Glimmer Paper, die-cut with the Banner Blooms Die. I wasn't so sure of the Rainbow Glimmer paper when I first saw it in the Stampin' up! Annual Catalogue but when paired with the right products it really is gorgeous! And the best thing about using this glimmer paper is that the glitter stays on the paper and doesn't go everywhere else!
All finished off with some ribbon, trim, Magenta Madness In Color Enamel Dots, and a sentiment from A Wish for Everything Stamp Set.
I really love that with the one sketch you can create three different looks. Check out the rest of the sketch creations that the Stampin' Fancy Friday Design Team has made on the Stampin' Fancy Friday Instagram Account. This is where all their creations will be shared throughout the month, so make sure that you are following them to get all of the amazing ideas!
Thanks so much for stopping by!
Happy Stamping!
Live in Australia?
Shop for Stampin' Up! with me 24/7
Shop for Stampin' Up! with me 24/7
Recreate these projects at home using the following Stampin' Up! products. Click on the images below to see the product information and to shop from my online store.


No comments:
Post a Comment
Thank You for taking the time to comment on my creations! I really love to hear what you think and will try to respond as soon as I can! Rochelle xo
In line with Data Protection legislation by commenting you do so in the knowledge that your name & comment are visible to all who visit this blog and thereby consent to the use of that personal information for that specific purpose.