Sunday, February 24, 2019

Stamping Sunday Blog Hop | Happiness Blooms Memories and More

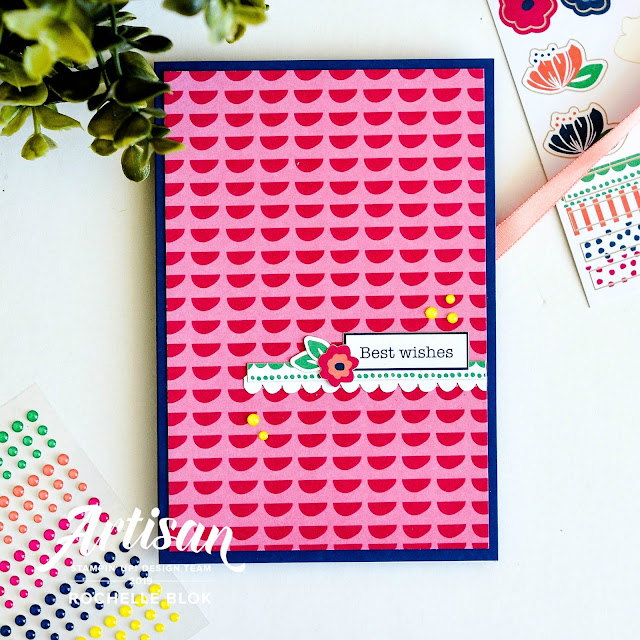
Hello there stamping friends! Welcome to this months Stamping Sunday Blog Hop. Today's hop is all about the bright and fun Happiness Blooms Memories and More Pack. This kit makes memory keeping a super easy and it's all coordinated together for you.


Normally when you think of a Memories and More card pack you probably of memory keeping/scrapbooking but today I've used the card pack to make some cards. One of the fabulous thing about these cards from the Happiness Blooms Memories and More card pack is that it goes perfectly with Happiness Blooms Memories & More Cards & Envelopes for instant cards.
Just adhere cards from the Happiness Blooms Memories & More Card Pack to these card bases, and you’re done. Boom too easy!

My cards today are for the Beginner, Casual and Avid crafters, showing you that no matter your crafting level you can make amazing looking cards using this card pack.


Beginner - Adhere a M & M card to your card base, add some of the stickers and the Happiness Blooms Enamel Dots to embellish and your card is done.


Casual - Add a die cut  circle and some Calypso Coral 3/8" (1 Cm) Satin Ribbon as well as the same elements as used by the beginner and you've got a card that is quick and easy to put together but 'packs a punch'.


Avid - Add some extra layers, die cuts, layers of ribbon and trim. extra stickers and embellishments, whatever you feel you want for that extra special card.


While the three card are designed to show the different crafting styles, they are still all relatively straight forward as the M & M card pack takes a lot of the guess work out of putting a card together and they make for some gorgeous creations. How fun and bright do they look?

Click on to Danielle Bennenk from The Netherlands, for her fabulous creations, who is next up on the hop! 

Thanks so much for stopping by!
Happy Stamping!

Live in Australia?
 Shop for Stampin' Up! with me 24/7

Recreate these cards at home using the following Stampin' Up! products. Click on the images below to see the product information and to shop from my online store.

Friday, February 22, 2019

Fancy Friday Blog Hop | Fav Occasions Catalogue Product

Hello there stamping friends! Welcome to this months Fancy Friday Blog Hop. We are all about our favourite products from the Stampin' Up! 2019 Occasions Catalogue. Before you scroll down can you guess what mine is? Actually mine is a whole suite. It's pretty, pretty, pretty.


It's been a while since I hopped with the Fancy Friday team but I'm so glad I am today and have we got a fabulous hop for you today.

If you've not see us before, the Fancy Friday team are past and present Stampin' Up! Artisan Design Team Members. We still love creating and blogging and sharing what we love, so we have a blog hop once a month with everything fun and fancy.


Did you guess that my favourite Occasions Catalogue products are from the Floral Romance Suite? What's not to love about this suite. Gorgeous DSP with printed Vellum, a beautiful stamp set with images that you can colour, pretty Petal Pink and Whisper White Variegated Ribbon, Floral Romance Seals, Frosted Flower Embellishments! Love, Love, Love!!!

If you saw my post yesterday you would have seen a technique that I often forget about, embossing with the Big Shot Embossing Mats. Well while I was on a roll, I thought I would give it another go and use the border Framelit/Edgelit from the Wonderful Floral Framelits Dies to emboss with the Big Shot Embossing Mats.

I love that when using the Big Shot Embossing Mats that it gives your card the look of a lot of effort for really not much effort at all. Watch me now, I'm going to be using the Embossing Mats on everything. Ha!


To go with the beautiful embossed edge I added a spray of leaves combining gold embossed vellum images from the Wonderful Romance Cling Stamp Set and the leaf die cuts from the Wonderful Floral Framelits Dies.

How gorgeous is the oval die? That to is from the Wonderful Floral Framelits Dies. Such a fabulous shape to go with any project. Under the oval is some strips of the Floral Romance Specialty DSP. And can you see that pretty two tone ribbon. I cut some of the Petal Pink/ Whisper White Variegated Ribbon in half and put it behind the spray of leaves and then you can see a full piece behind the 'Thinking of You' sentiment.

I hope that you've enjoyed my card for today and don't forget to keep hopping round for more 2019 Occasions Catalogue inspiration. Next upon the hop is fellow Aussie and amazingly talented Jennifer Frost. Make sure you check her creations out.

https://jenniferfrost.blogspot.com/2019/02/FEB19-FF.html


Thanks so much for stopping by!
Happy Stamping!

Live in Australia?
 Shop for Stampin' Up! with me 24/7

Recreate this card at home using the following Stampin' Up! products. Click on the images below to see the product information and to shop from my online store.

Stampin' Up! Artisan Design Team Blog Hop | Dear Doily

Welcome to this months Stampin' Up! Artisan Design Team Blog Hop. This month we are featuring either the Dear Doily Bundle or the Well Said Bundle, from the Stampin' Up! 2019 Occasions Catalogue, or even combining them both.


I was drawn to the beautiful and delicate nature of the Dear Doily stamp set and the intricate and detailed Doily Builder Thinlits and teamed them up with a Shimmery White, Powder Pink, Basic Black and Copper colour combo.


Both cards I used a water colour wash technique, which really gave a fantastic water colour look, by pressing the Powder Pink Ink pad down a few times on a Window Sheet, spraying the ink colour on the window sheet with water and then turn the window sheet over and pressing it down on the Shimmery White cardstock till I achieved the desired water colour look. I don't think I'll ever use an aqua painter again to try and achieve a water colour wash. This was quick and so easy. Got to love techniques that cut down time when creating.


This card I used the emboss resist technique with the fabulous and beautiful doily images. Make sure when adding a water colour wash over embossed images that you don't use too much water as you may make your embossed images 'lift' and come away from the cardstock.

To add to the emboss resist background I added some layers of the Doily Builder Dies in Powder Pink, Shimmery White and Vellum Cardstock and then embossed the sentiment on Basic Black Cardstock using White Stampin' Emboss Powder.


This card just has the water colour background but for some added texture and interest, when the Powder Pink Ink was dry from the water colour 'wash', more like a smoosh, I splattered droplets of water over the ink. This gives the dry water colour ink a fun splattered look as the water draws the colour out of the ink as it pools and dries. 

This card also has layers of the Doily Builder Thinlits dies. I love to try and leave all the little 'pieces' in the die cut as it gives another look to the dies and makes them more versatile to have different looks. Pretty!


I love the soft, delicate nature to these cards and when teamed with the Basic Black and the gorgeous bold contrast it gives.

I hope that you like both my cards today and you have been inspired to get creating with this bundle and to also try the water colour 'smooshing' using the window sheet and water. Why not try the technique with two or three colours and see what you come up with?

Now over to the super amazing and the super gorgeous Stesha Bloodhart, who I know has some beautiful creations in store for you!

Be sure to hop on around the whole team to see all the beautiful inspirations and ideas using these two bundles.

https://stampinhoot.com/2019/02/artisan-feb-fb/

Angela Meiritz-Reid
Ashley Van Camp
Aurélie Fabre
Emma Goddard
Jackie Aitken
Jennifer Picard
Kaylee van Es
Lauren Alarid
Maike Beimler
Manuela Geiswinkler
Mikaela Titheridge
Narelle Farrugia
Rochelle Blok
Stesha Bloodhart
Sylwia Schreck
Tanya Rees

Thanks so much for stopping by!
Happy Stamping!
Live in Australia?
 Shop for Stampin' Up! with me 24/7

 Recreate these cards at home using the following Stampin' Up! products. Click on the images below to see the product information and to shop from my online store.

Just Add Ink #445 | Just Add Embossing

Happy Friday Stamping Friends! It's time for another Just Add Ink Challenge and this week's theme has been chosen by yours truly, Just Add Embossing.


Embossing is one of my favourite techniques and I use some sort of embossing technique on nearly most of my cards. Whether it be Heat Embossing or Embossing with an Embossing Folder but  what I've done today is something I haven't done much of, using the Big Shot Embossing Mats to turn the beautiful, intricate Stampin' Up! Dies to embossing dies instead of cutting dies. And now thinking about it I don't know why I haven't done more of it. It's so effective!

These Butterfly Beauty Thinlits Dies teamed with the Big Shot Embossing Mats are perfect to create the maximum 'WOW' with minimum effort.


To create the embossed background layer I attached the die lightly in place on the cardstock with washi tape so that it was positioned perfectly in place. To then emboss the cardstock and not cut it I created the Big Shot 'sandwich' which is, all layered on top of each other, starting with;

1. Big Shot Platform,
 2. Cutting Pad,
3. Die facing up,
4. Cardstock on top of the die,
5. Thin Silicone Rubber Mat (Blue one) and then lastly
6. White Impressions Pad.

Run all that through together in the Big Shot and 'Hey presto' you've embossed with your die. How much more versatile do the embossing mats make your Framelits, Thinlits and Edgelits?


Because I wanted to keep the Butterfly embossed layer as the main focus to my card today I really didn't want to add to much to the card front to 'take over'. Just a few bits of ribbon, trim, and embellishments to coordinate. Just enough.


Finish off the card I heat embossed the 'Hello Beautiful' sentiment with White Stampin' Emboss Powder and heat embossed the little butterfly with Black Stmapin' Emboss Powder to add the the Just Add Embossing challenge for this week.

I'm so loving how the embossed die turned out on the card front. I think I might try it in other colours and see how that turns out. The possibilities are endless.

Check out the rest of the embossed creations from the rest of the Just Add Ink Design Team over at the JAI blog. Lots of fabulous creations! While you're there check out all the details for the challenge and then come and play along!

If you need a refresher on using the Big Shot Embossing Mats check out this You Tube Clip from Stampin' Up! It shows you how to layer your Big Shot 'sandwich' and which silicone mat to use with which dies. Well worth the watch!


Thanks so much for stopping by!
Happy Stamping!

Live in Australia?
 Shop for Stampin' Up! with me 24/7

 Recreate this card at home using the following Stampin' Up! products. Click on the images below to see the product information and to shop from my online store.
Friday, February 15, 2019

Just Add Ink #444 | Colour Challenge

Hello there stamping friends! Ready for another Just Add Ink Challenge? This week at Just Add Ink #444 | Colour Challenge, we have a colour challenge with a twist. We've given you two of the colours and then (insert audience participation) you choose the third. Fun right! You are only limited by your imagination as how you want to add to the colour combination.


I thought the Poppy Parade and Powder Pink would be great for a two-stepped floral image so I added Garden Green to finish off the colour combination.


Click on the colour name to see all the Stampin' Up! Products in these colours

I've used the Stampin' Up! Stamp Set, Incredible Like You, for my colour challenge card today! This set actually goes with the Incredible Like You Project kit from the 2019 Occasions Catalogue. I like to the look of some of the images for my card today and used the stamp set on it's own without the kit.


I started with my all time favourite card stock, Shimmery White, as the base for today's card. Shimmery White just gives every creation that something extra special, with its subtle shimmer. It's very hard to photograph here but the shimmer that it gives is just beautiful. And then under all my layers, I've used the striped image from the stamp set to White heat emboss some lines for some added texture. I went a bit crazy with all my layers and elements so the lines are not as prominent as when I first started creating this card but trust me there are there. One final thing I added to the base layer is a bit of splattering using the Powder Pink Ink. I just picked up a bit of the Powder Pink Ink from the lid of the ink pad using an aqua painter and then just flicked the brush tip end for that fun ink splatter.


The flower and the leaf images use the two step stamping technique for a fun layered look. The flower I started with the Powder Pink and the layered the Poppy Parade over top. For the leaf the lighter layer is Garden Green stamp off once first on scrap paper and then stamped onto the cardstock for the lighter ink colour. The top layer is the Garden Green stamped in full strength ink.  I love the stamping off technique, or as some people call it 2nd generation stamping, as it really give you another whole range of colour and gives so much more versatility to the Stampin' Up! Ink Pads.


It's all about the layers on this card today and there is a lot of them. Oops. The ribbon and trim I used Whisper White Flax Ribbon, Whisper White Polka Dot Tulle, Powder Pink Shimmer Ribbon, Gold Mini Sequin Trim and Braided Linen Thread. On top of all that ribbon and trim I also layered the longer die from the Doily Builder Thinlits Dies. To make that die cut piece look longer that it actually is, I just cut it in half and then added it under the Stitched Circle to make it look like one long piece.

All finished off with a frame from the wooden Frames Elements, some Gold Metallic Thread, Powder Pink Sequins from the Iridescent Sequin Assortment and the sentiment from the Incredible Like You stamp set embossed with White Stampin' Emboss Powder and die cut with the Stitched Shapes Framelits.

Check out the Just Add Ink Design Team to see what the other designers have created using the colour challenge as inspiration. Play along with us!We can't wait to see what you create!

Thanks so much for stopping by!
Happy Stamping!

Live in Australia?
 Shop for Stampin' Up! with me 24/7

Recreate this card at home using the following Stampin' Up! products. Click on the images below to see the product information and to shop from my online store.

Friday, February 8, 2019

Just Add Ink #443 | Just Choose Two

Hey there stamping friends! Welcome, welcome, welcome. It's is time for a new challenge over at Just Add Ink #443 | Just Add Two. It's a fun Just Add Two Challenge. Choose two from either embossing past, colouring or sequins.


If you've followed my blog for a while you would probably have thought that I would have chosen colouring. I do love my colouring but I didn't choose it this time. I did choose sequins, that of course was a given and I also chose Embossing Paste. I don't tend to use the embossing paste that much and wanted to create with it today.


I actually made my stencil for the embossing paste using the largest die from the Doily Builder Thinlits. I used a scrap piece of cardstock, ran the die through the Big Shot and then once cut used that piece as the stencil for the embossing paste.


I love the white embossing paste on the Shimmery White Cardstock for a classic white on white look. Id you wanted to step up the look of the base you could use the Shimmery Embossing Paste or even the Silver or even still colour the embossing paste with the Stampin' Up! Re-inkers.


The other die cut pieces layered on the card also come from the Doily Builder Thinlits. How gorgeous are the fun, intricate details on each of the die cut pieces? I love the little pops of colour against the white background and how fun are those colours together.  Teamed up with the embossing paste and the doily layers are the Powder Pink sequins from the Iridescent Sequin Assortment.

Why not try using other Framelits or Thinlits to make your own stencils/masks to use with embossing paste? You'll be able to make your own custom embossing stencils to customise your creations. 

There are lot of amazing creations from the Just Add Ink Design Team on the JAI Blog. Go and check out to see what 'two' they all chose for their creations this week and then while your there see how you can enter your creation. Can't wait to see what 'two' you choose.

Thanks so much for stopping by!
Happy Stamping!
Live in Australia?
 Shop for Stampin' Up! with me 24/7

 Recreate this card at home using the following Stampin' Up! products. Click on the images below to see the product information and to shop from my online store.

Thursday, February 7, 2019

Global Design Project #GDP175 | What Will You Stamp? #WWYS205 | Lovely Lattice

Hello there stamping friends! Welcome to my little part of blogging land. I'm playing along with the challenge over at the Global Design Project #GDP175. They have a gorgeous and fun challenge all about Spring.


The team over at the Global Design Project want us to share products that take us down a garden path - in the garden or from the garden, with all things plants and beautiful flowers.

While its crazy hot here in Melbourne at the moment, with us here in Australia right in the middle of summer, I had to take part in this challenge as Spring would have to be my favourite season. When the colder weather slowly starts to warm up and all the Blossom trees start to bloom it really is a beautiful sight to behold.

I'm playing, again, with the amazing Sale-a-bration stamp set, Lovely Lattice, for a spot of water colouring on water colour paper. I usually ,of late, when water colouring use the stunning Shimmery White paper with the beautiful, subtle shimmer. But this time I though I would water colour on actual water colour paper, because I could use a little bit more water when colouring and because I wanted the texture of the watercolour paper to be a feature of the card and the water colour layer.


I started the whole process of the card with stamping the Lovely Lattice image with Versamark and the heat embossed the image with White Stampin' Emboss powder. I like to emboss an image when water colouring as it provides a 'border' to each piece of the image and you don't have to be as careful when colouring the image in.


I used Old Olive and Mossy Meadow for the leaf pieces and Calypso Coral and Pumpkin Pie for the flower images to create an orange/pinky/peachy colour.  The two colours together almost look like the retired Peek-a-boo Peach colour when water coloured together like that.


To finish off the card I used Smoky Slate as an outline around the whole image to give the stamped image a little bit of definition on the paper, so it doesn't look so flat. It almost give the image the look of a shadow and lifts it off the cardstock. I probably could have added more of the Smoky Slate colour to give a bit more of a darker outline but I really like to subtle-ness (if that's a word) of it.

Just remember if you want to get the Lovely Lattice set for free, place a $90 (not including P&H) with me HERE and you can choose this gorgeous set for FREE!!

I'm also entering this card in the challenge over at What Will You Stamp? #WWYS205 as this weeks chosen challenge stamp set is - Lovely Lattice. Check out the projects by the design team at What Will You Stamp? They have lots of creative inspiration on how to use this stamp set and I'm sure it will get you inspired.


Thanks so much for stopping by!
Happy Stamping!

Live in Australia?
 Shop for Stampin' Up! with me 24/7

 Recreate this card at home using the following Stampin' Up! products. Click on the images below to see the product information and to shop from my online store.

Saturday, February 2, 2019

Stampin' Up! Artisan Design Team Blog Hop | Sale-a-bration Coordination

Hello there stamping friends! Welcome to the Stampin' Up! Sale-a-Bration Coordination Artisan Design Team Blog Hop. 
We are showing you today the products on offer for the Sale-a-bration Coordination Promotion. For a limited time now (1st - 28th February 2019)  demonstrators can pre-order these exclusive products now before they go live 1st March for customers to order. So grab yours now so you can start planning your Sale-a-Bration Coordination Classes.


The Sale-A-Bration Coordination promotion features brand new products that coordinate perfectly with select Sale-A-Bration items. These products are only available for a limited time. 

Have you seen the amazing Distinktive Sale-a-bration stamp set Lasting Lily? How stunning is this stamp set? It really helps you with the moments you can't put into words. Spend $180 (not including P&H) on any Stampin' Up! products, and you can get this amazing set for FREE!


I'm showing you today some amazing products to to with this amazing stamp set. Well, now with the Sale-a-bration Coordination promotion there is now a set of Framelits Dies, Lily Framelits Dies (150071) to go with this beautiful stamp set. All I can say is YAY, YAY, YAY! No more fussy cutting!! 

The Framelits Dies Set consists of 7 dies, 5 to go with the Lily images and then two shapes to outline some of the sentiments.
 
For my projects today, I really wanted to convey a more serious look to my cards starting with a Basic Gray card base. I also wanted to let those Lillies to be the 'hero' to my cards thus eliminating a lot of the 'fluff and stuff' that I usually add to my cards. There is still a little bit of ribbon and trim. Just enough to go with the CAS classic look.


I really think starting with the Basic Gray base as opposed to white or another colour has really given the lily images a whole different look and creates a stunning contrast. If you are having trouble getting a good stamped image of the Distinktive type stamps, try to use an ink pad that is 'juicy'. The more juicy your ink pad is the more 'bubbles' you'll get on the stamp and it will make it so much harder to get that beautiful Distinktive stamped image. 

Imagine how much more easier it would be if you were making lots of cards using the Lasting Lily Stamp Set and then just cutting them out with the Lily Framelits Dies rather than fussy cutting. Winning in my book! 


The second card uses a similar layout but I've just changed the orientation of the card for a different look. How beautiful do the sentiments look die cut using the two shapes from the Framelits Die set rather than just straight cutting them with your trimmer and creating a banner end on them. Really adds to the whole beautiful and stunning look of the Lasting Lily Stamp Set and the Lily Framelits Dies.

These dies really make it easy for any type of crafter - beginner, casual and avid. A few quick stamped images and then being able to quickly die cut them out, put all together on a card front and you've got yourself a beautifully created card. Perfect to achieve for any beginner. The casual and avid crafters can then step it up from there adding ribbon. trim and embellishments to add more accents and texture. 

How stunning would these lilies look stamped 'en mass' and then put in a frame or made into a home decor piece? Super easy to do now with the Lily Framelits Dies.


Make sure you as a Stampin' Up! Demonstrator you get these exclusive dies on your preorder NOW! The sooner you get these fabulous products in your hands the sooner you'll be able to make beautiful samples and cards. 

Just a reminder to the Stampin' Up! Customers, you'll be able to get your hands on these Lily Framelits Dies from March 1st. But if you as a customer, can't wait and want these products NOW, how about you join my team and you can put them in your starter kit. Just ask me how you can join TODAY!

I do hope that I've given you some inspiration with these fabulous products to create some stunningly simple but beautiful cards.

Now on to the amazing Stesha Bloodhart and her 'hoppy' creations!

https://stampinhoot.com/2019/02/artisan-sab1/
Thanks so much for stopping by! 
Happy Stamping!

Live in Australia?
 Shop for Stampin' Up! with me 24/7

 Recreate these cards at home using the following Stampin' Up! products. Click on the images below to see the product information and to shop from my online store.