Saturday, October 7, 2017

World Cardmaking Day Blog Hop


Hello and welcome to this special blog hop to celebrate World Card Making Day! We've got 19 talented Stampin' Up! Demonstrators from all around the world for a fun and creative hop.

With this hop having no specific theme I decided to finally pull out the Floral Statement stamp set and get creating and colouring with that. I've been meaning to ink up this stamp from the moment I got it when the new 2017 - 2018 Annual Catalogue when live but just haven't had the chance. So I thought today would be a good time to get this set all inky.

I inked up the stamp with the Tuxedo Black Memento ink and then used clear embossing powder to emboss over the image. Embossing over the image gives the image an added element and added texture. And I love the shinny look the clear embossing powder gives. So pretty.


Once the word was stamped and then clear embossed I pulled out the fabulous Stampin' Up! Watercolour pencils to add some colour to those gorgeous flowers. I used the Melon Mambo pencil for the flowers and the Old Olive one for the leaves. 

The way I like to use the watercolour pencils is to pick up the colour straight off the lead with my Aqua Painter and then colour in the image with the Aqua painter. If I then want the colour to then be a little darker I put some colour down with the pencil and then move that colour around on the cardstock with the Aqua Painter. I know everyone is different as to how they use the Watercolour pencils but by doing it this way I find I get the best results.

 Once I got the colour to the depth and shade that I wanted I added some Linen Thread, the leaf die cute from the Flourish Thinlits, a piece of the Flirty Flamingo Grosgrain Ribbon and a wooden emebellishment from the Touches of Nature Elements.  Just a fun layering of elements for some added interest.

The card is then finished off with the word 'Friend', from the Thoughtful Banner stamp set, embossed with White embossing powder on Basic Black Cardstock and then all finished off with a scattering of some Black Sequins from the Metallics Sequin Assortment. Love it!

Just a fun card for a fun and exciting day.

Up next on the hop is Cheryll Miller. Make sure you keep hopping around by clicking the next blog button below for more amazing World Card Making Day Creations.

https://senseofwhimsy.com.au/2017/10/07/world-card-making-day-blog-hop-2017

Thanks so much for stopping by!
Live in Australia?
 Shop for Stampin' Up! with me 24/7
 Recreate this card at home using the following Stampin' Up! products. Click on the images below to see the product information and to shop from my online store.


To celebrate Wold Card Making Day, from October 1-10th only, select stamp sets and note cards are on sale, PLUS there's an amazing deal of Fast Fuse!

http://bit.ly/2fZUdww

http://bit.ly/2fZUdww
You can see all the details for the World Card Making Day Sale in my Online Stampin' Up! Store Here (Australian Residents Only)

Make sure you get in quick before these items are all back to full price!

Friday, October 6, 2017

Stampin' Up! Artisan Blog Hop | More Merry Patterns

Hello, Hello. It's that time again for some fun and creativity from the Stampin' Up! Artisan Design Team. We've got some more fabulous ideas and creations using the promotion hostess set, Merry Patterns. 


What could make hosting a Holiday Catalogue party even more exciting?? How about the chance to earn an exclusive stamp set for FREE?? Simply host a party with $450AUD in sales by 31st October and you will earn the Merry Patterns host set for FREE.  Your party guests will also love shopping from our selection of our Designer Series Paper, now on SALE - By 3 get 1 FREE, making it easier to reach your $450 AUD and earn your FREE Holiday Stamp set. Don't miss out on this fabulous opportunity. FREEBIES for everyone. Contact me TODAY for more details on these fabulous promotions.

I've had a play around with the deer image and some of the DSP from the Christmas Around the World DSP from the Holiday Catalogue. This DSP captures the festive spirit with traditional Christmas images from all around the world. And the best thing is this DSP is on the Buy 3 Get 1 FREE promotion at the moment. Perfect to get those Christmas Cards started so you are organised by the time December 1st rolls around.

I first chose the Snowflake DSP because there was snowflakes in the deer image and then I really loved the colouring of the Pool Party Spotty DSP so decided to make a second card as well. Why not really.


 These two cards are same, same but different. It's just down to a personal preference as to which one you like.


I did start with having the deer stamped in black and then embossed with Clear Stampin' Emboss powder for that added gorgeous touch to the black. I changed the deer to the Silver Stampin' Emboss powder as I couldn't get the black to stamp clear and crisp as I wanted it. It just wasn't working, at all. I'm glad I changed to the Silver Stampin' emboss powder and I think the deer looks stunning in it. I literally gasped when I heated it up. It's just super gorgeous.


How stunning is that black and white striped ribbon? It just goes with everything! Love it! While the ribbon is a gorgeous size, I think it looks even better trimmed down to this smaller size.


Super gorgeous, super fun and super festive. 

 Now on to Shannon all the way over there in Canada. Has she got something super gorgeous and super fun for you too. Love that gal!!

http://crushoncolour.blogspot.com.au/2017/10/artisan-oct-1.html


Thanks so much for stoppping by!
Live in Australia?
 Shop for Stampin' Up! with me 24/7

 Recreate these cards at home using the following Stampin' Up! products. Click on the images below to see the product information and to shop from my online store.

Friday, September 15, 2017

#tgifc 125 - Theme Week - Getting around

Welcome, welcome. It's time for a new TGIF Challenge with this week being a fun theme week - how to travel.

Maybe it's by land,
maybe it's by sea,
maybe it's by air - 
This week let some form of transportation be your inspiration!!!


It can be by bike, balloon, wagon, car, plane, horse, whatever your transportation heart desires. 

When scouring through my stamp sets for something transporation related, the only stamp set that I had was Lift Me Up. I haven't used the set for a while and I really enjoyed playing around with this one again and creating with it.

I first started with the water colour wash layer and really wanted the wash to have a cloud like look. I first use Stampin Up!s colour, Soft Sky for the washed background but that was too light so I went over it again with Marina Mist. Once I washed the colour on the Shimmery White Cardstock I spritzed the wash with water using one of the Stampin' Up! Spritzers. This washes out the colour a bit more and gives it a more muted look.


Once the wash background dried, I then sprayed some of the water from the spritzer in my hand and then flicked some of the water over top of the wash. When the droplets dry, they pull some more of the colour out and gives another look to the water colour wash background.


I then added the Gold embossed Hot Air Balloons, some co-ordinating ribbons and trims and the dotted some of the gorgoeus sequins from the Iridescent Sequin Assortment.


Make sure that you check out the rest of the creations from the amazing TGIF Design Team. Lots of amazing creations and lots of inspiration for you for this weeks theme. While you are there check out all the details on how you can enter your creation in to this weeks challenge. I'm so looking forward to seeing your take on this weeks theme.

Thanks so much for stopping by!
Live in Australia?
 Shop for Stampin' Up! with me 24/7
 Recreate this card at home using the following Stampin' Up! products. Click on the images below to see the product information and to shop from my online store.

Stampin' Up! Artisan Blog Hop | Thankful Painted Harvest

Hello, Hello. Here's to Friday, well here in Melbourne it is, the start of the weekend and to another Stampin' Up! Artisan Design Team Blog Hop.  You are currently visiting me, Rochelle, in Melbourne, Australia and today we are bringing you creations using the Painted Harvest Stamp Set. Oh pretty!


It's got that Autumn or Fall feel with a watercolour look, without the all the work of actual water colouring. No colouring, just stamping! Yay!

I've gone for a rustic feel for my creations today. I do tend to love the rustic look and today is no exception. I've made shadow box frame, for a fun home decor piece, and a matching card. Just search in Pinterest and on You Tube, there are lots of tutorials on how to make the shadow box frame.


How gorgeous are those sunflowers from the set. These are part of a two-step stamping process where two stamps layer on top of each other to create the one image. I'm loving the 'yellow' look to the sunflower but also the 'deep red' look too. Gorgeous.

For the 'yellow' sunflower I  used So Saffron for the lighter layer and then Crushed Curry on top. For the 'Deep Red' sunflower the lighter layer is Cherry Cobbler, stamped off and then on the top Cherry Cobbler full strength.


How good are the Painted Harvest images teamed up with the Wood Textures DSP stack. The Wood Textures DSP really adds to that rustic look that I love and just another gorgeous element on its own.


While the sunflower I fussy cut out with the Fabulous Stampin' Up! Paper Snips, the leaf image has a co-ordinating punch. Definitely makes it easy just to punch out the images like that, that's for sure. Love it! Get the Painted Harvest Stamp Set and the Leaf Punch in an bundle (#146021), at a bundle price and you'll save 10%. Winning!!!


To eliminate the words 'for you' from the sentiment stamp 'I am Thankful for you' stamp I put Washi Tape over the 'For You' before inking it up with Versamark Ink and then removed the washi tape before stamping it down.

By having this frame on display it my home, it reminds me to stop and to remember to be thankful. It's something that I need for myself to be reminded of rather than complaining and criticizing, which sometimes I'm a little to quick to do.

Now on to the Shannon in Canada and her oh so fabulous creations. I love the way she puts colour and elements together. She's just so good at it!

http://crushoncolour.blogspot.com.au/2017/09/artisan-sep-2.html


Thanks so much for stopping by!

Live in Australia?
 Shop for Stampin' Up! with me 24/7

 Recreate this card at home using the following Stampin' Up! products. Click on the images below to see the product information and to shop from my online store.

Friday, September 8, 2017

Just Add Ink #376 | Just Add 'D'

Hello and welcome! Another week down and another Friday to bring you a new Just Add Ink Challenge - Just Add 'D'.


Any thing that begins with 'D' - Daisies, Dogs, Dots, Diagonals, Dragonflies or your favourite product that begins with 'D'. The possibilities are endless as long as it begins with the letter 'D'.

I've pulled out the Stampin' Up! Dragonfly Dreams stamp set. Even though this set has been around for a little bit now it still is fun to stamp with and makes fabulous cards.


I've gone with a very neutral colour palette today - Basic Black, Whisper White and Crumb Cake with a little pop of Gold. I do love me a netural palette. While it doesn't have all those bright and fun colours to pack that punch, it has that subtle elegance with it's subtle colours.


I stamped the dot image all around the edge using Crumb Cake Classic Ink onto Crumb Cake Cardstock and then pulled out the fun black ink splatter using the Basic Black Stampin' Write Marker. Super easy to do and just adds another dimension and layer to any card.


The Dragonfly was first inked up with Versamark and then Black Memento Ink, stamped down and then heat embossed with Clear Stampin' Emboss Powder. Everything looks better with some heat embossing, right?  I love it!

I've teamed up the dragonfly with some ribbon and trim from the Annual and New Holiday Catalogue. Loving that Black and White Striped Ribbon. It's new in the Holiday catalogue. It's just stunning! I'm loving it though to use not only on Christmas creations but on everything else as well. The striped ribbon is a bit wider than what is seen here on my card today. I trimmed the edges off the ribbon so that it would be a better size for my card today. Tip for Today - If your ribbon is too wide for your creation just trim it down. 

Make sure that you check out the rest of the Design Team over at Just Add Ink for all their 'D' creations. Lots of amazing ideas and creations. Once you check out the rest of the design team come and join in for this weeks challenge. So looking forward to seeing what you create!

Thanks so much for stopping by!
Live in Australia?
 Shop for Stampin' Up! with me 24/7
 Recreate this card at home using the following Stampin' Up! products. Click on the images below to see the product information and to shop from my online store.

Monday, September 4, 2017

Stamp Review Crew | Crafting Forever

Hello. It's the first Monday of the month so that means it Stamp Review Crew time. We are hopping with a fun set from the Annual Catalogue called, Crafting Forever.

http://stampreviewcrew.blogspot.com/2017/09/crafting-forever.html

If you are joining us for the first time we are a group of International Stampin' Up! demonstrators that show one Stampin' Up! stamp set at a time, every first and third Monday's of the month. Be sure to make your way around the hop by clicking the next button at the bottom of each post. If you get lost along the way click on the banner at the top of each post and that will lead you to the list of hoppers so you can continue seeing all the fabulous creations.

 The Crafting Forever stamp set reminds us how much we love creating and crafting. And even better yet, they're approved for use in conjunction with the Stampin' Up! Angel Policy. 

Whats the Angel Policy, you ask? Well, you can sell projects you've made with Stampin' Up! copyrighted images if  they include "© Stampin' Up!" on them.  The Crafting Forever set is perfect to help you get that copyright on your creations. You can find out more about the Angel Policy here.

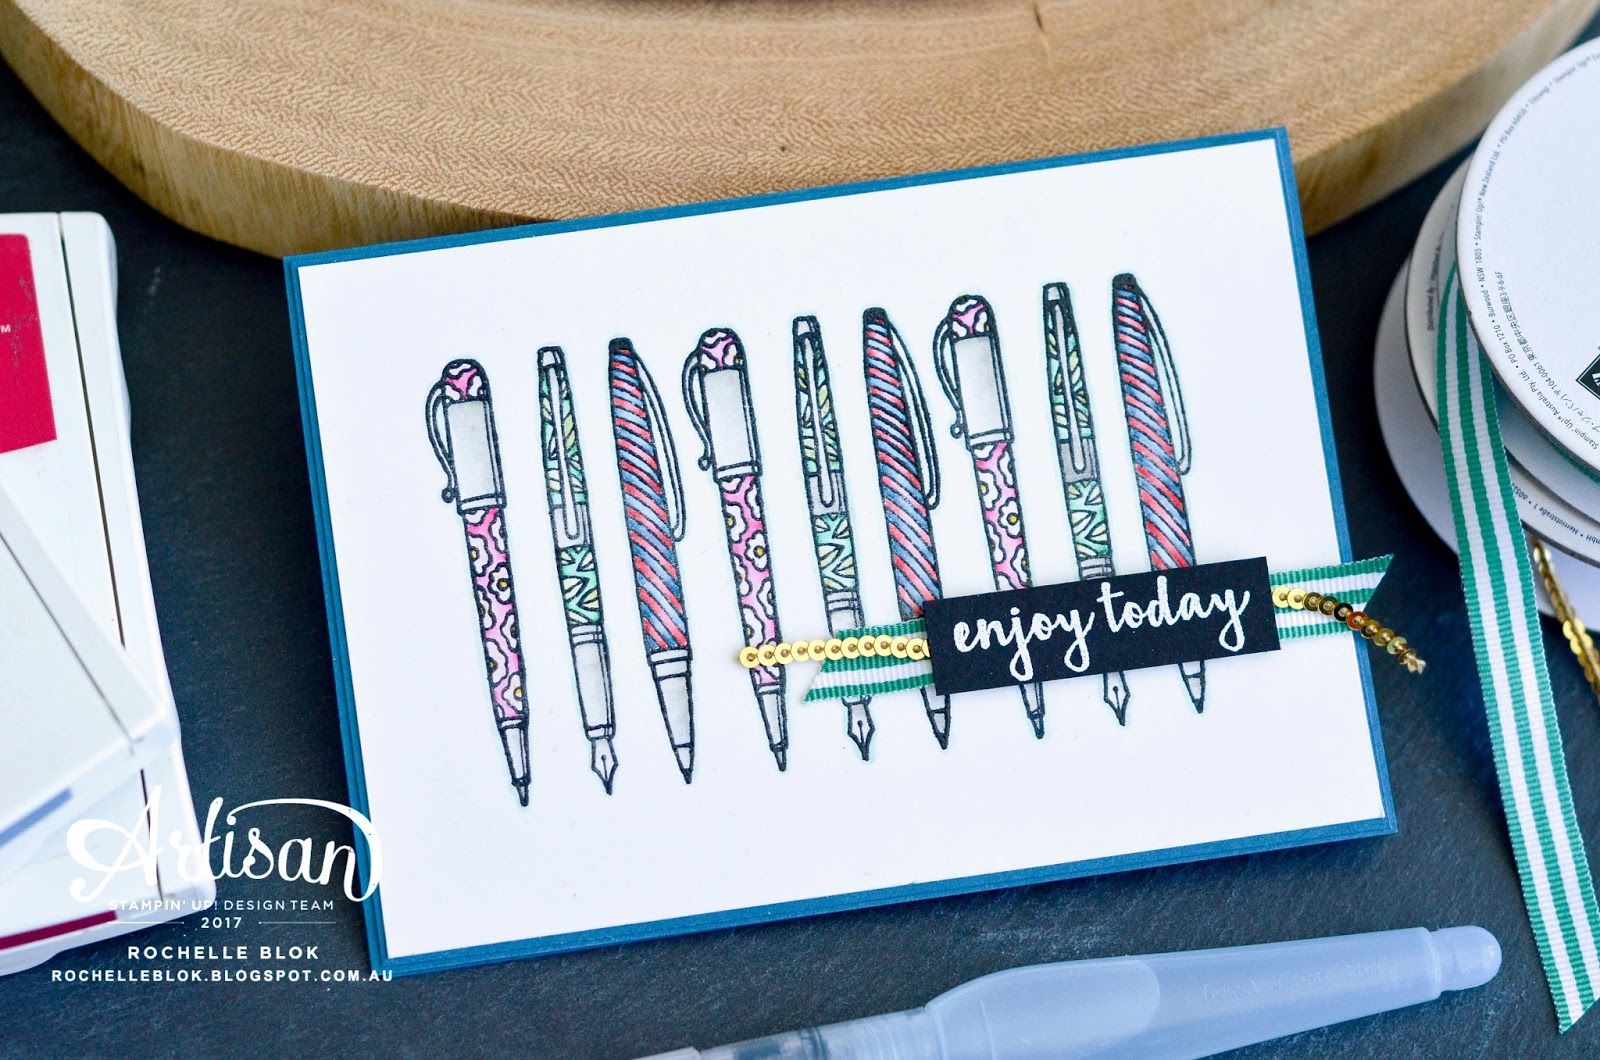
I've used the pen image from the Crafting Forever set for a bit of repeated stamping and some colouring. Super fun.


I first inked up the Pen image with Versamark and then Memento Black in and then stamped it down. Once the image was stamped I then covered it in Clear Stampin' Emboss Powder and then heat set the embossing powder.

I like to heat emboss my images when colouring as it provides a little bit of a barrier when colouring and the colour tends not to bleed out as much as compared to when colouring with out the embossed outline. It also gives a nice shinny look to the outline of the images. It's just one of those things that I like to do when crafting and colouring. I'm sure we all have those things that we just like to do when we craft and that is the way that we like it.


To get the images all lined up in that straight line I did have to pull out the Stamp-a-ma-jig to get them all positioned properly. I know most people have more of a hate relationship with the SAMJ but once you learn how to use it properly it really is quite easy to use. Then you'll go from hating it to loving it.


It really was quite relaxing to colour all those pens. I'm one of those people that actually find colouring like this very therapeutic. Get a bit of music going, pick out what colours you want to use and get going. To colouring the pens I picked up the colour from squeezing the lid of a closed Stampin' Up! ink pad firmly and then that picks up the colour of the ink pad in the lid like in a colouring well. That is one of the fabulous designs of a Stampin' Up! Ink pad and perfect for holding a little bit of colour in the lid.

The card is the all finished off with a little bit of Emerald Envy 3/8" Striped Grosgrain Ribbon, Mini Sequin Trim in Gold and the sentiment, embossed with White' Stampin' Emboss Powder, comes from the Pieces & Patterns stamp set.

Now on to the amazing Linda Callahan for her fabulous creations using the Crafting Forever set.

http://stampinseasons.blogspot.com/2017/09/stamp-review-crew-crafting-forever.html
Linda Callahan

http://www.inchofcreativity.com/2017/09/stamp-review-crew-blog-hop-crafting.html
Martha Inchley

Thanks so much for stopping by!
Live in Australia?
 Shop for Stampin' Up! with me 24/7

 Recreate this card at home using the following Stampin' Up! products. Click on the images below to see the product information and to shop from my online store.
 

Friday, September 1, 2017

Stampin' Up! Artisan Blog Hop | Introducting Merry Patterns

Why hello there! Welcome to another Stampin' Up! Artisan Design Team blog hop. We are hopping today with an all new, never been seen before, limited edition stamp set just in time for your Christmas Cards called Merry Pattens.


It is a super gorgeous, two-step stamp set with some fun outlines and some fantastic in-fill pattern images. Super cool, super fun. 

This set is available from 1st September till 31st October 2017.  The only way you can get this limited edition stamp set is if you host a Stampin' Up! party with me and have $450AUD in sales. This fabulous stamp set will be then yours for FREE and that is in addition to the Stampin' Rewards you earn when you host a qualifying party!! Bonus!!! 

Now on to my cards. I've played around with the new Christmas Around the World Designer Series Paper that Stampin' Up! customers can now get from TODAY, and teamed it up with the patterned images from the stamp set.


The first card I made was the one with the deer. I first had some gorgeous red and white stripes to go with it, also from the Christmas Around the Worlds DSP but I just wasn't loving it together so I kept flicking through the DSP pack and then I came across this tartan (plaid) pattern. I thought it was gorgeous with the deer and had that whole woodsy, rustic feel.


And then once the deer card was made I then replicated the layout and also using similar products, created the other two cards. How dramatic does that DSP look with then the bright white panel and then the images embossed with Gold Stampin' Emboss Powder? Love it!


If you want a bigger spray of the pine branches, just stamp them a couple of times till you are happy with the way it looks.


Aren't those enamel dots a great way to embellish your cards. Such gorgeous colours and I love the fun shine one them. I now have to get some more of these Real Red ones as I've now run out.


Stamping these candles is super easy due to the fact that the stamp set is photopolymer which means you can see through the stamp to see the image placement. There is even a stamp for the flame so you don't even have to get out your colouring tools to colour them in. Makes for a quick way to get your Christmas cards made that's for sure!


Remember to get this very limited stamp set you must have a qualifying party of $450AUD (or place and order of $450AUD) and it is only available for a very limited time. So contact me today to get your Merry Patterns Party and you will be able to get your hands on this fabulous set. Be quick because once Oct 31st comes around this set will be all GONE!!!!

Now on to the ever amazing Shannon Lane in Canada and her super fabulous creations.

http://crushoncolour.blogspot.com.au/artisan-aug-3.html


Thanks so much for stopping by!
Live in Australia?
 Shop for Stampin' Up! with me 24/7

 Recreate these cards at home using the following Stampin' Up! products. Click on the images below to see the product information and to shop from my online store.