Saturday, July 19, 2025

Artisan Extra | 2025 Stampin' Up! Artisan Design Team | Painterly Pears Elevated Cards


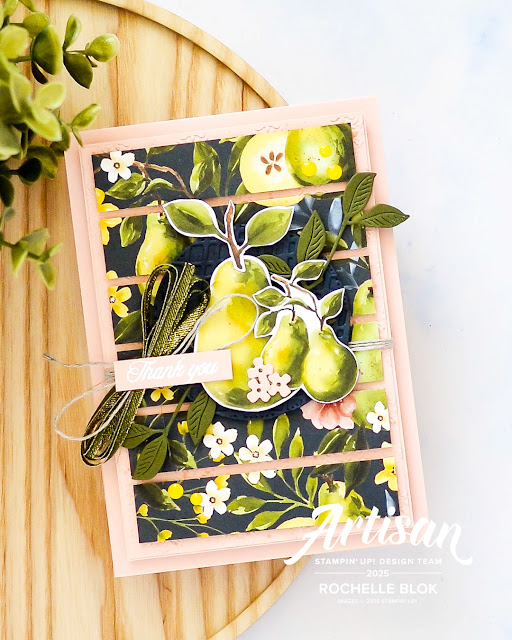
Hello stamping friends. Today I'm sharing my Creative Project 

for the 2025 Artisan Design Team. Through out an Artisans year they have to contribute 3 - 4 Creative Projects that are uploaded to the Stampin' Up! Facebook and Instagram social pages.

These creative projects are projects that feature new, never-before-seen content and that also have the 'WOW' factor.

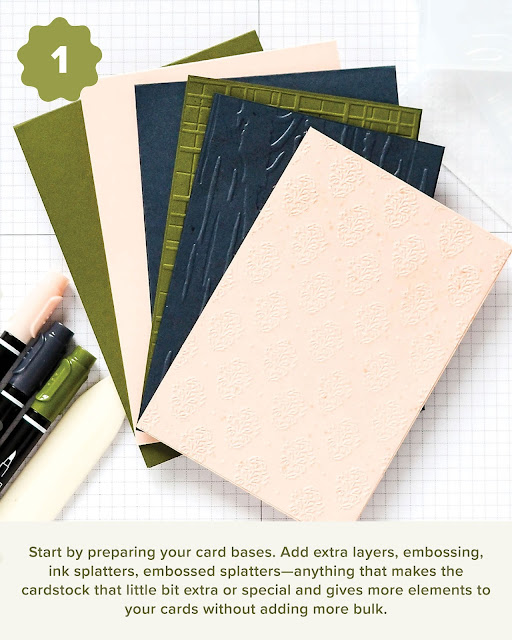
This time for my Creative Project I've created 3 cardst using the beautiful and stunning Painterly Pears Suite Collection. This suite can be found in the Online Exclusives section on the Stampin' Up! Website. For my cards I've shared some tips and techniques on how you can elevate your cards to give them that WOW!


How do you elevate your cards? Try and use some of these tips and techniques on your next creation! I'm sure you'll be pleased with the results!

Thanks so much for stopping by! 
Happy Stamping!
 

Live in Australia?
Shop for Stampin' Up! with Me 24/7 HERE
 
Recreate this project at home using the following Stampin' Up! products.  Click on the images below to see the product information and to shop from my online store 

Friday, July 11, 2025

Global Design Project #504 | #gdp504 | CASE the Designer Challenge

Hello stamping friends! I hope you are having a fabulous day! Thanks for stopping by my blog. Today, I'm playing along with the challenge over at the Global Design Project #504 | #gdp504 | CASE the Designer Challenge. 

  This week's challenge is to CASE the Designer, Mikaela Titheridge. Mikaela has an amazing crafting style. Her creations are always a WOW! She is always a source of crafty inspiration! No wonder she has been on the Stampin' Up! Artisan Design Team 3 times!

I was actually inspired by the layout and design of Mikaela's card and have used those elements for my card. 

I loved the large rectangle that Mikaela had on her card. She used a die to die-cut hers, but I've just cut some cardstock and DSP with my Paper Trimmer to create some layers. I've also added some embossing using the Forever Plaid 3D Embossing Folder.

Where Mikaela has the three watercolour washes on her card, I've used DSP to incorporate those elements, and I've also placed some die-cut elements where Mikaela placed her sentiment.

It's amazing when CASE-ing someone and using similar design elements, how different the two cards can be.

I do hope that you enjoy my take on the Global Design Projects CASE the Designer Challenge. For the full list of all the products used, please refer to the product list below.
 
Thanks so much for stopping by!
Happy Stamping!

Live in Australia?
Shop for Stampin' Up! with Me 24/7 HERE
 
Recreate this project at home using the following Stampin' Up! products.  Click on the images below to see the product information and to shop from my online store.

Just Add Ink #759 | Just Choose Two Challenge

Hello stamping friends. Happy Friday! I hope you are having a wonderful day. I'm here today with the Just Add Ink Design Team for the new Just Add Ink Challenge - Just Add Ink #759 | Just Choose Two Challenge. This week, our Just Choose Two Challenge has been suggested by team member Di.  

Today for our Just Choose Two challenge (to choose two items to feature on your project), we are choosing from Trees, Beach, and Water. I've chosen Beach and Water for my card today. I originally wanted to do trees, beach, and water with a beachy Christmas themed card but my creative brain just wasn't having it so its just beach and water today.

I've used the Everyday Arches Dies to create an arched cutout, and then in that, I've created a cute little beach/ocean scene using torn cardstock for the water and the sand, sponged clouds and some of the dies from the Notes & Totes Dies. I love the CAS look to this card and then the little pops of colour with the 'waves' and the shells and starfish. I could have added more layers and things like dry embossing with embossing folders and ink splatters, but I really like the less-is-more approach to this card.

To keep that CAS look, I've finished off this card with some Clear Gems that are in the Strawberry Slush & Pretty in Pink Gems and my all-time favourite and classic trim, Linen Thread.

I do hope that I've given you some inspiration for our Just Choose Two Challenge. Go and check out the design teams take on this week's challenge at the Just Add Ink Blog, and then come and join us for this week's Just Choose Two fun!

 Click on the image below to join in this week's challenge.

 Thanks so much for stopping by!
Happy Stamping!

Live in Australia? 
Shop for Stampin' Up! with Me 24/7 HERE
 
 Recreate this project at home using the following Stampin' Up! products.  Click on the images below to see the product information and to shop from my online store 
  

Sunday, July 6, 2025

Tractor & Co. Bundle | July | 2025 Artisan Design Team Monthly Project


Hello stamping friends! This month's assignment for Group 2 of the 2025 Stampin' Up! Artisan Design Team is to create projects using the super cute Tractor & Co Bundle from the  @stampinupofficial July Online Exclusive release.⁠

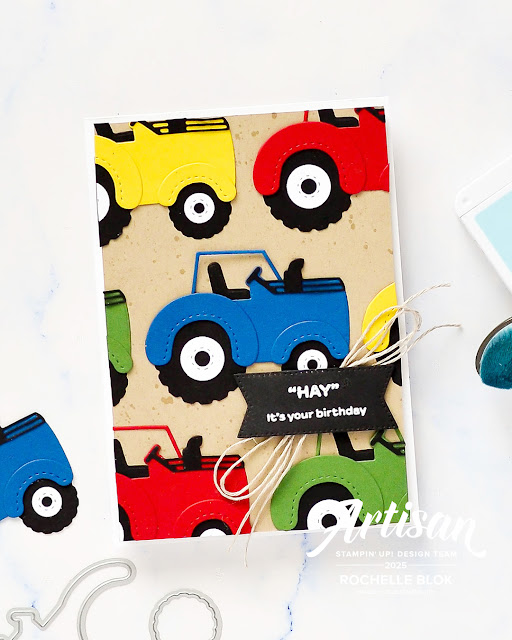
With the Tractor & Co bundle, create a fun card by combining stamped images and die-cut pieces of tractors, trailers, and harvested crops. Finish the card off with a sentiment for birthdays, Christmas, thanks or thinking of you. Perfect to use all year round. I've used the Tractor & Co dies with fun and bright colours for some gorgeous cards.

For my first card, I've created a fun CAS card by piecing together all the Tractor & Co dies to create the tractor and then used the tractors repeatedly in bright cards for a fun and adorable card. Pretty simple but quite effective with the gorgeous colours.


My second card is a cute little tractor scene. Again, a CAS card. Sticking with the bright colours makes for a fun and gorgeous card. 
 
This bundle is super cute and super fun!  I hope that I've given you some inspiration with this amazing bundle. Make sure you check out my post for this suite on Instagram HERE, as group two have an Instagram Hop and you will be able to see the rest of the teams' creations.
 
Thanks for stopping by!
Happy Stamping!

Live in Australia?
Shop for Stampin' Up! with Me 24/7 HERE
 
 
 Recreate this project at home using the following Stampin' Up! products.  Click on the images below to see the product information and to shop from my online store
Friday, July 4, 2025

Global Design Project #503 | #GDP503 | Flowers Challenge

 Hi there, stamping friends! Thanks for stopping here at my blog. Today, I'm playing along with the challenge over at the Global Design Project #503 | #GDP503 | Flowers Challenge.

Today I've made a pretty floral birthday card using some products from the Floral Impressions Suite, namely the Impressions Abloom Dies. I've made quite a few cards with these dies, you can check them out here, here, here, here and here. This suite is a stunning suite and perfect to use for the Global Design Project flower challenge.

  I've started the card with a Basic White card base and then added an embossed Basic White layer embossed with the fantastic Mini Corrugated 3D Embossing folder. This embossing folder is so very versatile and goes with any project. I've then used the Everyday Arches Dies to cut an arched die-cut piece, and then this has been embossed with the Pressed Flowers Embossing folder. I love layering embossed pieces. The embossing gives that extra WOW element to your creations, and using more than one embossed layer gives your projects that extra special look.

I die-cut all the floral pieces in Basic White cardstock and then, using a blending brush, added the colour to each flower. Here I used Pretty in Pink, Fresh Freesia, Peach Pie, Bubble Bath, and Daffodil Delight. The flower centers were coloured with Pecan Pie.

 I've finished the card off with some Gold Mesh Ribbon, Mossy Meadow & Gold Ribbon, Linen Thread, and Pretty in Pink & Strawberry Slush Gems. Super pretty and so florally!

 I do hope that you enjoy my take on the Global Design Projects Flowers Theme and are inspired to use multiple layers of embossing on your next project.

Thanks for stopping by!
Happy Stamping! 

 
Live in Australia?
Shop for Stampin' Up! with Me 24/7 HERE
 
Recreate this project at home using the following Stampin' Up! products.  Click on the images below to see the product information and to shop from my online store.