Friday, March 29, 2019

Fancy Friday Blog Hop | Case the Catty!


Hello there stamping friends and welcome to this months Fancy Friday Blog Hop. I'm so thrilled to have you here today to share my creations and hopefully inspire you. I'm hopping with my fancy friends today- all are either current or former members of the Stampin' Up! Artisan Design Team. We just love getting creative and sharing our projects.


Today we are all about 'CASing the Catty', 2018 -2019 Annual or 2019 Occasions. CASE in the crafting world means to 'Copy and Share Everything'.  But I see CASing as more seeing a project, take some of the ideas from the original creation and then change it up to suit your own style. So to CASE the Catty, select a project from one of the many amazing samples in the catalogues and then recreate it in your own way!

I've ,sort of, combined these two samples together found on pg. 36 of the 2019 Occasions catalogue, that showcases the beautiful Humming Along Stamp Set and Hummingbird Framelits Dies. I've then changed up the samples to make my own creations with the Tropical Chic stamp set found on pg.121 in the 2018 - 19 Annual Catalogue.


I've seen quite a few fabulous creations lately using the amazing Tropical Chic stamp set and they kind of reminded me to pull it out and get creating with it again. So really my creations are keeping with that tropical theme of the original samples and then changing it up to my style.


In the sample from the catalogue I was really drawn to the striped DSP and then the fun layout with the Stitched Rectangle Framelits. So that is where I started, with the striped DSP and then the rectangle. The black and white stripe DSP is from the Sale-a-bration DSP pack, Botanical Butterfly. I have so loved the black and white patterns in this paper. I've got all my fingers and toes crossed for something similar when the new 2019 - 20 Annual Catalogue is released. And there is still time to get this DSP for FREE. Spend $90AUD (not including P & H) and you can get this paper for FREE. Just click HERE to shop for Stampin' Up! with me.

The stripe in the Botanical Butterfly DSP is on an angle, but I turned the DSP around when cutting it so that the stripe would run horizontal, similar to the original creation.


I've accented the Basic Black stitched rectangle with a frame using the Tropical Escape 6" x 6" DSP. I love the contrast of the black and white and then the greens from the tropical DSP. It really is such a fabulous colour combo.

Combined with the layers of DSP and cardstock is an arrangement of the leaves and flowers from the Tropical Chic stamp set. To get the two-tone colours, stamp the image in the lighter colour and then using a sponge dauber lightly swipe the darker colour around the edge. It really changes up the look of the stamped images and really gives them a fun look. The Thank You is then stamped with Memento Black ink on Crumb cake cardstock.

Just loving the summery/tropical vibe to my creation. It's helping me hang on to the last of the warmer days before we head into the cooler months here in Melbourne.


If your ever stuck for ideas and just don't know where to start, when creating a project, have a look through the Stampin' Up! Catalogues (Old and New) and I'm sure you'll find project that will spark your creative ideas and get you going.

Next up on the hop is the super amazing, super gorgeous, super talented, fellow Aussie, Jenn Frost. Click on the next button to see her fabulous creations.

https://jenniferfrost.blogspot.com/2019/03/MAR19-FF.html
Thanks so much for stopping by!
Happy Stamping!
Live in Australia?
 Shop for Stampin' Up! with me 24/7

Recreate these cards at home using the following Stampin' Up! products. Click on the images below to see the product information and to shop from my online store.

Just Add Ink #450 | Just Add Babies

Hello stamping friends! Today for the new Just Add Ink Challenge  - Just Add Ink #450, we are all about babies. Not literally, but projects for babies. Get ready for an overload of cuteness.


My two cards today are for a new baby boy or girl. Using the Stampin' Up! A Little Wild Stamp set and using the Stampin' Up! Water colour pencils for a bit of water colouring. Super cute and super fun


I've incorporated the Stampin' Up! Twinkle, Twinkle Designer Series Paper to accent my cards today. Petal Pink spots for a girl card and Pool Party stars for a boy.


I've used the Stampin' Up! Watercolor Pencils to colour my images, no my two cards today but I coloured them a little differently to what you might think. I didn't colour in the image with the pencil first and then move the colour around with the aqua painter. No, I used the aqua painter to pick up the colour off the pencil lead and then coloured the image with the colour that was on the aqua painter. I just find that the colour blends a lot better that way and you don't get any harsh colouring lines. Also by picking the colour up off the pencil you can control how much colour you put down and it's easier to create a softer colour. Basic Gray for the elephant and Early Espresso for the bear.


To accent the coloured DSP I used the cloud stencil from the Pattern Party Decorative Masks and the white embossing paste for a cute textured background layer and then layered that with some Gray Granite cardstock. The white with the Gray Granite and the little bit of colour is such a gorgeous soft look, perfect for a new baby card.


Accented with the cardstock layers is Silver and Petal Pink Baker's Twine, Silver and Pool Party Baker's Twine and some Iridescent Sequins in the coordinating colours.  All super cute and super gorgeous.

I hope that I've given you some inspiration for this weeks challenge over at Just Add Ink. Head on over to the JAI blog and check out the rest of the Just Add Babies inspiration. While you are there check out all the details on this weeks challenge and then come and join in the Just Add Ink challenge fun.

Thanks so much for stopping by!
Happy Stamping!
Live in Australia?
 Shop for Stampin' Up! with me 24/7

Recreate these cards at home using the following Stampin' Up! products. Click on the images below to see the product information and to shop from my online store.

Friday, March 22, 2019

Just Add Ink #449 | Colour Challenge

Hello there stamping friends! Today its time for the new challenge over at Just Add Ink #449 | Colour Challenge. This week its a gorgeous colour combo using the Stampin' Up! colours - Lovely Lipstick, Gorgeous Grape and Bermuda Bay.


Click on the colour name to see all the Stampin' Up! Products in these colours

Normally when you see these three colours together you would usually think of a bright project full of these fun colours not a card that is bold and rich in colour with an intense depth to the colours used like what I've created here today.

Keeping with the colourful background techniques, I've given the sponge brayers a workout today to achieve the range and depth of colour that I got on the background layer to my card.


I started my card by gold embossing the doilies on to the background first and then working from the bottom up I covered the Shimmery White Cardstock starting with first Gorgeous Grape and then the Bermuda Bay, rolling the colour on with a sponge brayer. Just keep rolling the brayer over the cardstock until you are happy with the colour. Just remember, the more colour you put on, the darker the colour will be.


Where the Gorgeous Grape and the Bermuda Bay colours overlap it looks like I've added Night of Navy into the mix but that is just where the two colours blended together when rolling the colour on with the sponge brayer.


I splattered some water over the card to pull some of the colour out and to give another look to the card and then because I thought this card was busy enough it really didn't need much else other than the 'Happiest' and 'To You' embossed in gold and then the 'birthday' die cut, 3 times, from Lovely Lipstick cardstock and then layered on top of each other for some added height and dimension.

Just a few sequins scattered on the card and a little bit of Gold Metallic Thread and then that finishes off the whole card. This is one of those cards that is even better in real life as the depth of colour is just unbelievable.

Make sure you check out the rest of the projects from the Just Add Ink Design Team for this colour challenge. The range of creations is awesome. We all have the same colours yet we all made something different. While you are checking our projects out make sure you check out the details on this weeks challenge and then come and join in the fun! I can't wait to see what you do with this weeks colours!

Thanks so much for stopping by!
Happy Stamping!
Live in Australia?
 Shop for Stampin' Up! with me 24/7

Recreate this card at home using the following Stampin' Up! products. Click on the images below to see the product information and to shop from my online store.

Wednesday, March 20, 2019

Stampin' Up! Artisan Design Team Instagram Tip | Stampin' Blends Coloured Background

Hi there stamping friends! Hello and welcome to my blog. I've got a fun technique for you today. Did you know that you can make fun, colourful backgrounds using Stampin' Blends Alcohol Markers, Window Sheets, Glossy Cardstock and Isopropyl Rubbing Alcohol?

I have a few simple steps for you to help you achieve this fun and fabulous technique -
1. Simply lay a piece of  Window Sheet over a piece of cardstock (to see how big your glossy cardstock layer is) and 'scribble' very randomly the Stampin' Blends Markers over the window sheet as to the size of your cardstock.

2. Using a Stampin' Spritzer, spray very generously Isopropyl Rubbing Alcohol on to the Window Sheet as to where you have coloured with your Stampin' Blends.


3. Place a piece of Glossy Cardstock, glossy side down, onto the wet ink. Press the cardstock onto the ink for a few seconds and then lift up to reveal your background. Allow the ink to air dry or you can speed up the process by giving the cardstock a quick blast with your Heat Tool.

4. Adhere your background to your project for a fun and individual creation.


No two backgrounds will look the same. This is such a fun and quick technique that gives fabulous, eye catching results.


Make sure that you use your brightest colours when attempting this technique as the colours will appear muted on the Glossy Cardstock. What colours will you try?


I hope that you enjoyed my technique today. Why not give it a try for your next project? You wont be disappointed with the results.

As well as my blog here you can also see my projects on Instagram and Facebook. Come and follow me to see all my latest projects!

Thanks so much for stopping by!
Happy Stamping!

Live in Australia?
 Shop for Stampin' Up! with me 24/7

Recreate this card at home using the following Stampin' Up! products. Click on the images below to see the product information and to shop from my online store.

Friday, March 15, 2019

Stampin' Up! Artisan Design Team Blog Hop | Classic Garage

Hello there stamping friends! Welcome to another Stampin' Up! Artisan Design Team Blog Hop. This month we are all about the Classic Garage Suite. This suite is to celebrate the men in our lives. It isn't just for Father's Day, it covers a whole range of celebrations. 


This suite has been designed and 'geared' towards the men. When making cards for the guys I usually find that the cards end up looking so plain (well plain to me) because the guys generally don't like pearls and bling and 'pretties' that I love to put on cards. So pulling all that stuff off makes the card look 'naked'.


This suite in the 2019 Occasions Catalogue really has changed all that up. I love that this suite, the stamp set, dies, DSP, ribbon, embellishments, really it has meant that I can go to town with my usual layering style but still keeping the cards looking 'masculine'


On all three cards today all the 'mottled' looking layers all come from the Classic Garage 6" x 6" DSP pack. As I was giving the cards lots of layering and elements I picked sheets from the DSP that wasn't too busy. These three sheets of DSP then made up the colour combination for my cards today.

The first card I use the large gears die and die cut the gears out of vellum. I sponged Versamark Ink around the edge of the Vellum Die Cut and embossed Silver Stampin Emboss Powder. This just added to the metallic look of the card and also added another 'layer' to the card.

The coloured gears are die cut from the DSP. The larger gears die is coordinated with some of the patterns in the DSP. This is Stampin' Up! coordination at it's best! 


My second card I put the Big Shot Embossing mats to work again with the larger gears from the Garage Gears Thinlits. This was embossed onto the Classic Garage DSP and then over that I covered the DSP with a Embossing Powder Splatter.

Squirt out a little bit of Tombow Glue on you Silicone Craft Sheet, squeeze out a little bit of water from your Aqua Painter and mix the glue and the water together. Then using the brush tip of the Aqua Painter splatter the glue mix over your cardstock and then pour over your desired Stampin' Emboss Powder. Here I've used Silver Stampin' Emboss Powder again to go with that metallic look. I've also layered some of the smaller gears thinlits, die cut from Silver Foil Sheets, with some more of the DSP, some of the Black and Silver Striped Metallic Ribbon and the Classic Garage Metal Elements. How fun are those Metal Elements?


My last card is again layering of all the different elements from this fabulous suite, changing them up for a fun a different look. How fabulous do those Basic Black gears look on the Tranquil Tide DSP? Such a great colour combo for the guys! Such a manly look.


I hope that I've given you some more ideas on using this product suite and shown you how you can create the cards for the guys and they don't have to be 'plain'.

Next up on the hop is Stesha Bloodhart over in the U.S. She has some fabulous projects 'geared' up for you. Click on the next blog button to check them out!

https://stampinhoot.com/2019/03artisan-mar-fb/


Thanks so much for stopping by!
Happy stamping!

Live in Australia?

Shop for Stampin' Up! with me 24/7

 Recreate these cards at home using the following Stampin' Up! products. Click on the images below to see the product information and to shop from my online store. 

Just Add Ink #448 | Just Add 'J'

Hello there stamping friends. Happy Friday! It's means that it's time for the new Just Add Ink challenge. This week we have one of our letter challenges Just Add Ink #448 | Just Add 'J'. It could be a stamp set, colour, favourite product starting with J, fancy fold, papercrafting technique, just a long as it starts with the letter J.


I just couldn't think of much this week and was really challenged by the Just Add J. I only have one stamp set starting with J and I don't have any colours in my crafting supplies that start with J so I was really stumped as to what to do. I went on a hunt to a fabulous resource for paper crafters - Splitcoast Stampers and scoured their tutorials to see if there was anything that started with J. There was a few different ones there but I really loved the look of the Joy Fold Card.

Most people, when making a Joy Fold Card, will make the card in the standard greeting card size, which in Australia is A5 (105mm x 148mm) but I really liked the look of the smaller square size to do something different.


I've used some of the patterns from the beautiful Painted Seasons DSP, that is a Sale-A-Bration Freebie for the current Sale-A-Bration Promotion. There is two ways you can get your hands on this amazing DSP. Spend $90 with me here at my online store (not including P&H) and you can get this DSP for free #149574 or spend $180 at my online store (not including P&H) and you can get this DSP as part of a bundle with the Painted Seasons Stamp Set for free #150349.  

Check out my other creation with this AMAZING DSP HERE


To make the square Joy Fold card, cut your base piece of cardstock 4-1/4" x 6-1/4" and score at 4-1/4" on the long side. For the inner square flap cut a piece of cardstock 3" x 6" and score at 3". 

When putting the card together after you've decorated and added your layers make sure that the smaller 3" card layer is centre on the inner larger panel so that the smaller flap folds over the larger flap when folding the card shut.


To hold your card shut make sure that the smaller panel has something to 'tuck' into. The ribbon and leaf cluster gives just enough for the top panel to secure the flap from opening. The ribbon is Call Me Clover Grosgrain Ribbon with Whisper White Polka Dot Tulle, Linen Thread and Gold Metallic Thread. The leaves are from the Painted Seasons Stamp Set.  I've combined with the Painted Seasons DSP some of the words from the Well Said Stamp Set and the Well Written Framelits. To give the 'birthday' some more thickness and dimension I die cut three of the birthdays and then layered them together. Once stuck together I pressed the die cut into Versamark Ink and then covered it with Clear Stampin' Emboss Powder, just to give it a gorgeous, shinny sheen.

I hope that you like my take on the Joy Fold Card and my take on the Just Add 'J' Theme. There are heaps of other fabulous designs by the team this week with their Just Add 'J', so do pop over to the Just Add Ink Blog to check them out. While you are there check out the details on this weeks challenge and then come and join in the fun! Can't wait to see what you create.

Thanks so much for stopping by!
Happy Stamping

Live in Australia?

Shop for Stampin' Up! with me 24/7

Recreate this card at home using the following Stampin' Up! products. Click on the images below to see the product information and to shop from my online store. 

Sunday, March 10, 2019

ESAD Blog Hop | Sale - A - Bration 2019

Hello there stamping friends! Today and my fellow Stampin' Up! demonstrators from the Facebook group ESAD (Extra Special Australasian Demonstrators) have a fun and fabulous blog hop for you. We are showing you products from the 2019 Occasions Catalogue and then showing what you can earn for free with the 2019 Sale-a-Bration promotion.


With some of the Sale-A-Bration products sold out, all of the Sale-A-Bration products that are shown in this hop are still available for you to earn (as of 10/03/2019).

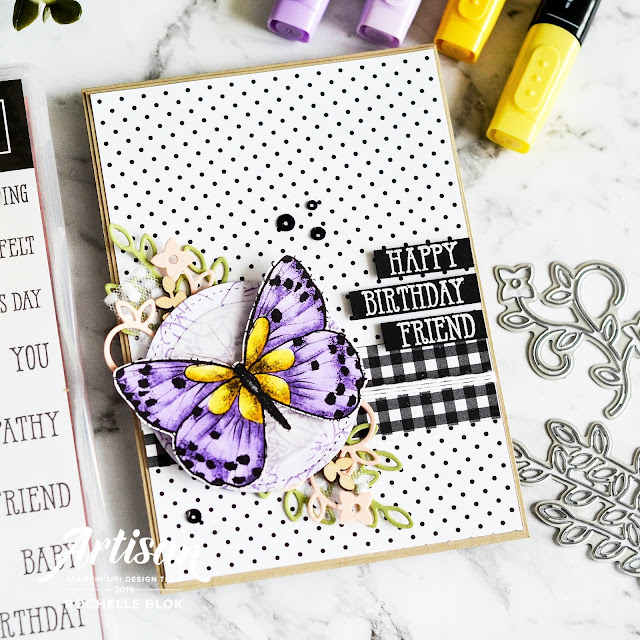
I've use the Well Said Bundle from the 2019 Occasions Catalogue and then incorporated with it the beautiful Botanical Butterfly DSP that you can earn for free from Sale-a-bration.


I know the Botanical Butterfly DSP has been out for a few months with its fabulous colours on one side and the gorgeous black and white patterns on the other side. If you've followed my blog for a while now, you'll know that I'm a huge sucker for black and white and this DSP just appeals to me so much.


One of the DSP sheets has lots of images of butterflies and flowers all in black and white so this makes it perfect for colouring with the Stampin' Blends Alcohol Markers and fussy cutting. Here I've used the Highland Heather Dark and Light Markers and the Daffodil Delight Dark and Light Markers. There is already a lot and shading and lines in the original black and white image so you just follow those lines already set out for the shading with your coloured markers.


The Well Said Bundle has all words and sentiments in the stamp set but in the coordinating Well Written Framelits not only are there words but there is also some fun images like some leaves, flowers, butterflies, hearts, birds. So it really is such a very versatile bundle. I've layered the leaves and the flowers flourishes,from the Well Written Framelits, behind the die cut circles and then heat embossed some of the words from the Well Said Stamp Set. I've also combined under the die cut circles some wooden leaves from the Butterfly Elements, also from the Sale-a-bration promotion. So if you were to combine the Well Said bundle with the Stitched Shapes Framelits you could then get the Botanical Butterfly DSP and the Butterfly Elements for free, which is most of the products that you'll need for this card.


Why not start out by colouring in the DSP sheet with all the larger butterflies and flowers and see what colour combo that you like and then use those elements for a fun and quick card? Once the colouring is done it's basically fussy cutting the images out and then putting your card together. Too easy.

I hope I've given you some inspiration today on combining products from the 2019 Occasions Catalogue and the 2019 Sale-A-Bration Promotion and and how you can get some products for free.
Remember spend $90 with me and get one Level One SAB product for free or spend $180 and get either 2 level one products for free or one level two product for free. Contact me for more information.


Click on the next arrow to hop around to Rebecca Scurr for her fabulous Occasions/Sale-A-Bration projects. She's got lots of inspiration for you.


https://thepaperandstampaddict.com.au/2019/03/10/esad-sale-a-bration-blog-hop/

Kelly Kent
Nicole Wilson
 Lou Kitzelman
Denise Buetler
Siobhan Fitzsimmons
 Peta Stephen
Monique Fielder
 Lisa Whitehead
Libby Dyson
 Lauren Meiklejohn
Jackie Aitken
Sharon Dalton
Maree McIntosh
Cheryl Algie
Rochelle Blok - You are here
Rebecca Scurr
  Delys Cram
 Jessie Holton
   

Thanks so much for stopping by!
Happy Stamping!


Live in Australia?

Shop for Stampin' Up! with me 24/7

 Recreate this project at home using the following Stampin' Up! products. Click on the images below to see the product information and to shop from my online store.

Friday, March 8, 2019

Just Add Ink #447 | Just Add A Sketch

Hello there stamping friends! Happy Friday to you and welcome to another Just Add Ink Challenge. This week at Just Add Ink #447 we have a sketch challenge that is very open to your interpretation. This weeks sketch gives you the base to your creation and then the rest is up to your imagination.

I'm creating today with the Sale-A-Bration Freebie, the Painted Seasons DSP. This paper is just so stunning with it's hand painted imagery for each season.

 
There is 12 sheets in a pack: 3 each of 4 double-sided designs And how gorgeous is this sheet with the 'Autumnal' elements? Love it!

There is two ways you can get your hands on this amazing DSP. Spend $90 with me here at my online store (not including P&H) and you can get this DSP for free #149574 or spend $180 at my online store (not including P&H) and you can get this DSP as part of a bundle with the Painted Seasons Stamp Set for free #150349.


To go with the 'mushrooms and toadstools' pattern I die cut a Stitched Rectangle incorporating the reverse pattern that is on the other side of this DSP sheet. Don't you just love that both sides of this DSP coordinate with each other? Stampin' Up! coordination at it's best. I also layered a piece of vellum over the rectangle that I die cut with the Stitched Shapes circle and then I embossed it, very carefully with the Corrugated Dynamic Textured Impressions Embossing Folder. I say very carefully because you need to take a bit more time and some extra love and care when embossing vellum with the Dynamic Embossing folders. If you don't the vellum tends to crack and break when being embossed with  the Dynamic Embossing Folders and then you have to start all over again.


Added to the layers its a piece of Basic Black punched out with the new Story Label Punch, the Happy and Birthday from the Well Said Stamp and Framelits Bundle and some coordinating ribbon and trim.

I didn't finish off my card today with some sequins but used instead some of the flowers from the Butterfly Elements also a Sale-A-Bration freebie. To give these wooden elements an extra special look I brushed on to them some Clear Wink of Stella, because every card needs that little bit of sparkle and bling.

That's my project for today stamping friends. Be sure to stop by all the Just Add Ink Design Team members blogs for more inspiration using this weeks Just Add Ink sketch challenge. Make sure you check out all the details for this weeks challenge at the Just Add Ink Blog and then come and play along! Can't wait to see your creations!

Thanks so much for stopping by!
Happy Stamping!

Live in Australia?

Shop for Stampin' Up! with me 24/7

 Recreate this card at home using the following Stampin' Up! products. Click on the images below to see the product information and to shop from my online store.