Friday, April 22, 2016

#TGIFC 53 - TGIFC Turns One

Today we are celebrating an awesome milestone at TGIF Challenges Headquarters and that is TGIFC is one year old. 52 wonderful weeks of creative challenges. Its all just a little bit exciting. I have only been on the Design Team for a short while but I'm very excited to be celebrating this fantastic achievement with the rest of the crew.

First things first we are celebrating with a makeover at TGIFC. Its fresh, clean, modern and gorgeous. So click on the link and check things out. I'm loving the new look and I'm sure you will to.

Secondly, also to celebrate our first birthday we are having a super fun prize give away!! WHOOP, WHOOP!! Free stamp sets are totally awesome and everyone loves free stuff!
The winner of our #birtthdaygiveaway is going to receive the not even released yet, all new Moroccan Nights stamp set!! Yay and Yay! This set will be in the new upcoming 2016 - 2017 all new Stampin' Up! Annual catalogue which goes live June 1st.
So here are the details on how you can get your hands on this set


Add your card at TGIFC and you'll be in the draw. So exciting!! Got to be in it to win it!!!

Thirdly, we also have our weekly challenge at TGIFC and this weeks challenge celebrates our Mums with a Mother's Day Challenge.


My card for this weeks challenge uses the Rose Garden Thinlit Dies and a sentiment from Teeny Tiny Sentiments.

The colour combination was inspired from the challenge over at Global Design Project #GDP032- Case The Designer Krista Frattin. So loving the pink and white. So pretty. I love playing along at GDP when I get a chance.


I started with a water colour wash background on Shimmery White cardstock and then I flicked Gold Wink of Stella for more of a splattered shimmer to the background. It all then built from there. I love the shimmer from Shimmery White cardstock. I don't think I'll ever use normal Whisper White cardstock again. The White and Blushing Bride colour combination is just so gorgeous!


I cut out two of the rose dies so that I could have the solid Blushing Bride outline with the Love Blossoms DSP pieced into it. It is then accented with the leaf die cut out of Gold Foil and Shimmery White.


Its all finished off with some Burlap Trim, Crochet Trim, Gold Metallic Thread and some clear sequins from the Metallic Sequin Assortment.

Make sure you check out all the other fantastic creations from the rest of the Design Team at TGIFC. Remember to mention TGIF Challenges in your blog post and when sharing your project on social media, please use this weeks hashtag- #TGIFC52.

Thanks so much for stopping by!

Shop for Stampin' Up! 24/7
(Australian Residents Only)
 Recreate this card at home using the following Stampin' Up! products. Click on the images below to see product information and to shop from my online store.

Just Add Ink - Just Add 'M'

It's another Friday and another challenge at Just Add Ink. This week is a theme challenge, with the theme being Just Add 'M'. So that would mean it would be a perfect challenge for some Mother's Day creations but I've chosen to go with one of Stampin' Up!'s colours starting with 'M' - Mint Macaron. I've also got some metallic elements on my card that fit in with the 'M' theme.

This card is  using some of my most favourite items that are on the newly released Retiring List. I'm very sad that some of these products are leaving us forever but I'm also on the other hand super excited because that now means we are inching closer to the all new 2016 - 2017 Stampin' Up! Annual catalogue with all new products in it to fall in love with.

Click to see all Stampin' Up!'s products in that colour

I've layered some Mint Macaron card stock over some Typeset Specialty DSP for my base layer. I just love Typeset Speciality DSP.  It's so versatile and goes with everything! Make sure you get some before its all gone!


I've embellished this card with some layers of ribbon and trim. Burlap Ribbon, Mint Macaron Dotted Lace Trim, Venetian Crochet Trim, Mint Macaron and Basic Black Baker's Twine and some linen thread. I'm a sucker for lots of ribbon and trim. You may notice that my Burlap looks a little different to what you actually get on the roll and that is because I like to trim off the overlocked edges. It may then start to fray but that adds to the appeal for the over all look. In otherwords, I just like it that way! He! I do use the pieces that I trim off. Can't waste any crafting products. No!


I've given the circle a light water colour wash of Mint Macaron and then embossed the Thank You sentiment with Black Stampin' Emboss Power. I'm loving the contrast of the soft Mint Macaron colour and then the bold black. 


It's all finished off with some Kraft Corrugated cardstock, some Metallics Sequin Assortment and a Mint Macaron In Colour Blossom Accent. I so could have kept going in embellishing this card but sometimes less is more, or something like that.

Make sure you have a look at what inspired the rest of the Just Add Ink gals and their things that made them go 'Mmmm'. You will find all the details on this weeks challenge there too and when posting your creation remember to mention Just Add Ink in your blog post!

Thanks so much for stopping by!
Shop for Stampin' Up! 24/7
(Australian Residents Only)
Get these products before they are gone FOREVER!!


The rest of the items to create this card at home

Monday, April 18, 2016

The Stamp Review Crew | Balloon Celebration

http://stampreviewcrew.blogspot.com/2016/04/stamp-review-crew-balloon-celebration.html

Welcome, welcome. Today we have another blog hop for the Stamp Review Crew. We are a group of International Stampin' Up! demonstrators showcasing one stamp set at a time, every first and third Monday's of the month. This time using the stamp set Balloon Celebration from the Occassions Catalogue. This is a fun set incorperating not only balloons as the title of the stamp suggests but some fun sentiments as well. I'm the first on the hop and I'm sure as you click along the links you will see all the fabulousness of this set.

I've done some stamping, embossing and sponging for my card today for something bright and fun.


I've heat embossed on of the images with White Stampin' Emboss Powder on Vellum. I wanted to give the balloons that see through look that you normally get with balloons in real life. So after I emboss the spotty image I sponged the ink on to the vellum so that the ink fully covered the paper when I punched it out.

I've kept my card fairly basic today and let that colour pop right of the Kraft Cardstock.


Its all finished of with some of the cloud images,the stars outlines, some Silver Metallic Thread and the 1/8" Silver Ribbon. I stamped off the clouds once first because I wanted a lighter saturation to the Whisper White Craft ink to make them look like fluffy clouds.


I hope that I've given you some inspiration to using the Balloon Celebration stamp set. On of the fabulous things about this set is that it has a matching punch - Balloon Bouquet Pnch and the stamp set and the punch are one of the 15% off Bundle and Save bundles. Winning! You can't go wrong with that!

Next on the hop is the ever wonderful Tanya Boser or if you are hopping backwards on to Shana Gaff. Just click the buttons below to hop on to either.

Remeber if you ever get lost along the way click the banner at the top and it will give you the roll call for this hop and will help you on you way.

http://tinkerin-in-ink.blogspot.com/2016/04/stamp-review-crew-balloon-celebration.html
Tanya Boser

http://stressfreestamping.blogspot.com/2016/04/the-stamp-review-crew-balloon.html
Shana Gaff


Thanks so much for stopping by!
Shop for Stampin' Up! 24/7
 Recreate this card at home using the following Stampin' Up! products. Click on the images below to see product information and to shop from my online store.

Saturday, April 16, 2016

Birthday Blooms Dear Friend | Global Design Project 031

I've finally had a bit of time this week just to play. Not to create for my Design Team commitments but to create just because. I thought that it was a good time to enter a challenge and what better challenge to enter than the one over at Global Design Project. Make sure you click on the link to see all the fabulous inspiration fron the fabulous Design Team at GDP. There are some amazing creations there thats for sure! This week at GSP its a theme challenge with the theme being Nature.

I've pulled out my Birthday Blooms stamp set for some more water colouring action. This stamp set is perfect to colour and its something you can easily do if you have an injured finger on the other hand. Just check out my Facebook page to see what happened to my thumb. Oops. Thumbs and sharp knives don't mix. Ouch!
The base DSP is from the Go Wild DSP stack. I love the large black and white stripes and think they make a striking contrast for the soft water coloured Birthday Blooms floral image.


I've water coloured the floral image with Blushing Bride, Old Olive and SO Saffron. With the Blushing Bride colour I laid down a light layer first and then went over it again to add a depth of colour.


With colouring with the Old Olive colour on the leaves I wet the leaves first with my Aqua painter and then laid down the colour. Having the water colour paper wet made it very easy to move the colour around. It almost moved itself.


It's all finished off with some Basic Black Stitch Satin Ribbon, leaves from the Bird Builder Punch, Gold Metallic Thread, Burlap Ribbon and sequins from the Metallics Sequins Assortment.


The circle behind the floral bloom I pierced with the Paper Piercing Tool and the one of the circles from the  Updated Essentials Paper Piercing Pack and then hand stitched some of the Gold Metallic thread though the holes.

Thank you so much for stopping by today! I hope that you've been inspired by my nature creation.

  Shop for Stampin' Up! 24/7
 Recreate this card at home using the following Stampin' Up! products. Click on the images below to see product information and to shop from my online store.

Friday, April 8, 2016

Just Add Ink #306 - Rose Wonder Sympathy

Welcome to another Just Add Ink Challenge. This week the theme of the challenge is Sympathy cards. The ladies over at JAI have created a stunning aray of sympathy cards that are perfect to convey your sentiments if there is ever such a time when you need to send a Sympathy card.

When I was making this card I was reminded by a passage in the Bible from Ecclesiasties :1 - 8

'A Time for Everything'.
"There is a time for everything, and a season for every activity under the heavens:
a time to be born and a time to die,
a time to plant and a time to uproot,
a time to kill and a time to heal,
a time to tear down and a time to build,
a time to weep and a time to laugh,
a time to mourn and a time to dance,
a time to scatter stones and a time to gather them,
a time to embrace and a time to refrain from embracing,
a time to search and a time to give up,
 a time to keep and a time to throw away,
a time to tear and a time to mend,
a time to be silent and a time to speak,
a time to love and a time to hate,
a time for war and a time for peace..."
(New International Version)
If you would like to know some information about this passage, check it out here.

This passage tells us about the 'Circle of life' and while we love to celebrate with others when new life is born there is a proper time for everything, even  mourning when our loved ones pass away.

It is a good idea to have some Sympathy cards on hand ready to go. We may not always feel like making the Sympathy cards when we need them but if they are ready to go then its quick and easy to get them sent out.

I didn't want to make my card all black but I still wanted to convey sense of respect by not making it super bright. So I've gone with greys and a little pop of So Saffron.

Click to see all Stampin' Up!'s products in that colour

I've embossed the rose image from the Rose Wonder stamp set with White Stampin' Emboss Powder and then coloured it in using an Aqua Painter and the Whisper White Craft Ink. You just pick up the ink from the lid of ink pad (after you give it a squeeze) with an aqua painter and 'paint' it on.  Make sure that your Aqua Painter isn't too wet and also make sure that when laying down the ink that you don't make the card stock too wet. The card stock will pill and ball up if you put down too much moisture.

I've hand stitched the Gold Metallic thread around the edge by first using my Paper Piercer and the Updated Essentials Paper-Piercing Pack to punch a border and then used the thread to stitch it through. I have used the Gold Metallic Thread in the sewing maching but hand stitching seems to work best with the Gold Metallic Thread. 


I didn't want to embellish the card too much so I've embossed a 'With Sympathy' sentiment, also from the Rose Wonder stamp set, in Black Stampin' Emboss Powder, finished off with a butterfly with a little touch of clear Wink of Stella.

I hope you have a fantastic weekend and that you will come along and play at Just Add Ink this week. For all the details on this weeks challenge and to see the projects from the Design Team, click here. Remember to mention Just Add Ink in your post.

Thanks so much for stopping by!
 Shop for Stampin' Up! 24/7
 Recreate this card at home using the following Stampin' Up! products. Click on the images below to see product information and to shop from my online store.

#TGIFC 50 - Blended Bloom Sketch Challenge

Happy Friday to you and a big Yay to the start of the weekend. I'm so happy you have stopped by today! We have a new challenge at TGIF Challenges and an ever amazing amount of inspiration for you from the Design Team. Gee these gals are amazing, so be prepared to have your socks knocked off!

This week is a sketch challenge. It's a pretty straight forward sketch so you really don't have any excuse to play along. You can use the sketch as is or change it up a little. 


I've kept it pretty straight forward today and used the sketch as is. I don't normally stick to the sketch as it is. I do like to change it up a little but my ideas for my card suited the sketch as is.

Click to see all Stampin' Up!'s products in that colour


I've embossed the Basic Black panels with Black Stampin' Emboss powder and used the triangle image from the stamp set Dotty Angles. Some of the triangles didn't quite ink up with Versamark ink properly before I heat embossed the embossing powder but I like the fact that they aren't perfect, giving the card a more modern feel.


I've stamped the Blended Bloom image on with Melon Mambo and they used the Gorgeous Grunge stamp set for the splatters.


Its all finished off with the sentiment from the Hostess set Silhouette and Script, Black sequins from the Metallics Assorment Sequins and the Melon Mambo and Basic Black Baker's twine from the current Occasions Catalogue.  How cool is the font of the sentiment? I wish there was a whole stamp set full of sentiments in that font. That would be super cool.

I do hope that you will play along this week. For all the details on this weeks challenge and to see the projects from the Design Team,  click here. Remeber to mention TFIG Challenges in your blog post and when sharing your project publicly, please use this weeks hashtag- #TGIFC50.

Thanks so much for stopping By!
Shop for Stampin' Up! 24/7
 Recreate this card at home using the following Stampin' Up! products. Click on the images below to see product information and to shop from my online store.

Monday, April 4, 2016

The Stamp Review Crew | White Christmas

http://stampreviewcrew.blogspot.com/2016/04/stamp-review-crew-white-christmas.html

Today for the Stamp Review Crew we want you to put your Christmas hats back on and get ready for some Christmas ideas using the stamp set White Christmas. Its a fabulous photopolymer set that is perfect for creating that winter Christmas scene.

You may have come here from Holly's blog, thanks for clicking on. Wasn't her card just so 'sweet'!

I can honestly tell you that my mind just wasn't co-operating with this one to get those Christmas ideas happening. Not sure what it was but my creation came down to the last minute to get created. It's not time for Christmas! Ha!

I did manage to get something created and I'm quite happy with how it turned out.
I originally started to using the dots image from this set to create a 'snow' background but because my White Craft Ink Pad was so juicy it just wasn't happening the way I wanted. So I went with plan B and used my ever favourite embossing folder at the moment, Softly Falling, and that was perfect to create that snow like background.

Click to see all Stampin' Up!'s products in that colour


I've used some of the images to create a bit of a winter Christmas scene on the side. It might be a bit hard to see but I've used a light Soft Sky wash at the top of the circle to create a sky and on the snow man, banner and the tree I've gone over with just a light wash of Wink of Stella. That stuff is just gorgeous with it's subtle sparkle and shine but ever so hard to photograph!


Its all finished off with some Burlap Ribbon, Crochet Trim and some Cherry Cobbler Bakers Twine.


Its all finished off with some Burlap Ribbon, Crochet Trim and some Cherry Cobbler Bakers Twine.

Might be a good time to start to make some Christmas Cards. Then they might be done and I might actually get some sent this year instead of just making them. Might need a new Christmas Card hashtag #imbringingchristmascardsback Ha!

Please make sure you click on below to move on to fellow Aussie and friend Nikki Spencer. And if you are following in reverse click the previous blog button to move on to the awesome Holly Stene.


http://nikkispencer-mysandbox.blogspot.com/2016/04/stamp-review-crewwhite-christmas-edition.html
Nikki Spencer

http://hollyshobbs.blogspot.com/2016/04/stamp-review-crew-white-christmas.html
Holly Stene

Remember if you get lost along the way click on the Stamp Review Crew header at the top of the post and it will give you the full list of participants.

Thanks so much for stopping by!

Sunday, April 3, 2016

Creation Station Blog Hop | Botanical Blooms


Hello and welcome. Thank you for stopping by! I'm so excited today to be able to share some more fantastic news. I was asked a couple of weeks ago by the ever fabulous Dena Rekow of The Creativity Cave fame to be part of the Creation Station monthly blog hops. First I was super blown away and then super excited to be a part of this super creative, international Stampin' Up! Demonstrators who can't help but to share what they love. I am so very honoured and humbled to be part of this wonderful group of crafters! This is my last design team, for now. I promise!

So with that I have my first blog hop with the Creation Station gals and I'm so excited to welcome you to my blog. If you came from Holly's blog thank you for clicking on to me.  Today's theme is spring flowers using the Botanical Blooms Bundle. It may not be spring here in Australia I can still have a play with the Botanical Blooms Bundle and create something floral like for you.

I've got three creations for you today using the Botanical Builder Framelits, a card and two gift packaging items made with the Gift Box Punch Board and the Gift Bag Punch board. Those two boards just make it so easy to create beautiful gift packaging quickly.


All creations use the same elements with the Pink Pirouette Botanical Bloom as the main focus and then accented by the Shine On DSP, Vellum, Softly Falling Embossing Folder and Silver Glimmer Paper.


I started with the Shine On DSP as a base, love that DSP, and then layered the elements from there. Make sure when sticking vellum to your card stock that you hide your adhesive under other elements so that you cant see it. On this card I've put glue dots behind the Botanical Bloom, the ribbon and used the edge of the Natural Expression element to adhere that side of the velum to the card. You can't even tell.


This bag is made with the Gift Bag Punch Board. You can easily make the flap for the top of the bag using the board too. Check out the video below for more details.


These framelits dies make it so easy to put together gorgeous and fabulous creations! Three/four die cuts and you've got a gorgeous floral bloom. 

Tip: When making gift boxes and bags out of vellum press lightly when scoring otherwise you will tear on the fold lines or they will crack when folding your boxes and bags together.

Check out the video below on how to do the flap on the Gift Bag. Too easy!


I hope that you have enjoyed my very first Creation Station Blog Hop and I'm so looking forward

Click on next to the super talented Mikaela
http://thecraftyoinkpen.blogspot.com.au/2016/04/creation-station-blog-hop-botanical.html

Or if you are hopping in reverse click to go back to the lovely Holly

http://hollyshobbs.blogspot.com.au/2016/04/spring-flowers-with-creation-station.html

Thanks so much for stooping by and being part of my first Creation Station Blog Hop.
Shop for Stampin' Up! 24/7
 Recreate this card at home using the following Stampin' Up! products. Click on the images below to see product information and to shop from my online store.

Friday, April 1, 2016

The Inkreators Blog Hop | Stampin' Up! Balloons


Today we have The INKreators Blog Hop presenting Balloons. Stampin' Up! have lots of balloon stamps, punches and framelits at the moment so there are lots of products to choose from.

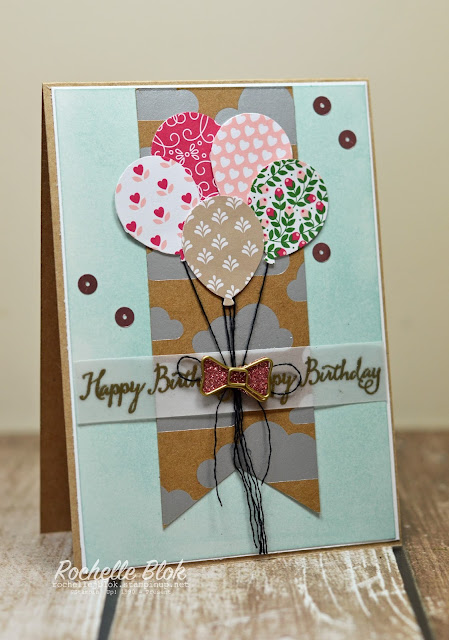
I've mad two creations today using the Balloon Celebration Stamp set and the co-ordinating Balloon Bouquet Punch. And the fabulous thing about these two products is that you can get them in a bundle and save 15%. Yay! More money in your pocket!

The first card highlights the fabulous punch. There are two sizes of balloons on the punch so you can pick either size or mix it up a little and use both. I've used the smaller size with the Love Blossoms DSP Stack. Gives the card a bit of a shabby chic feel.


My second card also uses the smaller balloon and some of the images from the Balloon celebration stamp set. Its probably a little hard to see but I first did a watercolour wash in the background using soft sky and then I got the colours for my balloons from the header for this hop.That came to me last night when I couldn't sleep.  It is a quick card that is quick to replicate. To get the two tones on the balloons I inked up the solid image and stamped that of once and the the dots are stamped at full strength.


Now on to the fabulous Lauren to see her balloon creations. Remember to leave us some comment love. We really love and appreciate your feedback!

 http://www.lovelifelauren.com/journal/2016/4/1/inkreators-blog-hop-balloon-celebration

Thanks so much for stopping by!